


Leveling your walk-in tub: why every leg must touch the floor before anything else
Updated October 2026
Leveling a walk-in tub is the number one thing that prevents door leaks, and it is the first thing to verify on any new install or any tub that has started leaking at the door. Every leveling leg must touch the floor and carry equal weight, with no gap under any leg. On the inward-swing acrylic family (Standard, Standard60, Zen, Zen60, Flow) and the HomeCare, the front legs must also be screwed into the subfloor. An unlevel tub slowly warps the frame and shell, the door falls out of alignment, the seal leaks, and misleveling voids the warranty, so this step deserves real care.
See Leveling Done During a Real Installation

Chapters in this video
- 0:00 Preparing for Your Walk-In Tub The video shows the removal of an old tub and the preparation of the space for a new Ella's Bubbles walk-in tub.
- 0:31 Unboxing and Leveling the Tub The installer removes the tub's panels to prevent damage and then levels the tub using its adjustable leveling legs.
- 1:00 Ella's Dual Drain Technology The video explains Ella's dual drain system and shows different drain configurations for efficient water removal.
- 2:03 Water Supply and Electrical Connections The video highlights the importance of shutoff valves, proper supply lines, and dedicated GFCI circuits for the tub.
- 2:31 Designing for Easy Access The video recommends incorporating access panels into the bathroom remodel for convenient future servicing of the tub.
This Big4One installation shows why the sequence matters: panels and aprons come off before the tub enters the home, and once inside, the tub must be properly leveled before anything is connected. Ella tubs have adjustable leveling legs so the tub can be leveled and set correctly on the actual floor. Without proper leveling, the tub door may not function properly and may leak. Watch: Ella's Bubbles: Installation Tips For The Ella Big4One with chapters and a full transcript.
How to Level the Tub, Step by Step
- Start with the subfloor. It must be level and rated to support the tub, the water, and the bather. Fix subfloor problems before setting the tub. The tub can sit on the subfloor before tile or on the finished floor; see slabs, condos, and upper floors for special cases.
- Set the tub in place and check every side with a level. Check length and width on the deck, not just one edge.
- Test each leg with a slip of paper. Try to slide a piece of paper under each leveling leg. If the paper slides under, that leg is not carrying weight. Adjust until every foot is securely on the ground.
- Tighten all legs firmly. On the Standard, Zen, and Flow platform there must be no gap between the floor and the leveling legs, and the front legs must be screwed into the subfloor.
- Verify the door. The door must close smoothly into a watertight seal. If you see uneven gaps between the door and frame, adjust the legs until the gaps close evenly. Proper leveling assures proper door alignment, and proper door alignment is critical to a leak-proof seal.
- Re-verify after connections. The tub is leveled at the factory, but the installer must re-verify leveling on site, and again after plumbing and electrical work is complete, then run the pre-installation water test.
Why Leveling Legs Matter
Chapters in this video
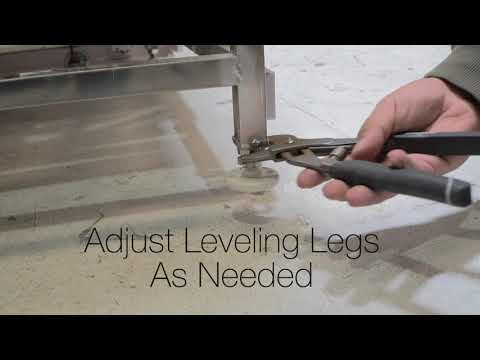
- 0:00 Leveling Legs Are Critical Many Ella's Bubbles walk-in tubs have up to eight leveling legs to evenly disperse weight and ensure proper function.
- 0:14 Secure Each Foot The technician checks if each foot is securely on the ground, as an unsealed door could leak.
- 0:28 Check Tub Levels The technician checks levels on all sides of the tub to ensure all feet sit securely on the floor.
- 0:41 Proper Door Alignment Proper leveling assures correct door alignment and closure for your walk-in tub.
The video above shows that many Ella tubs have up to eight adjustable leveling legs. Check that each foot is securely on the floor; if one is not, the door will not seal and may leak. Adjust each leg and check level on all sides for proper door alignment and closure. Ella tubs have at least six leveling legs, including center legs on many models, which spread the weight, reduce subfloor movement and frame twist, and protect the silicone seams. Watch: Ella's Bubbles-Leveling legs are critical to a proper functioning tub. with chapters and a full transcript.
If the Door Rubs the Frame or Jamb

Chapters in this video
- 0:00 Door Rubbing the Jamb The video explains that a door rubbing the jamb indicates the tub is bowed down.
- 0:33 Ensuring Tub is Level Ella's Bubbles tubs have at least six leveling legs that must be solidly on the ground to prevent leaks.
- 0:47 Making Final Adjustments Each leg is adjusted to rest firmly on the floor, and careful measurements are taken to achieve a level tub.
A door that rubs or scrapes the jamb usually means the tub is bowed down in the middle because the center leg is not carrying weight. The video shows the fix: raise the tub from the center by extending the center leveling leg so the door frame opens up and clears the jamb, then re-check every leg and measure all sides again. Our door rubs the frame article walks through it in detail. Watch: Ellas Bubbles: Proper Door Alignment with chapters and a full transcript.
Why This Is a Warranty Item
| What happens when a tub is unlevel | Result |
|---|---|
| Frame and shell warp over time | Door misalignment |
| Door misalignment | Door leaks |
| Misleveled installation | Warranty void |
The warranty activation form your installer signs includes an initialed line confirming the tub is level with all legs touching, plus a watertight door check after a 20 minute fill. Completing those two checks honestly on install day prevents nearly all door leak calls. Misleveling is one of the items listed in what voids your warranty.
If Your Door Is Already Leaking
Re-check leveling first, following the steps above, and adjust the legs until the door closes smoothly into a watertight seal. Most door leaks resolve right there, with no parts needed. Then clean the seal and frame as described in door seal cleaning and care. If a properly leveled tub still leaks at the door, see water at the door: what to check or call (800) 480-6850 and we will help diagnose the seal and alignment.
Related Guides
- Common Installation Questions: Tile Order, Leveling Legs, Subfloor, Panels, Drain Size and the Outdoor Test
- How Do I Fix a Walk-In Tub That Is Not Level?
- How Do I Check That My Walk-In Tub Is Level After Installation?
- How Do I Reach the Leveling Legs When the Apron Is On?
- How Do I Uncrate and Move a Walk-In Tub Without Damaging It?
- How Do I Adjust the Door Latch So the Door Seals Without Forcing?
Common Questions
How many leveling legs does my tub have?
Can the legs be raised another 2 inches?
Why does the door sag when someone steps in even though the corners read level?
Why does my door rub or scrape the jamb?
Do the front legs really have to be screwed to the subfloor?
Does an unlevel installation affect the warranty?
Should I level again after the plumbing and electrical are connected?
Can the tub sit on tile, or does it have to be on the subfloor?
Does Ella's Bubbles send its own crew to install my walk-in tub?
Can I set the tub against the studs and tile down to the deck instead of using drywall?
Should I run silicone along the apron and the stainless steel door frame?
Is a brand new tub that is off by a sixteenth or a thirty-second of an inch close enough?
Does my walk-in tub arrive fully assembled?
How much space is under the tub for the drain connection?
Should I wait to tile until after the tub is installed?
Can I hire my own installer for my walk-in tub?
Can the Monaco walk-in tub stand on its own in the middle of a room?
Is a panel included when the tub is going into a corner?
Is anything included to help fit the tub into an alcove?
Does an installer need to look at my bathroom before installing the tub?
Still need help? Open a ticket at ellasbubbles.com/support or call (800) 480-6850.
About this guide. Answers in the Ella’s Bubbles Support Center are compiled from real conversations with tub owners, our technicians’ notes and the product documentation, then reviewed by our team. Tub models and options have evolved over the years, so a detail here may differ slightly from your exact tub. If something looks different on yours, send us your serial number and a specialist will confirm it for your model.
Did this solve your question?
If not, open a ticket and our team will pick it up from here.
Open a Support Ticket Videos