


How Do I Adjust the Door Latch So the Door Seals Without Forcing?
Updated September 2026
There is no separate latch screw to turn on an Ella walk-in tub door. The door seals without forcing when the tub is level on every leg, the handle lock nut is set so the handle moves smoothly yet still holds the door firmly against the seal, and the seal itself is clean and in shape. If you have to force the handle, loosen the lock nut behind the front apron a little at a time; if the handle moves easily but the door never pulls into the seal, tighten it. Adjusting the Door Handle Lock Nut, and Why the Hinges Are Not the Fix for a Door That Is Hard to Close covers the same adjustment from the handle side.
Level the Tub Before You Touch the Latch
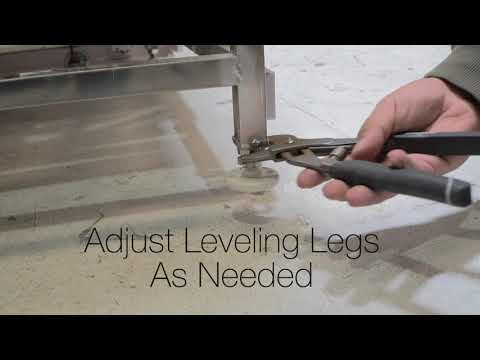
Most doors that need forcing are on a tub that is no longer level. Ella tubs have at least six leveling legs, and each one must rest solidly on the floor with no gap beneath it. When a leg hangs free the shell bows, the door rubs the jamb, and the gasket may not touch on the lower handle side, which is where most door leaks begin. Adjusting the latch or the handle on a bowed tub only masks the problem, and the hinges are never the fix.
- Check every leg. Any foot with a gap beneath it is the cause.
- If the tub is bowed down in the center, extend the center leg until the door frame clears the swing of the door.
- Measure all sides and keep adjusting until the tub is level and straight.
- Open and close the door several times. It should close securely and pull evenly into the seal all the way around.
Leveling is part of installation, so it belongs to your local licensed plumber or installer. Ella does not send technicians, but its technical support can answer your installer's questions by phone, email or video.
Adjusting the Handle Lock Nut
The Chrome Door Handle Adjustment video on this page shows the whole adjustment on tubs with one of Ella's custom chrome handles: remove the front apron, locate and remove the protective cap, then loosen the locking nut for less handle tension or tighten it for more.
- Remove the front apron to expose the back of the door handle mechanism. Put masking tape on the apron edge first, since the plastic can be sharp. If the apron will not come off entirely, prop it open against the frame near the handle.
- Locate the lock nut behind the handle and remove the protective cap.
- Loosen the lock nut for less handle tension, or tighten it for more. Work in small steps and test the handle after each one.
- Stop when the handle moves smoothly and still holds the door firmly against the seal, then replace the cap and the apron.
A handle that can hardly be moved, on a door that is very difficult to open and close, is the classic case for loosening. A handle that flops loosely while the door never draws tight is the case for tightening.
Outward-Swing Handles: Orientation Matters More Than Tension
The outward-swing U-shape and L-shape doors use a paddle or T bar handle that sits on tabs over the latch mechanism and is held by a single locking bolt under a chrome cover. These doors seal through a gear and shaft mechanism that pulls the door evenly into the seal: the U-shape door has a three shaft gear and lock system, and the extra wide L-shape door has a two shaft gear and lock system. If this handle feels wrong, check its orientation before anything else. The handle should face away from the hinges when unlocked and toward the hinges when locked. A handle fitted the other way will not pull the door tight to the seal no matter how hard you push it. If the handle has worked loose, remove the chrome cover, line up the tabs, seat the handle on the latch mechanism, hand tighten the locking bolt, secure it firmly with a socket wrench, then refit the cover. Where Can I Find a Replacement Walk-In Tub Door Handle? shows the correct and incorrect placements.
Match the Symptom to the Fix
- Handle stiff but the door swings freely: the lock nut is too tight. Loosen it a little at a time until the handle moves easily but still holds the door firmly against the seal.
- Handle loose and the door does not pull into the seal: tighten the lock nut until the handle locks with a positive feel.
- Door hard to close, rubs the jamb, or the gasket does not touch on the lower handle side: the leveling legs are not all firmly on the floor. Level first.
- Door closes but the seal is not compressed enough on the latch side: after leveling, the team may suggest adding a shim to the door latch and testing the door again.
- Door sits low after someone leaned on it: do not touch the hinges. Level the tub, check the seal, and contact the team with photos.
Clean the Seal and Test the Door
A seal that shipping has flattened can make a correctly adjusted door feel as if it needs forcing. Clean the seal with rubbing alcohol and reshape it by hand, then fill the tub to the seat and watch for 20 minutes. Do Walk-In Tubs Leak and How Is the Door Sealed? explains how the latch pulls the door into the seal and why a level, correctly installed tub does not leak. Remember that the door is designed to carry its own weight and nothing more. The door and seal warranty is valid only when the tub and door are aligned correctly and the alignment has not been changed by a bather's weight on the door, so the open door is never a grab bar; the deck and wall grab bars are the handholds.
When Adjustment Is Not Enough
If the handle spins freely, pulled off in your hand, or the latch mechanism itself moves at its pivot, stop adjusting and take photos. Open a ticket at ellasbubbles.com/support with your model, serial number and a clear photo of the handle and the door, or call your Ella dealer or the team at (800) 480-6850. The team confirms the assembly from your photos, ships a replacement handle and mounting assembly, and sends a video showing how it mounts on your door. On doors where the mechanism sits inside the door frame, the seal and glass lift out, the broken piece comes off with a 5mm hex key, and the new piece must be fitted with the mechanism in the closed position. Replacing the Door Handle Mechanism Inside the Door: Seal, Glass and the 5mm Hex Key walks through that job. Your installer or a local contractor does the work, and Ella's technical support is available to them by phone.

Watch: Ella's Bubbles: Chrome Door Handle Adjustment with chapters and a full transcript.
Related Guides
- Door Handle Loose, Wobbly or Hard to Turn: Tightening the Bolt Under the Cap and Adjusting the Lock Nut
- Door seal or gasket looks worn, loose, or leaks: care, repair, and replacement
- Leveling your walk-in tub: why every leg must touch the floor before anything else
- How Do I Adjust the LayDown60 Glass Door When It No Longer Seals Tight?
- How do you adjust the 3-latch gear lock on an outward-swing door?
- Can an Outward-Swing Walk-In Tub Door Open Before the Water Drains?
Related Videos

Chapters in this video
- 0:00 Door Rubbing the Jamb The video explains that a door rubbing the jamb indicates the tub is bowed down.
- 0:33 Ensuring Tub is Level Ella's Bubbles tubs have at least six leveling legs that must be solidly on the ground to prevent leaks.
- 0:47 Making Final Adjustments Each leg is adjusted to rest firmly on the floor, and careful measurements are taken to achieve a level tub.
Chapters in this video
- 0:00 Leveling Legs Are Critical Many Ella's Bubbles walk-in tubs have up to eight leveling legs to evenly disperse weight and ensure proper function.
- 0:14 Secure Each Foot The technician checks if each foot is securely on the ground, as an unsealed door could leak.
- 0:28 Check Tub Levels The technician checks levels on all sides of the tub to ensure all feet sit securely on the floor.
- 0:41 Proper Door Alignment Proper leveling assures correct door alignment and closure for your walk-in tub.
Common Questions
Should I adjust the hinges to make the door seal better?
How tight should the handle lock nut be?
Why does my door close but still leak on the handle side?
Can I fit a shim to the door latch myself?
What if the handle came off completely while I was adjusting it?
About this guide. Answers in the Ella’s Bubbles Support Center are compiled from real conversations with tub owners, our technicians’ notes and the product documentation, then reviewed by our team. Tub models and options have evolved over the years, so a detail here may differ slightly from your exact tub. If something looks different on yours, send us your serial number and a specialist will confirm it for your model.
Did this solve your question?
If not, open a ticket and our team will pick it up from here.
Open a Support Ticket Videos