


Water at the Door: What to Check First and Why You Should Never Lean on the Door
Updated September 2026
A walk-in tub door leak almost always traces back to one of a short list of causes, and the number one cause by far is leveling: if even one leveling leg is not carrying its share of the weight, the frame flexes, the door goes slightly out of alignment, and water finds the gap. Before anything else, check the legs, then work down the checklist below. Most door leaks are resolved at home without a service visit, and a whole new door is almost never the answer.
Start with the Leveling Legs
Chapters in this video
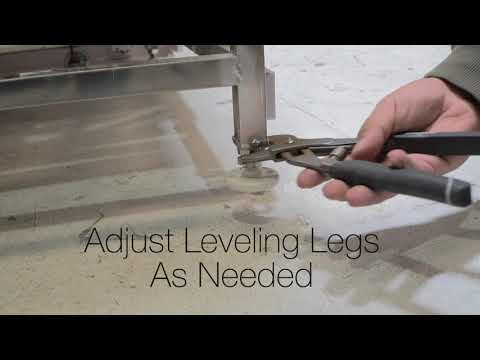
- 0:00 Leveling Legs Are Critical Many Ella's Bubbles walk-in tubs have up to eight leveling legs to evenly disperse weight and ensure proper function.
- 0:14 Secure Each Foot The technician checks if each foot is securely on the ground, as an unsealed door could leak.
- 0:28 Check Tub Levels The technician checks levels on all sides of the tub to ensure all feet sit securely on the floor.
- 0:41 Proper Door Alignment Proper leveling assures correct door alignment and closure for your walk-in tub.
Watch: Ella's Bubbles-Leveling legs are critical to a proper functioning tub. with chapters and a full transcript.
Many of Ella's walk-in tubs have as many as eight leveling legs to evenly disperse weight, and these adjustable legs are critical to the proper functioning of your tub. Check to see if each foot is securely on the ground. If not, the door will not seal correctly and could leak. Adjust each leg as necessary, check levels on all sides of the tub, and make sure all feet sit securely on the floor. This assures proper door alignment and proper closure. Our leveling guide covers the full procedure.
The Full Checklist, in Order
- Legs and level. Every leg firmly on the floor, no gaps, weight shared equally, tub level on all sides. Extending or shortening legs is also how you close any visible gap between the door and its frame. Our article on doors that rub the frame walks through the adjustment in detail.
- Clean the seal and frame. Debris or residue on the gasket or the door frame is a common leak cause. Wipe both down with a common household cleaner or rubbing alcohol.
- Inspect the gasket. Look for a section that has pulled out of its channel or stayed compressed. A shipping-deformed seal can be restored by squeezing it with your fingertips and pulling it away from the frame; a loose seal can be re-secured with a thin bead of silicone, set 20 minutes, then a 24 hour cure. The door seal care article has the steps.
- Let the seal reform. If the door has been kept latched, leave it open for about a day, or at least overnight, then fill and check again. Many leaks clear with this step alone.
- Check the handle and latch. On outward-swing doors, make sure the handle rotates fully; the handle faces away from the hinges when unlocked and toward the hinges when locked. A handle that was refitted in the wrong orientation will result in improper door closure and potential leaks. On the stainless inward door, a handle that is not flush needs its lock nut snugged.
- Confirm where the water is really coming from. Water behind or under the tub near the faucet end is often not the door at all: a hand shower that was wall-mounted without the barrel extension hose kit drips through the deck insert hole. That one is solved with the Leak Elimination Kit rather than any door work. Our guide to water under or behind the tub covers the other usual sources.
Seal Maintenance on Video

Chapters in this video
- 0:00 Clean Your Door Seal Regularly The video explains how to clean the door seal and frame to prevent leaks and debris buildup.
- 0:38 Replacing a Loose Door Seal The video demonstrates how to replace a loose or damaged door seal by applying a thin bead of silicone to the gasket channel.
- 1:02 Adding Silicone to Inward Doors The video shows how to add a bead of silicone to the corner of the gasket where it meets the frame on inward swing doors.
- 1:23 Extend Gasket Life The video recommends leaving the walk-in tub door slightly open when not in use to extend the gasket's flexibility and life.
This maintenance video applies to both inward and outward doors. It shows cleaning the seal and the door frame with a common household cleaner, explains why residue and debris cause leaks, demonstrates how to secure a loose gasket with a thin bead of silicone in the channel (set 20 minutes before reinserting, dry 24 hours), shows the extra bead where the gasket meets the frame on inward doors, and closes with the rule to leave the door slightly open when the tub is not in use. Watch: Ella's Bubbles: Proper Door Seal Maintenance-Inward and Outward Swing Doors with chapters and a full transcript.
Verify with a Standing Water Test
The same test used at installation works for you now: close the door, fill above the door threshold, and let the water stand while you watch the door line. The installer's warranty checklist requires the door seal to be watertight after a 20-minute fill, so that is the benchmark your tub was built to meet.
Never Lean on the Door
This deserves its own section because it is the easiest leak to prevent. Every Ella door, inward or outward, is designed to hold its own weight only, never the bather's weight. Leaning, sitting, or pressing on the door during entry, exit, or a wheelchair transfer can gradually shift the door's alignment, and alignment is exactly what keeps the seal watertight. It also matters for coverage: the warranty of the door and the door seal is valid only if the alignment of the bathtub and the door is done correctly, and the alignment of the door is not changed by applying the bather's weight on the door. Your tub gives you better places to hold: sturdy deck-mounted and wall-mounted grab bars are positioned for entry and exit, so let them take your weight every time. If a door has already been leaned on and now sits low, the hinge adjustment video guide shows the small correction.
If the Leak Persists
Some situations are ours to handle, and we are glad to. Open a ticket with your serial number, found on the label behind the magnetic access panel next to the door, plus photos of the leak area and a short description: where the water appears, whether it is the same spot every time, and whether the door is left open between baths. Photos of the affected part and a problem description are required for warranty part verification, and the shell, frame, door, and door seal are covered by our Lifetime Limited Warranty. Replacement seals, hinges, and hardware ship to you after verification.
Related Guides
- Water Drips Through the Striker Plate Pin Hole: Is a Part Missing?
- Replacing a Leaking Door Seal: Torn Seal or Door Alignment, Warranty Coverage, and How the Seal Ships
- Is There a Lock on the Walk-In Tub Door, and How Do I Stop Hand-Shower Splashing?
- Can I Remove the Door to Get the Tub Into the Bathroom?
- Do walk-in tub doors leak, and how are they sealed?
- Do walk-in tub doors leak, and how is that prevented?
Common Questions
My door leaks. What should I check first?
Is a leaking door covered under the warranty?
Water sits in the door frame and drains down the latch hole. What does that mean?
The door on my LayDown leaks at the bottom.
Does keeping the door closed cause leaks?
My installer tried silicone and the door still leaks.
Is the water really coming from the door?
Do I need a whole new door?
The door still leaks after a new seal. What does support look at next?
The latch bar does not tighten the door the way it used to. Is there a part for that?
My mother cannot fit through the door, sit inside and close it. Is there a different door or handle?
My door only leaks once the water climbs to a certain level. What does that mean?
Will a replacement gasket by itself fix my leaking door?
I found cracks on the inside of my walk-in door. What should I do?
What is the Auto Purge function and why does water still drip after I stop the jets?
How can I find where a leak under the tub is coming from?
What should I do if a leak is reaching the wall or a closet near my tub?
What information does the team need for a leak that has caused damage?
For anything specific to your model or serial number, open a ticket at ellasbubbles.com/support or call (800) 480-6850, and please attach photos so the team can help you quickly.
About this guide. Answers in the Ella’s Bubbles Support Center are compiled from real conversations with tub owners, our technicians’ notes and the product documentation, then reviewed by our team. Tub models and options have evolved over the years, so a detail here may differ slightly from your exact tub. If something looks different on yours, send us your serial number and a specialist will confirm it for your model.
Did this solve your question?
If not, open a ticket and our team will pick it up from here.
Open a Support Ticket Videos