


How Do I Reach the Leveling Legs When the Apron Is On?
Updated September 2026
You reach the leveling legs by taking the front apron off, because the legs sit behind it on the tub frame and there is no adjustment point on the outside of the panel. The apron is a removable cosmetic panel held by screws along its bottom edge, so it comes off an installed tub the same way it did on installation day and goes back on once every leg is carrying weight. What Are Leveling Legs on a Walk-In Tub? explains what the legs do, and this page covers getting to them after the tub is in service.
Where the Legs Are, and Why the Apron Has to Move
Every Ella walk-in tub stands on at least six threaded leveling legs, and many models have up to eight, including center legs that run down the middle of the frame to spread the weight and reduce twist. Each leg threads in and out of the stainless steel frame, and the factory height leaves about 3 inches under the tub so the drain piping can run above the floor. Every leg stops at its limit screw and must never be extended beyond it.
All of those legs sit behind the front apron, which is why the apron is described as removable for service. The installation guide notes that the apron usually comes with two access panels, but a proper leveling check means confirming every leg, including the center legs, so plan on taking the panel off rather than working through an opening. The apron is a flexible plastic panel whose lip tucks under the acrylic edge of the tub, and it hangs on brackets attached to the frame. The tub does not rely on the apron or the walls for support, so removing the panel changes nothing about how the shell is held up.
Taking the Apron Off an Installed Tub
- Open both drain openers and let the tub empty completely before you start.
- Put masking tape along the edge of the apron where you will be gripping it. The plastic edge can be sharp.
- Remove the screws along the bottom edge of the panel. If you only need to shift the apron rather than remove it, loosening those screws is enough.
- Ease the panel away from the frame. The lip sits beneath the acrylic edge, and the hardest section to free is directly under the door, where the lip has the least room.
- If the apron will not come off entirely, prop it open against the frame at the section you need to reach. That is the approach the door handle guide recommends for the lock nut, and it works for a leg near the front of the tub.
- Set the panel somewhere it will not be stepped on. It is cosmetic and flexible, and it goes back on the same brackets.
Ella does not send technicians, so this is work for you, a family member, or a local licensed plumber or contractor. Technical support can review photos of what you find behind the apron and talk that person through the adjustment.
Checking and Adjusting the Legs
The video on this page shows the check the team wants done: look at each foot to confirm it is securely on the ground, check levels on all sides of the tub, and adjust any leg that is not carrying weight. The quickest test is a slip of paper. Try to slide it under each leg. If it goes under, that leg is floating, and a floating leg lets the frame and shell slowly warp until the door no longer meets its seal evenly.
- A door that rubs the jamb usually means the center leg is not carrying weight and the tub is bowed in the middle. Raise the center leg until the door frame clears, then re-check every other leg.
- Uneven gaps between the door and the frame are a leveling sign. Adjust the legs until the gaps close evenly all the way around.
- A gap between the bottom of the apron and the floor means the tub is sitting higher than it needs to. Lower all of the legs evenly, keeping every leg in contact with the floor, so the shell stays supported while it comes down. The bracket side of that fix is in Gap Between the Apron and the Floor, or the Apron Will Not Sit Flush.
- Never run a leg past its limit screw, and keep the 3 inch factory clearance in mind if the drain piping runs above the floor.
The tub is leveled at the factory, but the installer re-verifies on site and again after the plumbing and electrical connections are made, because connecting the drain and supply lines can shift the tub. Floors also settle and legs work loose over the years, which is why an owner of a tub installed long ago can still find one foot off the floor. That is the number one cause of a door leak, so level first before assuming a seal has failed.
While the Apron Is Off
The chrome door handle is held by a lock nut behind the apron, and the same access lets you adjust handle tension: loosen the nut for less tension or tighten it for more, in small steps. Adjusting the Door Handle Lock Nut walks through that and explains why a door that has become hard to close is corrected at the legs, not at the hinges. Take a few photos of the frame, the legs and the handle mechanism before you refit the panel. They are the first thing support asks for if the door still does not close cleanly.
Putting the Apron Back on
Refitting the apron on a tub that is already set is harder than fitting it on installation day, and the difficult section is again under the door. If the tub can be tilted up about an inch, the lip slides under the acrylic edge easily. If the tub cannot move, file down the lip of the apron where it passes under the door so it clears. Check that the lip sits beneath the acrylic all the way across, adjust the brackets in or out if the panel bows or leans, then tighten the bottom screws and confirm the panel is flush at both ends. Repositioning the apron has no effect on the warranty or on how the tub works, and tub measurements are taken from the top of the tub rather than the apron, so a small shift of the panel does not change the fit of the shell. How the panels come off and go on during a first install is covered in How is a walk-in tub installed in an existing bathroom?.
Why It Matters for the Warranty
Misleveling voids the warranty, and the activation form your installer signs confirms that all legs are touching the floor. Keeping every leg in contact is what protects the silicone seams, the door alignment and the seal. If you have leveled and the door still leaks or rubs, open a ticket at ellasbubbles.com/support or call (800) 480-6850 with your model, serial number, photos of the door gap and a note on whether the paper test passed at every leg.
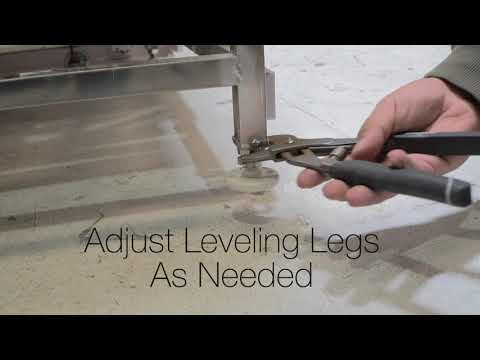
Chapters in this video
- 0:00 Leveling Legs Are Critical Many Ella's Bubbles walk-in tubs have up to eight leveling legs to evenly disperse weight and ensure proper function.
- 0:14 Secure Each Foot The technician checks if each foot is securely on the ground, as an unsealed door could leak.
- 0:28 Check Tub Levels The technician checks levels on all sides of the tub to ensure all feet sit securely on the floor.
- 0:41 Proper Door Alignment Proper leveling assures correct door alignment and closure for your walk-in tub.
Watch: Ella's Bubbles-Leveling legs are critical to a proper functioning tub. with chapters and a full transcript.
Related Guides
- Leveling your walk-in tub: why every leg must touch the floor before anything else
- The Front Apron on My New Tub Looks Bowed or Pulled Away: Why It Happens and How to Reseat It
Related Videos

Chapters in this video
- 0:00 Door Rubbing the Jamb The video explains that a door rubbing the jamb indicates the tub is bowed down.
- 0:33 Ensuring Tub is Level Ella's Bubbles tubs have at least six leveling legs that must be solidly on the ground to prevent leaks.
- 0:47 Making Final Adjustments Each leg is adjusted to rest firmly on the floor, and careful measurements are taken to achieve a level tub.
Common Questions
Can I adjust the leveling legs without removing the apron?
Do I need to drain the tub before removing the apron?
How do I know which leg is not carrying weight?
Will removing the apron on an installed tub affect the warranty?
Does Ella send someone to level the tub for me?
About this guide. Answers in the Ella’s Bubbles Support Center are compiled from real conversations with tub owners, our technicians’ notes and the product documentation, then reviewed by our team. Tub models and options have evolved over the years, so a detail here may differ slightly from your exact tub. If something looks different on yours, send us your serial number and a specialist will confirm it for your model.
Did this solve your question?
If not, open a ticket and our team will pick it up from here.
Open a Support Ticket Videos