


Common Installation Questions: Tile Order, Leveling Legs, Subfloor, Panels, Drain Size and the Outdoor Test
Updated September 2026
The most common walk-in tub installation questions have short answers: the tub goes in first, directly on the level subfloor, and the wall finish comes afterward so that tile or panels overlap the flange and deck. The leveling legs adjust only up to their limit screw, every foot must sit solidly on the floor, all panels come off before the tub is carried, and the tub should be filled and run before it is boxed in. Those five rules answer most of the installation questions that reach support, and the details are below. The full requirements checklist and the step-by-step leveling guide are separate articles; this one is the quick-answer companion to them.
Tile First or Tub First?
Tub first. Set the tub on the finished, level subfloor, level it, connect it and test it, then finish the walls. Ella tubs do not ship with a tile flange on the deck, so the installer adds an aftermarket flange: any rustproof, waterproof strip about 5 inches tall (acrylic, thin stainless or fiberglass, 1/8 or 3/16 inch thick) glued with 100 percent silicone so it overlaps the tub edge by about 2 inches. The tile or wall panel then overlaps the flange and the deck, and every joint is caulked with silicone. This is the standard way to waterproof any Ella tub once it is in place, and tile flange and wall finishing covers it in full.
Can the Legs Go Up Another 2 Inches?
No. The shorter screw on each leveling leg is the limit screw, and the legs cannot be raised higher than that screw. The frame and threshold height are preset at the factory so the drain piping can pass under the tub and above the floor to reach the house drain. If your drain routing seems to need more height than the legs provide, talk with the team before making any change.
Level at the Corners, but the Door Sags Under Load
This is the most common cause of a door that closes freely when the tub is empty but binds or sags once someone steps in. A level laid across the deck will read level as long as the corner legs are firmly against the floor, even if the legs by the door are not all the way down. When a bather enters and the tub fills, the weight of the water pulls the unsupported section of the frame down and the door no longer meets the jamb. The fix is to bring every leg, and especially the legs beside the door and in the center, into firm contact with the floor with equal weight, then re-check level on all sides. A door that rubs the jamb usually means the tub is bowed down in the middle; extending the center leg opens the door frame back up, as explained in my door rubs the frame.
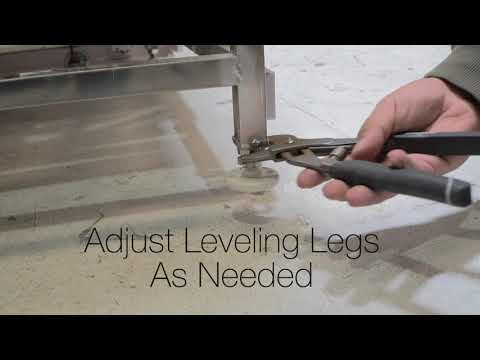
Chapters in this video
- 0:00 Leveling Legs Are Critical Many Ella's Bubbles walk-in tubs have up to eight leveling legs to evenly disperse weight and ensure proper function.
- 0:14 Secure Each Foot The technician checks if each foot is securely on the ground, as an unsealed door could leak.
- 0:28 Check Tub Levels The technician checks levels on all sides of the tub to ensure all feet sit securely on the floor.
- 0:41 Proper Door Alignment Proper leveling assures correct door alignment and closure for your walk-in tub.
The video shows why: many Ella tubs have as many as eight leveling legs to spread the weight evenly. Check that each foot is securely on the ground; if any foot is off the floor the door will not seal correctly and can leak. Adjust each leg as needed, then check level on every side of the tub. All feet sitting securely on the floor is what guarantees proper door alignment and closure. Watch: Ella's Bubbles-Leveling legs are critical to a proper functioning tub. with chapters and a full transcript.
Panels Off Before Carrying
Yes, always. Remove the front apron or access panels and the end panel before the tub is moved, and lift only by the frame, never by the plumbing or the panels. On Standard and Zen tubs that is two panels; the Ultra family has four access panels; two-seat tubs also have toe kick plates. Air jets on the underside will break off if the tub is dragged or set down on them. Any time the tub is relocated later, the panels come off again. Doorway widths and the moving sequence are in our delivery inspection and moving guide.
Test It Outside, or Run the Pre-Installation Test

Chapters in this video
- 0:00 Unboxing and Initial Inspection The video shows the unboxing of an Ella's Bubbles walk-in tub and the initial inspection for any shipping damage.
- 0:49 Pre-Installation Leak Check The tub is filled outside to check for leaks and all pumps are run to ensure proper function before installation.
- 1:11 Drain and Water Supply Connections The installer modifies the floor for the oversized drains and connects the water supply lines with shut-off valves.
- 2:10 Electrical and Leveling A licensed electrician adds proper breakers and GFCI outlets, and the tub's adjustable legs are used for leveling.
- 2:47 Final Checks and Finishing Touches After all connections are secure, the tub is filled to check for leaks, and the side panels are replaced and sealed.
Watch: Walk-In Tub Installation and Delivery Ella's Bubbles Transfer 60 with chapters and a full transcript.
This Chicago-area Transfer 60 installation shows the sequence. On arrival the crate and packing are removed and the tub is inspected for shipping damage. All end and side panels come off before the tub goes inside. Whenever possible the tub is filled outside, all pumps are run, and the installer checks for leaks before the tub is drained, dried and moved in. Inside, the floor is modified for the oversized 2 inch drains; here the installer capped one side of the T-type dual drain and connected the other side to the house main. The 5 foot supply lines that ship with the Ella fast-fill faucet are connected to new shut-off valves placed where they can be reached. A licensed electrician adds the correct breakers and GFCI outlets. The tub is leveled on its adjustable legs, filled again with every pump running, checked thoroughly, and only then are the panels replaced and screwed on, with silicone applied as needed.
If an outdoor test is not practical, run the pre-installation water test on a flat surface before the walls close: wipe the door seal, close the drains, fill to 3 inches above the highest jet (or to the bottom of the grab bar on a soaking tub), let it stand 30 minutes and inspect, then run every electrical component on its rated circuit for another 30 minutes while you inspect the unions. A weeping union is an over-tightened or displaced O-ring; take it apart and reseat it.
Drain Size
Ella's dual drain uses two oversized 2 inch drains with four T-type ports. Connect two ports (most common) or all four to the house drain. A 2 inch house drain is recommended for the fastest draining, but a T or Y fitting into an existing 1 1/2 inch drain also works; a Y is preferred because fewer turns mean faster flow. Cap the unused ports. Have a plumber verify that the house drain itself flows well before installation, because no tub drain can fix a slow house drain. Layouts for left and right doors, center drains, and slabs are in drain configurations and the house drain.
Electrical
All Ella walk-in tubs run on standard 110/120 volt household power on dedicated GFCI-protected 20 amp circuits installed by a licensed electrician. The number of circuits depends on the therapy package: one line for a single-pump package, two for combinations such as hydro plus microbubble or packages with the heated seat, and three for the full digital packages on the largest tubs. Outlets go inside the equipment compartment under the seat so the cords reach, and extension cords are never used. The exact count for your model and package is in electrical requirements by model.
How Thick Does the Plywood Subfloor Need to Be?
The standard is 1 inch of plywood. A 3/4-inch plywood subfloor on standard joists is a common starting point, and the usual approach is to add a layer on top to reach or exceed 1 inch rather than tearing the existing floor out. If you can, check the thickness from below at the drain penetration, since that is where the floor is easiest to see.
The tub carries its filled weight through the adjustable leveling legs, so the floor under those legs needs to be solid and level rather than exotic. Ella walk-in tubs can be installed over a plywood subfloor, concrete, tile, or luxury vinyl tile. The finish material matters less than two things: the surface is level, and the leveling feet are securely anchored so the tub cannot move or shift once it is filled.
Level the tub on the surface it will live on, not on a temporary one that will be covered later, because changing what is under the legs after leveling changes the height. For the net, shipping, and filled figures your framing needs to carry, see how much a walk-in tub weighs.
Related Guides
- Can I Stand the Tub on End to Get It Through the Door?
- Is the Ella Shower Base Solid Underneath, and Why Does It Rock?
- What Plumbing, Electrical and Space Does a Walk-In Tub Installation Need?
- How do I tile over the tile flange on a walk-in tub?
- Who Installs a Shower Pan or Shower Base in My Bathroom?
- Can My Regular Plumber Install an Ella Walk-In Tub?
Common Questions
Do the front legs need to be screwed down?
Does an out-of-level tub affect the warranty?
What if the alcove is longer than the tub?
Can the drains be recessed below the subfloor?
Should the door be left closed after delivery?
Can the tub sit on tile instead of the subfloor?
Do I need to enlarge my 1 1/2 inch house drain?
Where do the installation instructions come from?
Will an alcove installation make service harder?
For anything specific to your model, serial number or jetting package, open a ticket at ellasbubbles.com/support.
Is a 3/4-inch plywood subfloor enough for the tub?
Can the tub be installed over luxury vinyl tile flooring?
Does the tub need to be anchored to the floor?
About this guide. Answers in the Ella’s Bubbles Support Center are compiled from real conversations with tub owners, our technicians’ notes and the product documentation, then reviewed by our team. Tub models and options have evolved over the years, so a detail here may differ slightly from your exact tub. If something looks different on yours, send us your serial number and a specialist will confirm it for your model.
Did this solve your question?
If not, open a ticket and our team will pick it up from here.
Open a Support Ticket Videos