


How Do I Check That My Walk-In Tub Is Level After Installation?
Updated October 2026
To check that a walk-in tub is level after installation, drain it, remove the front apron, set a level on the deck front to back and then side to side, and confirm that every leveling leg sits solidly on the floor with no gap, paying special attention to the center leg. The door is your second gauge: on a level tub it closes with a gentle push, meets the frame evenly all the way around, and stays dry through a full fill. If the door drags, stands off on one side or weeps at the bottom, the tub is telling you a leg is not carrying weight, which is why Why Is My Walk-In Tub Door So Hard to Close? begins with leveling rather than the door.
Why the Check Matters After the Tub Is in
Ella walk-in tubs have at least six leveling legs, and some models have up to eight, to spread the weight evenly and keep the shell in its factory shape. When every leg bears weight the door frame stays square and the seal closes watertight. When one leg floats, or the center of the tub is unsupported, the shell bows. A bow in the middle narrows the door frame so the door rubs the jamb, a twist from one light leg opens a gap on one side, and either one can let water out along the bottom edge.
That is why a tub that tested perfectly on the factory floor, or outside on delivery day, can misbehave in the bathroom. The bathroom floor is rarely perfectly flat, and floors settle and legs work loose over time, so a door that closed well at installation can get tight months or years later. The installation video on this page makes the same point: proper leveling is vitally important, and if the tub is not level the doors will not close properly and could leak. A level check is therefore worth repeating whenever the door starts to behave differently, not just once at install.
The Check, Step by Step
- Drain the tub completely. Do all leveling on an empty tub, and do not fill it until the door closes evenly, because water pressure on a misaligned door can leak and can shift the alignment further.
- Remove the front apron so you can reach the leveling legs and see the underside of the deck.
- Place a level on the deck and read it front to back. Then turn it and read side to side. Check on all sides of the tub, not just the front edge.
- Look for a low spot in the middle. A deck that reads level at the ends but dips at the center means the center leveling leg is not carrying weight.
- Check every leg one at a time. Each foot must sit solidly on the floor with no gap and carry an equal share of the weight. A leg that is not touching the floor, or is carrying less than the others, is the one twisting the frame.
- Adjust any floating leg until it bears on the floor. If the middle is low, extend the center leg until it takes weight and the door frame opens enough for the door to clear the jamb.
- Re-check the door after each adjustment. Leveling alone closes most gaps, so sight along both edges of the door before moving to any other fix.
- Close the door with a gentle push. It should meet the frame evenly and the seal should compress rather than fold.
Only when the tub is level should the other door items come into play. A stiff chrome locking handle is adjusted at the lock nut behind the front apron, a sticky seal is cleaned so it does not grab the frame, and a door that sits low is corrected at the hinge. Adjusting any of these on a tub that is not level treats the symptom and leaves the cause in place.
The Fill Test That Proves It
Once the door closes evenly, fill the tub and watch the bottom edge and both sides of the door. The warranty activation checklist asks the installer to confirm the door seal was watertight after a 20 minute fill, so use that as the standard: a level tub with a properly seated seal stays dry for the full fill. Do this before any surrounding walls or finishes are closed up, because a leg adjustment later is far easier with the apron and floor still accessible. The delivery video shows an additional step the team strongly suggests: whenever possible, fill the tub outside before it goes into the house, run all the pumps and inspect for leaks, then drain and dry it before moving it inside.
Reading What the Door Tells You
- Door hard to close or rubbing the jamb: the tub is bowed down in the middle and the center leg needs to take weight.
- Gap on one side of the door: one or more legs are not bearing equal weight, so the frame is twisted. Why Is There a Gap on One Side of My Walk-In Tub Door? also covers restoring a seal that was flattened in transit.
- Water at the bottom edge or at the door frame: a leg is floating or the seal sits off center in its channel. Why Does My Walk-In Tub Door Leak at the Bottom? explains why silicone or caulk over the seal is never the fix.
Record the Check on the Warranty Activation Form
The second page of the activation form is a list of 16 installation checks the installer initials, and the tub being level with all legs touching the floor is one of them, alongside the dedicated GFCI breaker, operating the thermostatic control valve on both hot and cold, tightening the locking nut on both drain stoppers, and the 20 minute watertight fill. What Is the Warranty Activation Form for an Ella Walk-In Tub? shows how to submit it online at ellasbubbles.com/warranty-activation or from the printed form in the owner's manual with a copy of the sales receipt. If your installer has already left and the form was never completed, do the level check yourself, then complete the form now, since there is no published deadline. For any question the check raises, open a ticket at ellasbubbles.com/support or call (800) 480-6850 with your serial number and a photo of the level on the deck.

Chapters in this video
- 0:00 Unboxing and Initial Inspection The video shows the unboxing of an Ella's Bubbles walk-in tub and the initial inspection for any shipping damage.
- 0:49 Pre-Installation Leak Check The tub is filled outside to check for leaks and all pumps are run to ensure proper function before installation.
- 1:11 Drain and Water Supply Connections The installer modifies the floor for the oversized drains and connects the water supply lines with shut-off valves.
- 2:10 Electrical and Leveling A licensed electrician adds proper breakers and GFCI outlets, and the tub's adjustable legs are used for leveling.
- 2:47 Final Checks and Finishing Touches After all connections are secure, the tub is filled to check for leaks, and the side panels are replaced and sealed.
Watch: Walk-In Tub Installation and Delivery Ella's Bubbles Transfer 60 with chapters and a full transcript.
Related Guides
- Leveling your walk-in tub: why every leg must touch the floor before anything else
- How Do I Fix a Walk-In Tub That Is Not Level?
- Gap Between the Apron and the Floor, or the Apron Will Not Sit Flush: Leveling Legs and Bracket Adjustment
- Why Is My Walk-In Tub Door So Tight or Hard to Open?
Related Videos
Chapters in this video
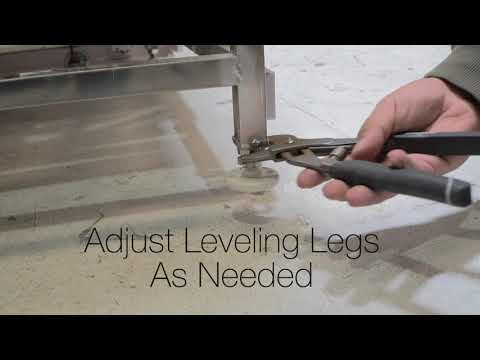
- 0:00 Leveling Legs Are Critical Many Ella's Bubbles walk-in tubs have up to eight leveling legs to evenly disperse weight and ensure proper function.
- 0:14 Secure Each Foot The technician checks if each foot is securely on the ground, as an unsealed door could leak.
- 0:28 Check Tub Levels The technician checks levels on all sides of the tub to ensure all feet sit securely on the floor.
- 0:41 Proper Door Alignment Proper leveling assures correct door alignment and closure for your walk-in tub.

Chapters in this video
- 0:00 Leveling Feet for Bathtub Stability The video explains how leveling feet are crucial for installing a walk-in tub and ensuring its longevity.
- 0:29 More Leveling Feet, More Stability The speaker emphasizes that more leveling feet disperse weight, prevent movement, and lead to a more stable and lasting installation.
- 1:16 Ella's Bubbles' Unique Design Ella's Bubbles offers more leveling feet, including center legs, compared to competitors, providing a stronger foundation for the tub.
Common Questions
Where do I place the level when checking a walk-in tub?
How many leveling legs does an Ella walk-in tub have?
Should the tub be full or empty when I check the level?
The tub reads level but the door still rubs, what should I check next?
Does the installer have to confirm the tub is level for the warranty?
My door closed fine at installation but is tight now, why did that change?
About this guide. Answers in the Ella’s Bubbles Support Center are compiled from real conversations with tub owners, our technicians’ notes and the product documentation, then reviewed by our team. Tub models and options have evolved over the years, so a detail here may differ slightly from your exact tub. If something looks different on yours, send us your serial number and a specialist will confirm it for your model.
Did this solve your question?
If not, open a ticket and our team will pick it up from here.
Open a Support Ticket Videos