


Why Does a Deck Push Button Do Nothing on My Walk-In Tub?
Updated October 2026
A deck push button that does nothing on an Ella walk-in tub is almost always a connection problem rather than a broken part. The buttons are pneumatic, so a button only works when the puff of air it sends reaches its relay in the control box and when the circuit feeding that pump has power. Confirm the tub is filled above the jets and the GFCI for that function is on, then check the air tube at the control box before assuming anything needs replacing. What Are Push Controls (Easy-Touch Buttons) on a Walk-In Tub? explains the buttons themselves, and this page walks through every reason a button can go quiet and what to do about each one.
How a Deck Button Works, and Why It Can Go Quiet
Each chrome button on the deck is a small air pump. Pressing it squeezes a puff of air down a slim tube to the blue control box under the tub, where a relay clicks and switches the matching pump or the light. There is no electricity at the button itself, which is why a gentle press with the palm of your hand is all it needs and why pressing too hard can damage the mechanism inside. You should hear a faint relay click from the control box with each press. The first video shows the push controls and the digital touchpad in normal use so you can compare what a working button does.
That design is also the reason a button can look and feel perfectly fine while doing nothing. If the tube has popped off at either end, the puff of air never arrives and the relay never clicks. If the relay clicks but the pump stays silent, the air side is fine and the fault is on the power side. Sorting a dead button into one of those two groups is the whole job.
Things That Look Like a Dead Button but Are Not
- The tub is not filled. Never press a pump button on a dry tub, because a dry run causes permanent damage that is not covered. Fill until the water is above the highest jets before you test the Water button. The air pump can run dry safely.
- The Air button is stepping through speeds. On the three-speed push control the first press is high, the second is medium, the third is low, and a fourth press turns the air off. A press that seems to do nothing may simply have moved the blower from high to medium.
- The button is unlabeled. Some Transfer and legacy tubs ship with unlabeled buttons, and that is normal. Water is the hydro pump, Air is the air massage, Micro is the microbubble system, Light is the LED chromatherapy and the flame button is the heated seat. What Does This Button on My Walk-In Tub Do? has the full key.
- The plain knob is not a switch. The unlabeled dial on a hydro tub is the intensity control that regulates jet pressure, and it does nothing until the hydro pump is running.
- The Light needs a hold to switch off. One press cycles the colors, repeated presses lock a color and a two second hold turns the light off.
- The tub does not have that system. A tub only has buttons for the therapies it was built with, so a Water button with no Air button means air massage was not ordered.
Check the Circuit Before You Open the Panel
The pumps are not all on the same circuit. The foot massage pump, for example, is on a separate breaker from the other pumps, so the air jets and light can work while the foot jets are dead because one GFCI has tripped. Reset the GFCI and the breaker for that function first. If nothing on the tub responds at all, treat it as a power problem rather than a button problem and start at the panel, since the tub runs on its own dedicated GFCI breakers.
On a brand new Standard or Zen platform tub, a full set of silent buttons often points to the install itself. The air pipe connection on those models passes through the shell with a back nut, and it must be tightened and verified working before the installation is finalized, so a loose connection there is worth raising with your installer.
Reseat the Air Tube and Listen for the Click
- Turn off the GFCI breaker that feeds the tub.
- Remove the large access panel next to the door. It is held on by magnets, so a butter knife slipped behind the edge will pry it loose.
- Find the blue control box screwed to the frame. It has three 3/8 inch air hoses and three power plugs coming out of it and a green LED. The port labels on the white face read Airswitch Pump #1 for the Water button, Blower/Airswitch Pump #2 for the Air button and Light Airswitch for the Light button.
- Trace the tube from the dead button to its port and push it firmly onto the nipple, twisting and pushing at the same time so it seats fully. The second video shows this step on a control box and push control.
- Check the button end as well. Work a fine flat screwdriver under the chrome ring to pry it off, lift out the button, pull out the black pump behind it and make sure the hose is secured at the lock nut. Push the pump back in, replace the button and the chrome ring.
- Restore power and press the button while you listen for the click at the control box.
A button that stays down is a related fault with a simple fix. It is an air lock rather than a broken part: disconnect its tube at the control box so the button pops back up, then reconnect the tube.
The Hose Swap Test Tells You Which Side Is at Fault
If reseating the tube does not bring the button back, swap hoses at the control box. Pull the hose off the port for the dead button and the hose off the Light Airswitch port, then plug each into the other port. Press the Light button, which should now start the pump that belongs to the dead button, and press the dead button, which should now turn on the LED. If the Light button runs the pump but the dead button still does not light the LED, the fault is the button or its hose. If the dead button lights the LED but the Light button does not start the pump, the button and hose are fine and the fault is the pump, its plug or the control box. Return both hoses to their original ports when you are done, and if the water pump starts during the test press its button again immediately unless the tub is already filled above the jets. The full procedure and how to read each outcome are in One Push Button Does Nothing While the Others Work: The Breaker Check and the Hose Swap Test.
The ozone button has its own version of this test because the control box carries two similar relays, one for the LED and one for the ozone generator. Swapping the LED and O3 tubes shows whether the ozone relay works, and a failed relay ships under the parts warranty, as described in Ozone (O3) Button Does Nothing: Checking the Relay Click, the Air Tube, and Swapping Relays to Test.
What to Have Ready for a Ticket
If the click is there and the pump is still silent, or the swap test points at the pump or the box, open a ticket at ellasbubbles.com/support or call (800) 480-6850. Have your model name, your serial number, your order details from where you purchased, which button is affected and whether you hear a click when you press it. A short video of the test and a photo of the blue control box with its cords and air tubes lets the team confirm the part. A failed relay ships under the parts warranty, and pumps and electronic controls are covered as supporting equipment under the Lifetime Limited Warranty, with a local licensed electrician or plumber doing any labor. If the opposite happens and a control will not stop its function, How Do I Turn the Jets Off in an Emergency? covers stopping each system and cutting power at the breaker.
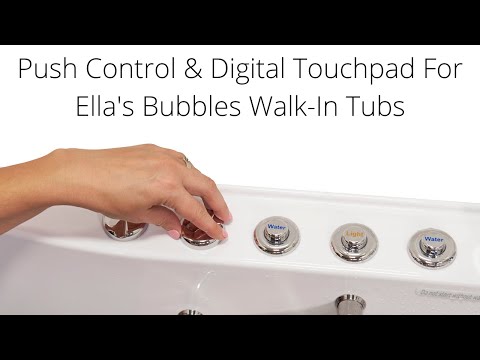
Chapters in this video
- 0:00 Push Controls Versus Digital Touchpad Ella's Bubbles walk-in tubs offer a choice between on/off push controls and a digital touchpad for easy bathing.
- 0:45 Controlling Air Massage With Touchpad The air bubble icon on the digital touchpad activates the air massage, with plus and minus buttons adjusting intensity.
- 1:21 Chromo Therapy Light Functions Chromo therapy light functions the same with both control types, cycling through colors or selecting a specific one.
Watch: Walk-In Tub with Push Controls & Digital Touchpad for Easy, Effortless Bathing | Ella’s Bubbles with chapters and a full transcript.

Chapters in this video
- 0:00 Understanding Air Signal Connections The technician explains how the push control sends an air signal to the control box via an air tube.
- 0:51 Securing Control Box Connections The technician demonstrates how to firmly plug the air tube onto the nipple of the control box.
- 1:03 Checking The Button Connection The technician shows how to retrieve the button from its housing using a flat screwdriver.
- 1:21 Securing The Pump Connection The technician pulls out the black pump part and secures the connection with the lock nut and hose.
- 1:40 Reassembling The Button The technician puts the pump and button back in place, securing it with the chrome ring.
Watch: How to Secure Air & Hydro Connections in Your Walk-In Tub | Ellas Bubbles with chapters and a full transcript.
Related Guides
- Heated Seat Not Warming Up: What to Check First and Which Parts Support Ships
- Control Box Has Power but Nothing Turns On: Where the Air Tube Connects
Related Videos

Chapters in this video
- 0:00 Pneumatic Push Button Controls The video introduces how push button controls work using pneumatic pressure and a red connection tube.
- 0:32 Activating the Relay Switch Pushing the button creates pneumatic pressure, which activates the relay switch inside the control box.
- 1:05 Relieving an Air Lock The video demonstrates how to relieve an air lock by disconnecting the red tube from the control box.
- 1:20 Reconnecting the Tube After reconnecting the tube, pushing the button should produce an audible clicking sound from the control box.

Chapters in this video
- 0:00 Chromotherapy Control Box Explained The video explains the chromotherapy control box, showing how to power it and connect the LED light and air switch.
- 0:29 Air Massage Control Box Explained The video explains the air massage control box, demonstrating how to power it and connect the air pump and air switch.
- 0:50 Air Massage Speeds And Auto Purge The video details the three speeds and wave function of the air massage, along with the auto Purge feature.
Common Questions
Does a push button on an Ella tub carry any electricity?
Why does my air button seem to do nothing on the first press?
What does it mean when I hear a click but the pump does not start?
Why does my push button stay pressed down after I use it?
Do I need to drain the tub before testing the buttons?
About this guide. Answers in the Ella’s Bubbles Support Center are compiled from real conversations with tub owners, our technicians’ notes and the product documentation, then reviewed by our team. Tub models and options have evolved over the years, so a detail here may differ slightly from your exact tub. If something looks different on yours, send us your serial number and a specialist will confirm it for your model.
Did this solve your question?
If not, open a ticket and our team will pick it up from here.
Open a Support Ticket Videos