


The warranty replacement part did not fix my tub, what happens next?
Updated September 2026
If a warranty replacement part did not fix your tub, reply on the same support ticket, keep the old part where it is, and describe exactly what the tub does now. Free lifetime technical support does not end when a part ships. The team looks at the diagnosis again from your new photos, a short video or a live video call, and either sends a different part or guides your installer through the next check. The steps between approval and a working tub are laid out in What Happens After a Warranty Part Is Approved: Testing, Where It Ships, Return Labels and What to Keep, and this page covers the outcome that article only touches on: what happens when the part goes in and the problem stays.
Why a Replacement Part Sometimes Does Not Solve the Problem
Warranty parts are verified from photos and a description before they ship, and parts such as hoses and control boxes are tested before they are packed. So when a new part goes in and nothing changes, the part itself is rarely the reason. In the team's experience the cause is usually one of three things.
- Two problems share one symptom. A door that needs a hard pull to close and hangs out of level when open looks like a worn seal, but it usually has a bent hinge, and a new seal will not fix a door that is not level because the seal keeps hitting the tub frame. The way to tell them apart is in Bent or Loose Door Hinge: Diagnosis, Tightening, and Replacement.
- The first part addressed one piece of a larger fault. A leaking hand shower hose is normally cured by a new brass connector rod, but if the rod was twisted or snapped off inside the faucet during a difficult installation, the faucet body itself may need to be replaced. Support confirms which from photos, as explained in Hand Shower Hose Leaks or Will Not Attach at the Faucet: Replacing the Brass Connector Rod.
- Something in the swap is not quite right. A control box, for example, is only finished once the power cords, the air hoses and the light wire are all connected in their places. On a faucet, a missing hose washer or a hose fitted backwards produces a drip that looks just like the original leak.
None of these mean the claim starts over. They mean the ticket continues, with the team now holding more information than it had the first time.
What to Do Before You Reply on the Ticket
- Do not throw the old part away. Keep any replaced part in a safe place until the ticket confirms the replacement fixed the issue. If the team needs it back for diagnosis, they will say so on the ticket and tell you exactly what to do. A control box shipment may already include a return label for that purpose.
- Check the connections on the new part. Confirm every cord, hose and wire that was moved during the swap went back where it belongs. If a contractor did the work, ask them what was disconnected.
- Test before you finish the job. The Digital Touchpad Replacement video on this page shows the habit that saves a second visit: after the new pad is plugged in, power is temporarily reconnected to make sure the new unit is working correctly before the tape backing is removed and the edges are sealed with white silicone. Apply the same idea to any part. Run the function it controls before panels go back on or sealant goes down.
- Record what the tub does now. Take new photos or a short video of the symptom, and note whether it is the same as before, better, or different. A leak that moved, a pump that now hums but does not run, or a door that closes but drips are all different next steps.
- Reply on the existing ticket, not a new one. Your serial number, the original photos, the verification and the shipping record are already there. If you prefer to call, use (800) 480-6850 and mention the ticket.
What the Team Does Next
Diagnosis is free and lifetime, and it happens the same way it did on the original claim: by phone, by email with photos, and by video chat, FaceTime, WhatsApp or WeChat when a live look helps. The team may ask a question or two or suggest a quick check, exactly as described in How do I start a warranty claim for my Ella walk-in tub?. From there, one of three things happens.
- A different part ships. If the new information points to another component, that part is verified and shipped the same way as the first, to the original customer's address at no charge, and normally parts are sent out immediately.
- The old part comes back for diagnosis. For a control box, the return label in the shipment lets the team examine the original box. For most other parts nothing needs to be returned unless the ticket says so.
- Your installer gets a guided second look. The team walks any licensed plumber, electrician or handyman through the repair with manuals, videos and a phone or video call while they are on site during business hours. The person doing the work does not need prior Ella experience.
The ticket stays open until you confirm the tub is working. Only then should the old part be discarded.
Labor, the Second Visit and Who Covers It
The published warranty is a parts warranty. It does not cover labor, removal, replacement or installation, plumbing and electrical connections, or water damage to the home, and Ella's Bubbles does not send technicians into the field. That does not change when a first part fails to solve the problem: the next part still ships free, and the labor to fit it is still done by you or a local licensed professional. Installers operate independently and provide their own labor warranties, so ask the person who did the first swap what coverage they offer on their work. If your installer or dealer is no longer reachable, the team will help you find someone; the details are in Who Services an Installed Ella Tub? Parts From Ella, Labor From a Local Pro, and What to Do When the Installer or Dealer Is Gone.
If the Replacement Part Itself Is the Problem
Occasionally the new part arrives damaged or does not work once connected. Treat it exactly like the original defect: photograph it, describe what it does, and report it on the same ticket, because replacement parts are verified from photos in the same way. A replacement control box comes tested and configured, so the button-hold configuration step should not be needed; if it was performed anyway, tell the team, since that changes what they will ask you to check. Keep the packaging and the part until the ticket tells you what to do with them.

Chapters in this video
- 0:00 Replacing Your Digital Touchpad This video explains how to replace an Ella's Bubbles walk-in tub digital touchpad.
- 0:12 Removing the Old Touchpad The technician carefully cuts the seal around the old pad and pries it away from the tub.
- 0:44 Connecting the New Touchpad The technician connects the new touchpad and temporarily reconnects power to test its function.
- 1:03 Installing and Sealing the Touchpad The technician removes the backing from the tape, sets the new unit in place, and seals the edges with silicone.
Watch: Ella's Bubbles: Digital Touchpad Replacement with chapters and a full transcript.
Related Guides
- Troubleshooting Start Here: Match Your Symptom to the First Check and the Right Article
- How to Reach Ella's Bubbles Support: Hours, Location, the Ticket Form, the Phone Line, Live Chat and What to Have Ready
- My Installer Went Out of Business, Who Does Warranty Repair Labor Now?
Related Videos
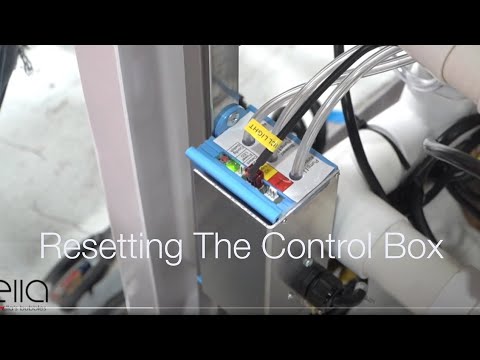
Chapters in this video
- 0:00 Disconnect Main Power Supply The video begins by showing how to disconnect the main power supply to the control box, and the green LED light goes out.
- 0:13 Disconnect All Function Connections The technician disconnects all function connections to the control box, recommending that each connection is marked before removal.
- 0:38 Disconnect Air and Water Pumps The technician disconnects all electrical connections to the air and water pumps that the tub may have.
- 0:59 Locate and Press Config Switch The technician locates the config switch on the control box and presses it until the green LED light cycles through its configuration process.
- 1:31 Reconnect Tub Components The technician reconnects all the tub's components, including the air and electrical lines, ensuring each is secured firmly.
- 1:49 Test All Tub Functions The technician tests all the tub's functions, including air, water, micro bubbles, and LED lights, to ensure they are working correctly.

Chapters in this video
- 0:00 Chromotherapy Control Box Explained The video explains the chromotherapy control box, showing how to power it and connect the LED light and air switch.
- 0:29 Air Massage Control Box Explained The video explains the air massage control box, demonstrating how to power it and connect the air pump and air switch.
- 0:50 Air Massage Speeds And Auto Purge The video details the three speeds and wave function of the air massage, along with the auto Purge feature.
Common Questions
Do I have to open a new warranty claim if the first part did not work?
Should I send the old part back to Ella's Bubbles?
Will Ella's Bubbles cover my plumber's second visit?
Can the team look at the tub live to find the real problem?
What if the tub now has a different symptom after the swap?
What if my installer is no longer reachable for the second repair?
About this guide. Answers in the Ella’s Bubbles Support Center are compiled from real conversations with tub owners, our technicians’ notes and the product documentation, then reviewed by our team. Tub models and options have evolved over the years, so a detail here may differ slightly from your exact tub. If something looks different on yours, send us your serial number and a specialist will confirm it for your model.
Did this solve your question?
If not, open a ticket and our team will pick it up from here.
Open a Support Ticket Videos