


Installing the Ella Ultra: The Owner's Manual Sequence From Crate to Finished Wall
Updated September 2026
This page follows the Ella Ultra from the delivery truck to a finished wall, using the sequence in the Ultra owner's manual ("Ella Acrylic Walk In Bathtubs Owners Manual," 27 pages, dated 6/15/23), with dimensions and included parts confirmed against the Ultra spec sheet and brochure.
What Makes the Ultra Install Different
The Ultra's door is an inward-swinging brushed aluminum frame with frosted tempered glass, the S-shape door the brochure calls out. The spec sheet lists a stainless steel towel bar, a wall-mounted grab bar, one reversible end panel and one 7" extension panel as included. The manual's cover gives the Ultra as 30"W x 52"L; the spec sheet's actual size is 29.5" x 52.125" x 40", shipping size 32" x 54" x 50", net weight 205 lbs and shipping weight 230 lbs. Use the actual size for fit and the shipping size for the path into the house. More on the model is in the Ultra profile.
Delivery Inspection and Moving by the Frame
Inspect the crate and carton on receipt. If you find damage, photograph it, record the details on the shipper's delivery document and ask the driver to sign; the manual states that damage must be recorded on the delivery paperwork for a claim to be processed. Then remove the front apron, all four access panels and the end panel before carrying the tub inside. The manual warns "REMOVE END PANELS BEFORE ATTEMPTING TO MOVE OR CARRY" and allows lifting only by the frame, never by the plumbing. Keep all packaging until the installation is complete, because returns are accepted only in the original packaging.
Safety and the Required Steps Before Installation
- Use a licensed plumber and a licensed electrician and follow local codes. Indoor use only, manufacturer parts only.
- The unit must be on a GFCI protected circuit installed by a licensed electrician and tested periodically. If the GFCI fails its test and reset check, turn the power off until the fault is found.
- Keep electric appliances at least 3 feet from the tub.
- "Operating the pumps without first filling the bath to above the jets can cause permanent damage to your equipment."
Water Test Before the Walls Close
- Set the tub on a completely flat surface where it can be drained afterward.
- Wipe the door seal with a clean rag and warm water.
- Seal the drains with tape and fill to at least 3 inches above the highest jet, or to the bottom of the grab bar if there are no jets.
- Let the water stand for 30 minutes and inspect all plumbing and seals.
- Using rated three-prong extension cords on separate outlets, run the air blower, water pump and heater (if fitted) for another 30 minutes, then inspect again, especially the unions at the pump and heater.
- A union that leaks after tightening is either over-tightened or has a displaced O-ring; disassemble it and reseat the O-ring. Check that the heater threads match the pipe threads.
The pre-installation water test article has more detail on each step.
Leveling and Door Alignment
The subfloor must be level and able to carry the tub, the bather and the water. Set the tub, check level in all directions, and adjust the leveling legs until every leg touches the floor with equal weight distribution. An unlevel tub can warp the frame and shell, misalign the door, leak and void the warranty. Your Ultra was leveled at the factory, but the installer must repeat the check; extending or shortening a leg closes a gap between the door and the frame, and the door must close smoothly to a watertight seal. See the leveling guide. While at the door, release a seal that stuck in shipping by squeezing it and pulling it away from the frame, and keep the door open when the tub is not in use.
Dual 4-Port Drain Connection and the Below-Floor Option
The Ultra ships with two 2" 4-port PVC drains, 2 end caps, 2 overflows and 2 stainless steel openers. Connect through all four 2" ports, or through two with the caps closing the rest. Join the outlets with a Y fitting rather than a T, and confirm the house drain flows properly first. If you lower the tub so the drain sits below the subfloor, you must cut subfloor access and trim the bottom of the apron or end panel; the manual warns that the warranty will not cover the altered parts.
Faucet, Supply Lines and the Hand Shower Barrel Rule
The 5-piece fast-fill faucet is rated up to 18 GPM at 60 PSI under ideal in-home plumbing and comes with two 5' 3/4" supply lines that connect to your shut-off valves (not included). The hot handle is red, the cold handle blue; turn the middle diverter lever toward OFF and push the faucet lever down for the pull-out hand shower, which has 5 flow settings. The manual is specific: "Do not attach the hand held shower to the wall unless you have an extension hose with a barrel protection." To fit one, unscrew the shower head mixer, screw the stainless barrel onto the hose end, screw the extension hose to the other side of the barrel, seat the barrel in the shower base to plug the hole, and screw the mixer onto the extension hose.
Electrical and Ventilation
The spec sheet calls for "Dedicated GFCI protected electrical line(s) required, 110/120V"; two-pump packages may need more than one line, as explained in electrical requirements by model. Do not insulate around the tub equipment, and provide code-compliant service access, which is the installer's or owner's responsibility.
The Ultra Reversible Extension Kit, Part by Part
| Kit part | Quantity |
|---|---|
| L stainless steel brackets | 2 |
| 1" x 1/8" bolts | 7 |
| 1" x 1/4" bolts | 7 |
| 1" screw | 1 |
| 1/2" nuts | 9 |
| 3/8" nuts | 7 |
| Medium washers | 14 |
| Small washers | 14 |
| Plastic washer | 1 |
| Plastic cap | 1 |
- Install the 3 extension support brackets.
- Clamp the extension panel to the tub shell, lining up the top and front facade.
- Pre-drill holes about 3/8" wider than the mounting screws so the panel can be adjusted.
- Mount the extension with 7 screws, washers and bolts.
- Apply silicone or white caulking as needed.
Other models are in extension panels and filler kits by model.
Wall Finishing and the First Fill
Glue a tile flange strip (any thin 1/8" or 3/16" rustproof, waterproof material, about 5" tall, overlapping the tub edge by 2") to the tub edge with 100% silicone before pushing the tub to the wall, then let the tile or wall panel overlap the flange and the flat deck, with silicone-based caulking at all joints; see tile flange and wall finishing. For the first fill, check that the drain handles open clockwise and close counter-clockwise, never fill above the center of the drain handle, and do not open the door until the tub is completely drained.
Download the official document: Ella Ultra Owner's Manual
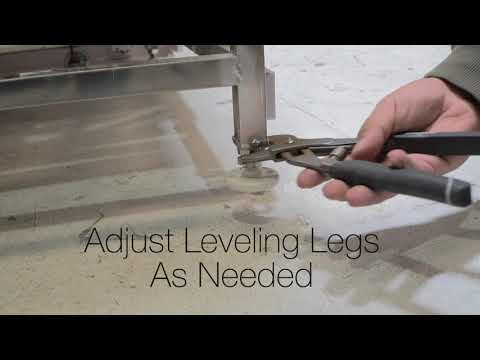
Chapters in this video
- 0:00 Leveling Legs Are Critical Many Ella's Bubbles walk-in tubs have up to eight leveling legs to evenly disperse weight and ensure proper function.
- 0:14 Secure Each Foot The technician checks if each foot is securely on the ground, as an unsealed door could leak.
- 0:28 Check Tub Levels The technician checks levels on all sides of the tub to ensure all feet sit securely on the floor.
- 0:41 Proper Door Alignment Proper leveling assures correct door alignment and closure for your walk-in tub.
The video shows the check that matters most: each adjustable leg securely on the floor and the tub level on all sides so the door aligns and seals. Watch: Ella's Bubbles-Leveling legs are critical to a proper functioning tub. with chapters and a full transcript.
Common Questions
What size opening does the Ultra need to fit through?
Does the Ultra include an extension panel for a 60 inch alcove?
Can the hand shower be mounted on the wall?
Why does the door not close cleanly after the tub was set in place?
About this guide. Answers in the Ella’s Bubbles Support Center are compiled from real conversations with tub owners, our technicians’ notes and the product documentation, then reviewed by our team. Tub models and options have evolved over the years, so a detail here may differ slightly from your exact tub. If something looks different on yours, send us your serial number and a specialist will confirm it for your model.
Did this solve your question?
If not, open a ticket and our team will pick it up from here.
Open a Support Ticket Videos