


Extension panels and filler kits: fitting your walk-in tub into a 60 inch alcove
Updated September 2026
Walk-in tub extension panels, also called filler kits, are what let a 52 to 55 inch Ella tub fill a standard three-wall 60 inch alcove with a clean, finished look. Tubs shorter than 60 inches include one custom-size extension panel, with a few exceptions listed below, and 60 inch and longer tubs do not need one. The panel can be placed on the left or right side of the tub, can be trimmed for out-of-square alcoves, rests on adjustable stainless steel shelf brackets that are part of the tub frame, and doubles as a handy shelf for towels, shampoos, and soaps.
Watch: Extension Panels Explained
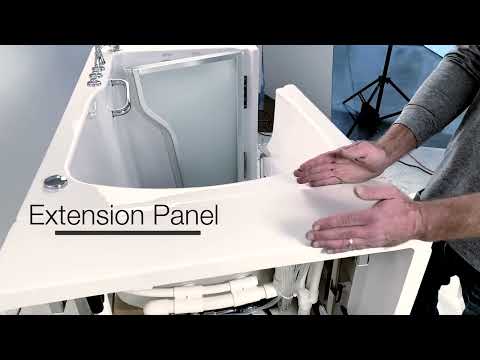
Chapters in this video
- 0:00 What Are Extension Panels? Ella's Bubbles walk-in tubs use extension panels to create the best fit for your new tub in your home.
- 0:14 Trimming Panels For Fit Extension panels can be trimmed to ensure your tub fits seamlessly and beautifully, even if your alcove is out of square.
- 0:29 Panel Storage Space The extension panels provide a convenient place for towels, shampoos, soaps, and other bathing items.
As the video shows, the extension panels come with integrated stainless steel shelf support brackets that are fully adjustable and are an integrated part of the tub frame, giving the panel a robust and durable support system. If your alcove is out of square or an unusual size, the panel can be trimmed for a seamless fit. Watch: Ellas Bubbles: Extension Panels or "Filler Kits" For Alcove Installation with chapters and a full transcript.
Which Models Include an Extension Panel
| Model | Extension panel |
|---|---|
| Standard, Zen, Flow | Included (Standard: 7 inch panel; Flow kit includes panel for 60 inch alcoves) |
| Standard60, Zen60 | Not needed (already 60 inch) |
| Ultra | 7 inch panel plus reversible end panel included |
| Elite, Petite, Royal | 7 inch |
| Deluxe | 4 inch |
| Ultimate | None (60 inch tub) |
| Capri | 8 inch |
| Monaco, Lounger | Available |
| Big4One, Shak, Front Entry, Mobile | No extension panel |
| Transfer26, Transfer30, Transfer32 | 8 inch |
| TransferXXL | 5 inch |
| Transfer60 | None listed (60 inch tub) |
| Two-seat models (Tub4Two, Companion, Escape, Big4Two) | None (full-length tubs) |
For the Petite, use the actual width of 27.5 inches from the current spec sheet when planning; the 27 inch figure printed in the older extension-kit table of the stainless-family manual is a misprint. Our alcove fit and extension panels article and the dimensions by model table help you check the whole alcove before ordering.
What Is in the Kit
Kit contents vary by door family. Your kit matches your tub, so use this to verify nothing is missing before install day.
- Standard/Zen/Flow (Economy platform) kit: 2 L-shaped stainless brackets, 1 L-shaped plastic bracket, 2 pressure metal clips, and 4 nuts. Installation uses 3 brackets and a clamp panel, pre-drilling holes 3/8 inch oversize, 7 screws, and silicone.
- Ultra kit: 2 L-shaped stainless brackets, 7 x 1" x 1/8" bolts, 7 x 1" x 1/4" bolts, 1 x 1" screw, 9 x 1/2" nuts, 7 x 3/8" nuts, 14 medium and 14 small washers, 1 plastic washer, and 1 plastic cap.
- Outward-swing and Transfer kit: 2 L-shaped stainless brackets, 7 x 1" x 1/8" bolts, 2 x 1" x 1/4" bolts, 2 x 1/2" nuts, 7 x 3/8" nuts, 4 medium and 14 small washers.
Fitting Tips from the Ella Standard

Chapters in this video
- 0:00 Ella Standard Walk-In Tub Overview The video introduces the Ella Standard walk-in tub, highlighting its size and design for average bathers.
- 0:27 Fitting Tub Into Alcove Tips are provided for fitting the tub into a 60-inch alcove, including trimming the apron or using the standard end piece.
- 0:49 Hydro Massage System Features The tub's 18-jet hydro massage system is described, including its intensity control dial and inline water heater.
- 1:14 Drainage And Adjustable Frame The oversized two-inch drain and adjustable frame with access points for door adjustments are showcased.
Watch: Ella's Bubbles: Installation Tips For The Ella Standard Walk-In Tub with chapters and a full transcript.
The Standard comes equipped with an end panel for the faucet side and a 7 inch extension panel on the other side that mounts easily for a snug fit in a 60 inch alcove. If you are having an issue fitting the tub into a 60 inch alcove with the extension panel, the video recommends trimming the corner piece off the main tub apron for a cleaner, tighter fit. You can also slide the tub into the alcove using the standard end piece and apron without the end panel. On the Flow, the side panel must be cut 3/8 inch for a flush wall fit, and it attaches with magnets on the frame that meet tabs inside the panel.
Order of Work on Install Day
- Set and level the tub first, with every leveling leg firmly on the floor. The panel is fitted last.
- Measure the gap between the tub and the wall at the top and bottom, since alcoves are rarely square, and mark the panel.
- Trim the panel to the wall with masking tape over the cut line to protect the finish.
- Adjust the shelf brackets on the frame so the panel sits level with the tub deck, then secure it with the kit hardware.
- Caulk the joint to the wall and deck with 100 percent silicone after the tile flange and wall finish are in place; see tile flange and wall finishing.
Freestanding and Double-Exposed Installs
Every Ella tub can also stand free against one or two walls. One reversible end panel is included to cover an exposed end of the shell, and a second end panel is available when both ends are exposed. Our article on freestanding and exposed-side installations covers the layouts that work.

Chapters in this video
- 0:00 Extension Panel for Seamless Installation The video introduces the extension panel, also called a fill kit, which allows for custom cutting to fit various wall spaces.
- 0:35 Integrated Shelf Support Bracket The video shows the integrated shelf support brackets, which are adjustable and made of stainless steel.
- 0:52 Panel Support and Durability The video explains how the integrated support prevents issues like silicone cracking or panel failure, making it a durable component.
This video shows the fill kit being set after the tub and cut to whatever the walls are, so an out-of-square alcove still gets a seamless finish and a place for soaps and towels. Underneath, the adjustable stainless shelf-support brackets on the frame carry the panel, so the load never rests on the silicone joint. Watch: Walk-In Tub Extension Panels for Seamless Installation - Voted Best/Safest 2020 with chapters and a full transcript.
Related Guides
- Installing a Walk-In Tub in a Wet Room: Keeping the Electrical Compartment Dry
- End Panel Too Long for the Opening: Trimming It to Fit
- Getting an Extension Panel When Your Alcove Is Wider Than Your Tub
- What If the End Panel Is Too Short and Leaves a Wall Gap?
- How do you fill the alcove gap when installing the 45 inch Ella Mobile?
- How do I remove the access panels before moving an Ella walk-in tub?
Common Questions
Can the extension panel be trimmed to fit out-of-square walls?
What holds the extension panel up?
Can the panel go on either end of the tub?
Does the extension panel add length to the tub?
Which tubs do not come with an extension panel?
Can I get extension panels on both ends?
What if my alcove is shorter than 60 inches?
Can I opt out of the extension panel?
I need a replacement panel or bracket. Where do I get one?
I only need a 4 inch filler. Do you cut the extension panel down?
Do you have a tub that fits a 4 foot opening?
I cannot figure out which extension kit bracket goes where. Any pointers?
Can Ella's Bubbles tubs be installed as fully freestanding units with all four sides covered?
What end panel and extension kit come with the Triple XL 36 by 55 inch tub?
Does Ella's Bubbles offer a panel for the back wall side of the tub?
Can an extra end panel hide the plumbing and mechanisms on an exposed end?
How many extension panels and side panels come with the tub?
Still need help? Open a ticket at ellasbubbles.com/support or call (800) 480-6850.
About this guide. Answers in the Ella’s Bubbles Support Center are compiled from real conversations with tub owners, our technicians’ notes and the product documentation, then reviewed by our team. Tub models and options have evolved over the years, so a detail here may differ slightly from your exact tub. If something looks different on yours, send us your serial number and a specialist will confirm it for your model.
Did this solve your question?
If not, open a ticket and our team will pick it up from here.
Open a Support Ticket Videos