


L-Shape Transfer Door Pins Do Not Line Up or the Striker Plate Is Loose: Pin Adjustment and Replacement
Updated October 2026
When the transfer door pins do not line up, or the striker plate on your Transfer tub is loose, the fix is usually simple. The L-shape outward-swing door on Ella's Bubbles Transfer tubs is held shut by a two-latch gear-and-shaft lock: turning the handle drives two tapered pins out of the door and into the striker on the tub frame, and with the handle fully locked each pin should extend about 1 1/2 inches. When one pin sits noticeably shorter than the other, the pins have usually skipped a gear inside the door, and the bottom pin can be adjusted on its own. When the striker plate itself is loose because its weld is separating, the team reviews photos and ships a replacement as a warranty part, and the leveling legs should be checked at the same time.
How the Two-Latch Lock Works
The Transfer family (Transfer26, Transfer30, Transfer32, Transfer60 and TransferXXL) uses an aluminum L-shape door that swings outward and opens to 172 degrees. The handle sits on the front of the door and turns clockwise to close. Inside the door, gears on a shaft move two oversized, tapered pins into the jamb. Because the pins are tapered, the first part of the handle travel needs only light pressure, and the last part of the travel presses the door evenly into the integrated gasket. The seal is just as tight when the tub is empty as when it is full, which is why the door should never be opened until the tub has completely drained. Everyday use of this door is covered in our guide to operating the L-shape Transfer door.

This short support clip shows the L-shape transfer door mechanism and how the handle assembly mounts to the door. It is the clip the team sends along with a replacement handle or mounting assembly, so you can see how everything fits together before you start.
Symptom Map
- One pin is shorter than the other when the handle is locked. The pins have most likely skipped a gear. Measure both pins with the door open and the handle in the locked position. They should both extend about 1 1/2 inches. Adjust the bottom pin individually as shown in the video below, then recheck both.
- The door closes but water seeps at one end. Uneven pin travel or a door that is sitting slightly low can leave one end of the gasket under less pressure. Check the pins first, then the leveling legs. Our door leak checklist walks through the rest.
- The striker plate wobbles or shows a crack at the weld. Photograph it and open a ticket. A striker plate with a failing weld is replaced as a warranty part once the team has reviewed the photos.
- The handle has worked loose from the door. The mounting nut on the inside of the door may have loosened and dropped. It is usually still inside the door cavity. The team can send a replacement mounting assembly with a door handle so you have the parts on hand.
- The handle was refitted and now the door will not seal. On outward doors the handle must be installed in the correct orientation: facing away from the hinges when unlocked and toward the hinges when locked. Our door latch and handle guide covers handle installation.
Adjusting the Bottom Pin
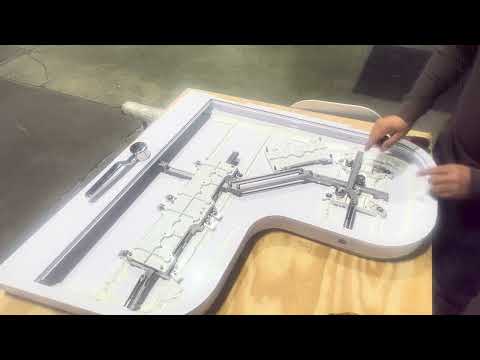
The video walks through adjusting the bottom pin of the L-shape door on its own. In summary:
- Open the door fully and turn the handle to the locked position so both pins are extended.
- Hold a tape measure next to each pin. The target is about 1 1/2 inches of travel on both.
- Following the video, adjust the bottom pin until it matches the top pin, then return the handle to the unlocked position.
- Close and lock the door, fill the tub to a normal bathing level and watch the gasket line for 20 minutes. This is the same watertight test the installer signs off on during warranty activation.
- If you send photos to the team, include the tape measure in the frame so the pin travel is easy to read.
Striker Plate with a Failing Weld
If the weld holding the striker plate is coming apart, the plate no longer gives the pins a firm surface to press against and the gasket will not compress evenly. Send clear photos through ellasbubbles.com/support. Once the defect is verified, the replacement plate ships to the original customer address under the Lifetime Limited Warranty. Labor for fitting the part is not covered, so plan on having your installer or a handy helper do the swap. Our article on the parts-only warranty and labor explains how that works.
Two practical points come up on almost every striker plate case:
- Re-level first. A door that is sitting a little low, usually because a leveling leg is no longer firmly on the floor, can cause or worsen the stress on the striker plate. Every Ella tub has at least six leveling legs and every one of them must sit solidly on the floor with no gap. Misleveling is the number one cause of door leaks and it voids the door warranty, so check the legs before and after the new plate goes on. The walk-in tub leveling guide shows the full procedure.
- The nuts are reached from inside the front apron. The striker plate is secured with nuts that are accessed by removing the front apron. If baseboard or trim was installed over the apron, that trim has to come off first. Removing trim is the installer's responsibility, so contact whoever finished the bathroom and ask them to open up the apron before the part arrives.

Chapters in this video
- 0:00 Door Rubbing the Jamb The video explains that a door rubbing the jamb indicates the tub is bowed down.
- 0:33 Ensuring Tub is Level Ella's Bubbles tubs have at least six leveling legs that must be solidly on the ground to prevent leaks.
- 0:47 Making Final Adjustments Each leg is adjusted to rest firmly on the floor, and careful measurements are taken to achieve a level tub.
The alignment video explains what to do when a door rubs the jamb or sits low. The tub is usually bowed down slightly in the middle, so the fix is to raise the center by extending the center leveling leg until the door frame opens up and the door clears the jamb. Then confirm every leg is firmly on the floor, take measurements on all sides of the tub, and adjust until the tub is level and the door closes smoothly into a watertight seal. Watch: Ellas Bubbles: Proper Door Alignment with chapters and a full transcript.
Related Guides
- Water Drips Through the Striker Plate Pin Hole: Is a Part Missing?
- Can the L-Shaped Door on a Transfer Tub Be Removed for Cleaning?
Common Questions
Why is one of the pins on my transfer door shorter than the other?
How far should the door pins extend when the handle is locked?
Can the pins skip a gear?
The striker plate weld is coming apart, is that covered?
Baseboard trim covers the front apron, how does anyone reach the striker plate nuts?
The door suddenly needs a lot of force to close. Is that the pins?
Do I need a new door if the lock is not sealing?
What should I include when I open a ticket about the door?
For anything specific to your model or serial number, open a ticket at ellasbubbles.com/support or call (800) 480-6850, and please attach photos so the team can help you quickly.
About this guide. Answers in the Ella’s Bubbles Support Center are compiled from real conversations with tub owners, our technicians’ notes and the product documentation, then reviewed by our team. Tub models and options have evolved over the years, so a detail here may differ slightly from your exact tub. If something looks different on yours, send us your serial number and a specialist will confirm it for your model.
Did this solve your question?
If not, open a ticket and our team will pick it up from here.
Open a Support Ticket Videos