


Installing the 2-Piece and 5-Piece Fast-Fill Faucets and Hand Shower
Updated September 2026
Fast-fill faucet installation on an Ella walk-in tub is a four-step job for the 5-piece set and simpler still for the 2-piece single-lever set. Your faucet ships with the tub and the deck is pre-drilled for it, but the supply lines are never connected when the tub leaves our facility, so your installer completes the mounting and connects the two included supply lines on site. This article gives the cut-out sizes, the installation sequence, and the hand shower details so the job goes smoothly.
Is the Faucet Installed When the Tub Ships?
The faucet set is included with the tub, and the deck is pre-drilled for it, but the supply lines are never connected in shipping so the tub can travel fully drained. Depending on your order, the faucet components may arrive seated loosely in the deck or packed with the tub, and either way the installer finishes the mounting using the steps below. If you would rather use a different faucet, the tub can be ordered without the Ella faucet; on a tub ordered that way, your installer drills the deck holes for the fixture you supply. If you are still choosing, our 2-piece versus 5-piece faucet comparison lays out the differences.
Deck Cut-Out Sizes
The Ella faucets are designed to be installed through a 2-1/2 inch diameter hole for the faucet body, a 1/3 inch diameter hole for the mounting rods, and a 7/8 inch diagonal hole for the hand shower. These are the dimensions to use if your installer is drilling a deck for an Ella faucet.
Installing the 5-Piece Fast-Fill Faucet

Chapters in this video
- 0:00 Install Hot Water Faucet The technician installs the hot water faucet, ensuring the set screws are flush and the washers are in place before tightening.
- 0:52 Install Cold Water Faucet The technician installs the cold water faucet, making sure the set screws are flush and the washers are correctly positioned.
- 1:21 Install Diverter Valve The technician installs the diverter valve, ensuring the set screws are flush and the gaskets are placed correctly before tightening.
- 2:01 Connect Faucet Lines The technician connects the hot and cold faucet lines to the diverter, checking for silicone washers and tightening connections.
- 2:49 Connect Supply Lines and Spout The technician connects the hot and cold supply lines and the main spout, applying silicone under the spout base to prevent leaks.
- 4:01 Install Hand Shower Receptacle The technician installs the hand shower receptacle and connects the hand shower line to the diverter valve.
- 4:53 Attach Handles and Caps The technician attaches the diverter, hot, and cold handles, setting them appropriately, and then adds the color and silver caps.
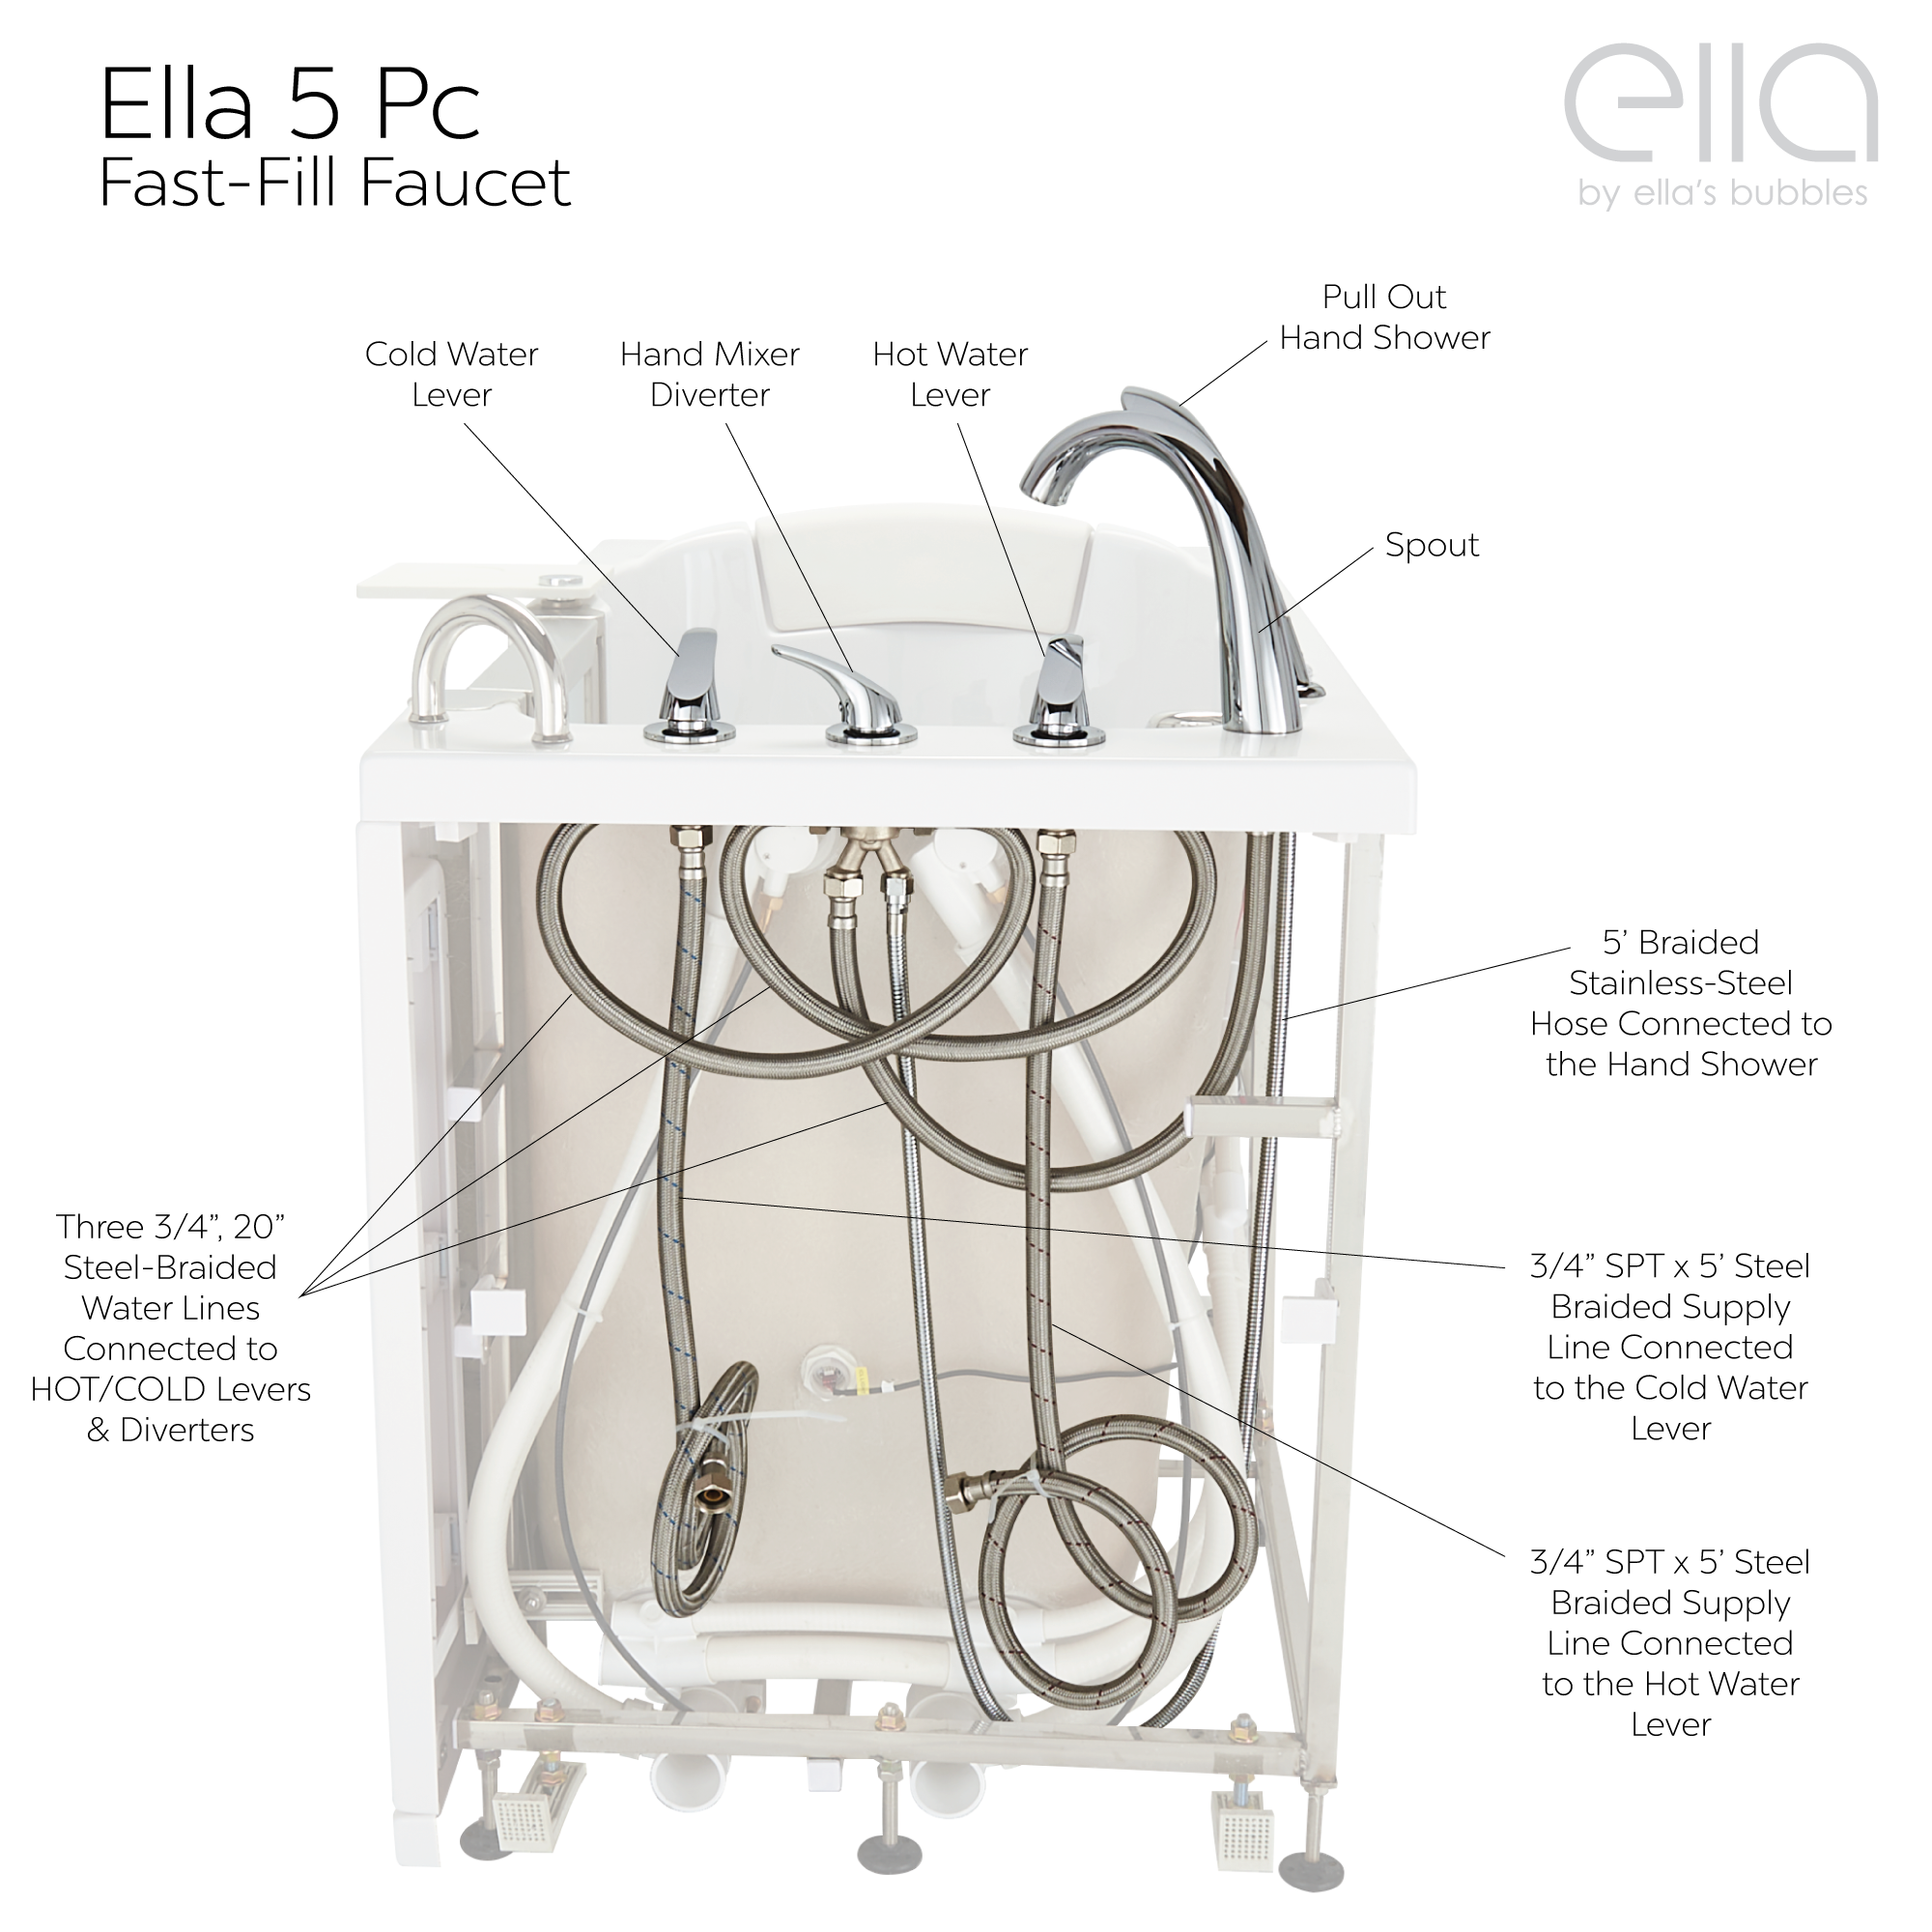
The 5-piece set has a red hot handle, a blue cold handle, a spout, a diverter lever, and the pull-out hand shower mixer. The video above shows the installation, which follows four steps:
- Lever. Remove and reseat the steel washer and rubber gasket, then secure the two nuts from below the deck.
- Spout. Seat the gasket above the deck and tighten the washer nut below.
- Hand mixer. Secure the hand shower base with the plastic nut below the deck.
- Supply lines. Connect the hot and cold supply lines to the faucet and to your shut-off valves.
In use, moving the middle diverter lever toward OFF and pushing the faucet lever down sends water to the pull-out hand shower.
Installing the 2-Piece Fast-Fill Faucet

Chapters in this video
- 0:00 Install Two-Piece Faucet Unit The technician inserts the two-piece faucet unit into the pre-drilled hole, ensuring the gasket is seated correctly.
- 0:18 Secure Faucet with Locking Plate The technician installs the metal locking plate and foam gasket, then hand screws and tightens the attachment bolts and locking nuts.
- 0:43 Connect Hot and Cold Supply Lines The technician attaches the hot and cold supply lines, ensuring the gaskets are seated correctly and tightening them with a wrench.
- 1:10 Install Hand Shower Receptacle The technician places the hand shower receptacle into its pre-drilled hole, ensuring the gasket is seated correctly, and tightens the locking nut.
- 1:32 Attach Shower Hose Line The technician threads the shower hose line through the receptacle, attaches the adapter nut to the brass connector, and tightens it with a wrench.
The 2-piece set is a solid brass single-lever faucet with a diverter button under the spout and a separate pull-out hand shower. It uses the same deck holes and the same supply lines. Lift the lever for on, move it left for hot and right for cold, press the diverter button to switch between spout and hand shower, and push the lever down for off. It is available in chrome or brushed nickel. Watch: Ellas Bubbles: Two Piece Fast-Fill Faucet Set Installation video with chapters and a full transcript.
Supply Lines and Tightening
Both faucet sets include two 3/4 inch by 5 foot braided stainless steel supply lines. Shut-off valves are not included, so have your plumber place accessible shut-offs close to the tub. Hand-tighten the connections and snug them gently; never over-torque the supply lines, because over-torquing damages the internal gasket and can cause a leak. Fill rates of 18 GPM for the 5-piece and 16 GPM for the 2-piece are designed at 60 PSI with ideal in-home plumbing, and our supply lines and shut-off valves article explains how house pipe size and pressure affect them. The size of your water heater matters just as much for a comfortable fill; see hot water heater requirements.
The Hand Shower and Wall Mounting

The pull-out hand shower has five flow settings on a dial, is limited to 1.9 GPM, and rides on a 5 foot retractable braided stainless hose with a backflow prevention valve. If you plan to mount the hand shower on the wall, the hose extension kit shown above is required. The printed instructions are direct about it: do not attach the hand held shower to the wall unless you have an extension hose with a barrel protection, because water can otherwise drip through the deck insert hole and leak behind the tub. The kit adds a 5 foot extension hose and a stainless steel barrel that plugs the deck hole. The step-by-step fitting of the kit is covered in our hand shower hose and diverter article, and the wall slider bar in hand shower slider bar installation.
Related Guides
- Where Does the Pull-Out Hand Shower Hose Connect Under the Deck?
- Buying a Fast-Fill Faucet Set or Valve Body on Its Own: Specs, Finishes and Deck Hole Size
- Choosing a Shower Valve and Cutting the Valve and Shower-Head Openings
- Hairline Lines Around a Hole Cut in the Tub Deck: Why They Appear and Why They Do Not Spread
- How to Get Installation Instructions and Spec Sheets for Your Ella Fast-Fill Faucet
- Does the Ella Faucet Meet ASSE 1014 Backflow Requirements for the Hand Shower?
If your tub arrived with an empty opening in the deck and you are wondering whether a part was left off, see There Is an Open Hole in the Deck of My New Tub: That Is Where the Spout Installs.
Common Questions
What are the deck cut-out sizes?
How do I install the 5-piece set?
What supply lines are included?
My installer cannot find a fitting to match the faucet connections. Are they metric?
What thread size is the hand shower?
Can I use my own faucet instead of the Ella faucet?
Can I add a rain shower later?
Why is the fill slower than the rated 16 or 18 GPM?
Which finishes are available for the 2-piece fast-fill faucet?
Have a question that depends on your exact model or configuration? Open a ticket at ellasbubbles.com/support or call (800) 480-6850 and our technical support team will be glad to help you and your installer.
About this guide. Answers in the Ella’s Bubbles Support Center are compiled from real conversations with tub owners, our technicians’ notes and the product documentation, then reviewed by our team. Tub models and options have evolved over the years, so a detail here may differ slightly from your exact tub. If something looks different on yours, send us your serial number and a specialist will confirm it for your model.
Did this solve your question?
If not, open a ticket and our team will pick it up from here.
Open a Support Ticket Videos