


Do walk-in tubs leak, and how is the door sealed?
Updated September 2026
A properly installed and leveled Ella walk-in tub does not leak. The door closes against a soft silicone gasket that compresses into a watertight seal when the door is latched, inward-swing doors are pressed tighter into that seal by the water itself, and outward-swing doors are drawn shut by a gear and shaft locking mechanism. When water does show up on the bathroom floor, the cause is almost always correctable, and it is most often a leveling leg that has lost contact with the floor rather than a failed seal, as What Is the Door Seal on a Walk-In Tub? explains.
How the Door on a Walk-In Tub Is Sealed
Every Ella walk-in tub door, inward-swing or outward-swing, closes against a silicone gasket, also called the door seal, that runs around the door opening. When you close and lock the door, the latch draws the door into the frame and the gasket compresses against it. The seal needs two things to work: a clean surface to press against, and a rest when the tub is idle, which is why the door should be left open or unlocked whenever the tub is not in use.
- Leveling does half the work. On a level tub the latch draws the door evenly into the frame and the silicone compresses the same amount all the way around. A frame that has twisted because one leg lost contact with the floor no longer meets the seal evenly.
- Inward-swing doors use the water. As the tub fills, the water presses the door into the seal, which is also why an inward-swing door will not open until the tub has drained.
- Outward-swing doors use a gear and shaft lock. The first video shows the mechanism: the U-shape outward door, made of PVC composite and tempered glass, has a three shaft gear and lock system, and the extra wide L-shape door has a two shaft gear and lock system. Both handles are easy to engage and disengage, and the mechanism pulls the door tight against the gasket for a leak-proof seal.
- Each door has its own seal size. A replacement gasket is matched to your model and serial number, so there is no universal seal to buy.
Before the tub is handed over, your installer confirms a watertight seal after a 20 minute fill as part of the warranty activation checklist. New seals sometimes arrive stuck or slightly flattened from shipping. That is normal, and squeezing the seal with your fingertips and pulling it away from the door frame restores its shape.
Why a Door Leaks, and What to Check in Order
Water at the door does not mean the gasket has failed. Work through these checks before assuming the seal needs replacing.
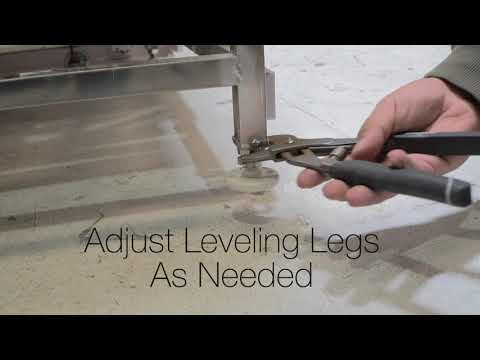
- Level and leg contact. Confirm the tub is level and every leveling leg carries weight, with no gap under any leg. The number one cause of a door leak is leveling, not the gasket.
- Seal shape. If the seal was flattened in shipping, squeeze it with your fingertips, pull it away from the frame to reshape it, then wipe it with rubbing alcohol.
- Weight on the door. Never lean on the door or use it as a handhold. The warranty on the door and seal depends on the alignment staying as it was set at installation and not being changed by a bather's weight on the door.
- The latch. If the door cannot be pulled tight, look at the latch. A cracked hard plastic receiver or a worn silicone latch cover lets the handle slip out of its locked position, and the fix is a replacement latch assembly, not glue and not a new door. Why Did the Plastic Door Latch Crack and Why Won't the Door Seal Now? tells you which pieces to photograph.
- Retest. After the adjustments, fill to the seat and watch for 20 minutes to see whether the door is watertight.
Water That Is Not a Door Leak
Some of the water blamed on walk-in tub doors comes from somewhere else entirely. Three sources are worth ruling out before you open a ticket.
- Water behind or under the tub near the hand shower. The pull-out hand shower normally rests in a base on the tub deck, with its hose dropping through a deck insert hole to the faucet below. If the handset is lifted to a wall mount without the wall attachment and water leak elimination kit, water drips down through that hole to the space behind the tub, where you cannot see it. The kit is a 5 foot extension hose with a stainless steel barrel connector that plugs the hole, and What Is a Barrel Extension Hose (Leak Elimination Kit) on a Walk-In Tub? gives the five installation steps. This is a common fix that avoids a service call.
- Seepage at a push control button. The second video shows the leak prevention procedure for a push control: remove the button collar carefully with a flat edge so the tub surface is not scratched, lift out the collar and the button, run a thin bead of silicone caulk around the rubber gasket and smooth it for complete coverage, replace the button, snap the collar back on, and clean any excess with denatured alcohol.
- Spray on the floor while showering. A walk-in tub is open on top, so a hand shower aimed toward the room, or jets running above the waterline, sends spray onto the floor. Keep the hand shower below deck height and aimed at the tub wall, fill until the water covers every jet before switching on any therapy, and consider the 4 fold glass screen, which keeps water in only when its bottom gasket brushes the tub deck. Why Does Water Spray Out of the Tub When I Use the Hand Shower? covers screen placement.
Door Leaks on Clearance Tubs
One group of tubs is sold with a known door leak. A clearance unit labeled Handyman Special is sold as is because its door leak is a manufacturing defect that cannot be repaired or covered, and it is meant for shower style use with a shower screen, where the door never needs to hold water. Every other clearance tub is fully working with cosmetic blemishes, so its door should seal, and a leak on one of those calls for the same leveling and seal checks described above. My Clearance Tub Was Sold With a Door Leak. Can It Be Fixed? explains how to read your listing.
Keeping the Seal Watertight for the Long Run
- Leave the door open or unlocked between baths so the silicone can rest.
- Clean the seal with a soft cloth and rubbing alcohol, never abrasives.
- Keep every leveling leg touching the floor. A leg that loses contact can warp the frame and throw the door out of alignment.
- The door seal is covered by the Lifetime Limited Warranty and has no scheduled replacement interval.
When a replacement is warranted, the team ships one after a support ticket with your serial number and clear photos of the seal and the leak point. Ella ships the part rather than sending a technician. Note whether all leveling legs touch the floor, then open a ticket at ellasbubbles.com/support or call (800) 480-6850.


Chapters in this video
- 0:00 Remove Button Collar A technician carefully removes the button collar with a flat edge, taking care not to scratch the tub surface.
- 0:12 Apply Silicone Caulk A thin bead of silicone caulk is applied around the rubber gasket and smoothed to ensure complete coverage.
- 0:28 Replace Button And Collar The button is replaced, and the collar is snapped back on, then excess silicone is smoothed away.
Watch: Leak Prevention Push Control System for Walk-In Tubs | Ella’s Bubbles with chapters and a full transcript.
Related Guides
- Caring for Your Door Seal: Cleaning, Reseating, and Replacing the Gasket
- Why Does the Door Gasket Pop Out Every Time I Shut the Door?
- Water Leaking From the Door Handle Screws: Reseal the Screws Before Replacing the Door Seal
Related Videos

Chapters in this video
- 0:00 Clean Your Door Seal Regularly The video explains how to clean the door seal and frame to prevent leaks and debris buildup.
- 0:38 Replacing a Loose Door Seal The video demonstrates how to replace a loose or damaged door seal by applying a thin bead of silicone to the gasket channel.
- 1:02 Adding Silicone to Inward Doors The video shows how to add a bead of silicone to the corner of the gasket where it meets the frame on inward swing doors.
- 1:23 Extend Gasket Life The video recommends leaving the walk-in tub door slightly open when not in use to extend the gasket's flexibility and life.

Chapters in this video
- 0:00 Door Rubbing the Jamb The video explains that a door rubbing the jamb indicates the tub is bowed down.
- 0:33 Ensuring Tub is Level Ella's Bubbles tubs have at least six leveling legs that must be solidly on the ground to prevent leaks.
- 0:47 Making Final Adjustments Each leg is adjusted to rest firmly on the floor, and careful measurements are taken to achieve a level tub.
Chapters in this video
- 0:00 Leveling Legs Are Critical Many Ella's Bubbles walk-in tubs have up to eight leveling legs to evenly disperse weight and ensure proper function.
- 0:14 Secure Each Foot The technician checks if each foot is securely on the ground, as an unsealed door could leak.
- 0:28 Check Tub Levels The technician checks levels on all sides of the tub to ensure all feet sit securely on the floor.
- 0:41 Proper Door Alignment Proper leveling assures correct door alignment and closure for your walk-in tub.
Common Questions
Do walk-in tub doors start leaking as they age?
Why will my inward-swing door not open while the tub is full?
Is the door seal covered under the Ella warranty?
What should I check first if I see water at the door?
Why is there water behind the tub near the hand shower?
Can a leaking door on a clearance tub be fixed?
About this guide. Answers in the Ella’s Bubbles Support Center are compiled from real conversations with tub owners, our technicians’ notes and the product documentation, then reviewed by our team. Tub models and options have evolved over the years, so a detail here may differ slightly from your exact tub. If something looks different on yours, send us your serial number and a specialist will confirm it for your model.
Did this solve your question?
If not, open a ticket and our team will pick it up from here.
Open a Support Ticket Videos