


Pourquoi un bouton-poussoir de plage ne fait-il rien sur ma baignoire à porte ?
Mis à jour Octobre 2026
Un bouton-poussoir de plage qui ne réagit pas relève presque toujours d'un problème de signal pneumatique, et non d'une panne électrique au niveau du bouton. Chaque bouton chromé envoie une bouffée d'air dans un fin tuyau jusqu'au boîtier de commande. Un bouton inactif signifie généralement qu'un tuyau s'est débranché ou qu'un disjoncteur GFCI a sauté sur le circuit de cette fonction. Plus rarement, la pompe ou le relais associé est en cause. Lorsqu'un seul bouton est concerné, le moyen le plus rapide d'identifier l'origine est décrit dans Un bouton-poussoir ne fait rien alors que les autres fonctionnent : vérification du disjoncteur et test d'inversion des tuyaux. Cette page replace ce test dans le contexte de toutes les autres vérifications, dans l'ordre qui vous fera gagner le plus de temps.
Pourquoi Un Bouton-Poussoir Peut Rester Inactif Sans Être Défectueux
Les boutons-poussoirs Ella sont pneumatiques. Aucune électricité ne circule dans le bouton lui-même. Appuyer sur le bouton pousse l'air dans son tuyau jusqu'au boîtier de commande, où un relais s'enclenche et met en marche la pompe correspondante ou l'éclairage. Le boîtier de commande bleu est vissé au châssis sous le siège ; il comporte trois tuyaux d'air de 3/8 de pouce, trois prises d'alimentation et une LED verte. Les étiquettes des ports sur la face blanche du boîtier indiquent quel tuyau correspond à quel bouton. Airswitch Pump #1 correspond au bouton d'eau, Blower/Airswitch Pump #2 au bouton d'air, et Light Airswitch au bouton d'éclairage.
Comme le signal n'est que de l'air, un bouton peut être en parfait état alors que son tuyau s'est détaché à l'une ou l'autre extrémité. C'est une bonne nouvelle, car la solution la plus courante consiste simplement à rebrancher un tuyau. Le fonctionnement de base du système est expliqué dans Que sont les commandes à effleurement (boutons Easy-Touch) sur une baignoire à porte ?.
Écartez Le Fonctionnement Normal Avant D'ouvrir Quoi Que Ce Soit
Plusieurs situations ressemblent à un bouton inactif sans être des pannes. Passez en revue les points suivants, baignoire remplie.
- Testez avec de l'eau dans la baignoire. Remplissez jusqu'à ce que l'eau se trouve au moins 1 pouce au-dessus des jets les plus hauts. N'appuyez jamais sur un bouton de pompe dans une baignoire vide : un fonctionnement à sec provoque des dommages irréversibles qui ne sont pas couverts.
- Vérifiez que la baignoire est équipée de ce système. Une baignoire ne possède que les boutons des thérapies dont elle a été équipée à la fabrication, et certains modèles Transfer et anciens sont livrés avec des boutons non étiquetés, ce qui est normal. Water correspond à l'hydromassage, Air à l'air, Micro aux microbulles et Light à la LED. La légende complète se trouve dans À quoi sert ce bouton sur ma baignoire à porte ?.
- Le bouton lisse est une molette, pas un interrupteur. Sur une baignoire hydromassante, la molette non étiquetée règle l'intensité. Elle n'a aucun effet tant que la pompe hydro ne tourne pas.
- Le bouton d'air fait défiler les vitesses. La première pression correspond à la vitesse rapide, la deuxième à la vitesse moyenne, la troisième à la vitesse lente, et la quatrième arrête le massage à air. Une pression qui semble sans effet n'a peut-être fait que changer la vitesse.
- Le bouton d'éclairage a trois comportements. Une pression lance le défilement complet des couleurs, des pressions répétées sélectionnent une couleur précise, et un appui de deux secondes éteint l'éclairage. La vidéo sur les commandes à effleurement montre chacune de ces pressions sur une baignoire en état de marche.
- Appuyez doucement. Les boutons ne demandent qu'une légère pression de la paume de la main. Appuyer trop fort peut endommager le mécanisme interne.
Associez Le Symptôme À La Cause Probable
- Rien ne répond sur la baignoire. Le problème vient de l'alimentation, pas d'un bouton. Réarmez d'abord le disjoncteur dédié et le GFCI.
- Un bouton est inactif alors que les autres fonctionnent. Les pompes ne sont pas toutes sur le même circuit. La pompe du massage des pieds, par exemple, est sur un disjoncteur distinct des autres pompes. Les jets d'air et l'éclairage peuvent fonctionner alors que les jets des pieds restent inactifs, simplement parce qu'un GFCI a sauté. Réarmez le GFCI et le disjoncteur de ce circuit, puis passez aux vérifications des tuyaux ci-dessous.
- Le bouton reste enfoncé après la pression. Il s'agit d'un blocage d'air, pas d'une pièce cassée. Débranchez son tuyau au niveau du boîtier de commande pour que le bouton remonte, puis rebranchez le tuyau.
- La baignoire vient d'être installée et ses boutons ne font rien. Sur les plateformes Standard et Zen, le raccordement du tuyau d'air traverse la coque et est fixé par un contre-écrou. Il doit être serré et son fonctionnement vérifié avant la fin de l'installation : un raccord mal serré à cet endroit est une cause fréquente sur une baignoire neuve.
- C'est le bouton d'ozone (O3) qui est inactif. Les baignoires avec ozone comportent deux relais similaires sur le boîtier de commande, un pour l'éclairage LED et un pour l'ozone, ce qui permet de les comparer directement. L'inversion des tuyaux entre les deux est expliquée dans Le bouton ozone (O3) ne fait rien : vérifier le clic du relais, le tuyau d'air et inverser les relais pour tester.
Écoutez Le Clic Du Relais
Sous tension, appuyez sur un bouton qui fonctionne et repérez le léger clic provenant du boîtier de commande. Appuyez ensuite sur le bouton inactif et écoutez si le même son se produit. Un clic signifie que le relais commute : le signal pneumatique arrive donc bien et le problème se situe plus loin. L'absence de clic signifie que le signal pneumatique n'atteint pas le relais, le plus souvent parce qu'un tuyau n'est pas enfoncé à fond. Cette simple observation est aussi l'information la plus utile à transmettre à l'équipe d'assistance : notez-la.
Fixez Le Tuyau Aux Deux Extrémités
Coupez le disjoncteur GFCI qui alimente la baignoire avant de manipuler les raccordements. Le grand panneau d'accès est maintenu par des aimants ; un couteau de table glissé derrière le bord suffit à le décoller. Repérez le boîtier de commande bleu et suivez le tuyau depuis le port du bouton inactif.
La vidéo sur les raccordements montre cette réparation du début à la fin. Un technicien y explique que lorsqu'un massage ne fonctionne pas, il n'y a le plus souvent aucune liaison entre la commande à effleurement et le boîtier de commande. Soit le tuyau d'air n'est pas branché, soit il est défectueux. La vidéo montre ensuite la fixation des deux extrémités :
- Au niveau du boîtier de commande. Enfoncez fermement le tuyau sur l'embout en tournant et en poussant en même temps pour qu'il s'emboîte complètement.
- Au niveau du bouton, retirez le capuchon. Glissez un tournevis plat fin sous le capuchon du bouton, utilisez-en un second si nécessaire, et faites le tour jusqu'à ce que le capuchon se détache.
- Accédez au raccordement. Retirez la pièce noire située derrière le capuchon. L'écrou de blocage et le tuyau sont alors accessibles.
- Rebranchez et remontez. Si le tuyau est débranché, rebranchez-le et fixez-le. Remettez la pièce noire dans son logement, puis replacez le bouton et la bague chromée qui le maintient.
Rétablissez l'alimentation, remplissez la baignoire au-dessus des jets si vous testez un bouton de pompe, et appuyez de nouveau sur le bouton en écoutant le clic.
Utilisez Le Test D'inversion Des Tuyaux Pour Repérer Le Côté Défectueux
Si le tuyau est bien enfoncé aux deux extrémités et que le bouton reste inactif, inversez deux tuyaux sur le boîtier de commande. Débranchez le tuyau du port du bouton inactif et celui du port Light Airswitch, puis branchez chacun sur l'autre port. Appuyez sur le bouton Light : il doit désormais démarrer la pompe correspondant au bouton inactif. Appuyez sur le bouton inactif : il doit désormais allumer la LED. Remettez les deux tuyaux sur leurs ports d'origine une fois le test terminé.
- Si le bouton d'éclairage démarre la pompe mais que le bouton inactif n'allume toujours pas la LED, le problème se situe du côté du bouton. Il vient soit du bouton lui-même, soit du tuyau entre le bouton et le boîtier.
- Si le bouton inactif allume la LED mais que le bouton d'éclairage ne démarre pas la pompe, le bouton et le tuyau sont en bon état. Le problème vient de la pompe, de son branchement au boîtier, ou du boîtier lui-même.
Une précaution s'impose ici. La pompe à eau ne doit jamais tourner à sec. Si elle démarre pendant le test, appuyez immédiatement de nouveau sur le bouton, ou remplissez la baignoire au-dessus des jets avant de commencer. La pompe à air, elle, peut tourner à sec sans risque.
Quand Ouvrir Un Ticket Et Quoi Y Indiquer
Si ces vérifications ne remettent pas le bouton en service, ouvrez un ticket sur ellasbubbles.com/support ou appelez votre revendeur Ella ou l'équipe au (800) 480-6850. Indiquez les éléments suivants :
- le nom de votre modèle
- les détails de votre commande chez le vendeur
- quel bouton est concerné
- si vous entendez un clic du boîtier de commande lorsque vous appuyez dessus
- le résultat du test d'inversion des tuyaux, qui indique à l'équipe exactement quelle pièce envoyer
Les pièces de rechange sont expédiées sous garantie, et la main-d'œuvre est assurée par un plombier ou un électricien agréé local. Dans le cas inverse, si une commande refuse d'arrêter sa fonction, Comment arrêter les jets en cas d'urgence ? explique comment couper toute l'alimentation aux disjoncteurs GFCI dédiés de la baignoire.

Chapitres de cette vidéo
- 0:00 Comprendre les raccordements du signal pneumatique Le technicien explique comment la commande à poussoir envoie un signal pneumatique au boîtier de commande par l'intermédiaire d'un tuyau d'air.
- 0:51 Bien fixer les raccordements du boîtier de commande Le technicien montre comment enfoncer fermement le tuyau d'air sur l'embout du boîtier de commande.
- 1:03 Vérifier le raccordement du bouton Le technicien montre comment extraire le bouton de son logement à l'aide d'un tournevis plat.
- 1:21 Bien fixer le raccordement de la pompe Le technicien sort la pièce noire de la pompe et fixe le raccordement avec l'écrou de blocage et le tuyau.
- 1:40 Remonter le bouton Le technicien remet la pompe et le bouton en place et les fixe avec la bague chromée.
À regarder : Comment sécuriser les raccords d'air et hydro de votre baignoire à porte | Ellas Bubbles, avec chapitres et transcription complète.

Chapitres de cette vidéo
- 0:00 Commandes à bouton-poussoir ou pavé tactile numérique Les baignoires à porte Ella's Bubbles vous laissent le choix entre des commandes marche/arrêt à bouton-poussoir et un pavé tactile numérique, pour un bain en toute simplicité.
- 0:45 Régler le massage à air avec le pavé tactile L'icône de bulles d'air du pavé tactile numérique active le massage à air, et les boutons plus et moins en règlent l'intensité.
- 1:21 Les fonctions de la chromothérapie La chromothérapie fonctionne de la même façon avec les deux types de commandes : défilement des couleurs ou sélection d'une teinte précise.
À regarder : Baignoire à porte avec commandes à poussoir et pavé tactile numérique pour un bain simple et sans effort | Ella’s Bubbles, avec chapitres et transcription complète.
Guides Associés
Vidéos Associées

Chapitres de cette vidéo
- 0:00 Commandes à bouton-poussoir pneumatique La vidéo présente le fonctionnement des commandes à bouton-poussoir, qui utilisent la pression pneumatique et un tube de raccordement rouge.
- 0:32 Activation du relais Une pression sur le bouton crée une pression pneumatique qui active le relais à l'intérieur du boîtier de commande.
- 1:05 Éliminer un bouchon d'air La vidéo montre comment éliminer un bouchon d'air en débranchant le tube rouge du boîtier de commande.
- 1:20 Rebrancher le tube Une fois le tube rebranché, une pression sur le bouton doit produire un déclic audible provenant du boîtier de commande.
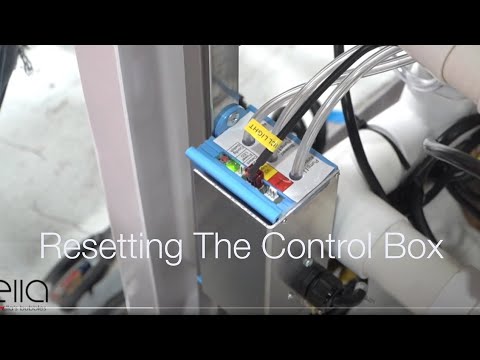
Chapitres de cette vidéo
- 0:00 Couper l’alimentation électrique principale La vidéo commence par montrer comment couper l’alimentation électrique principale du boîtier de commande ; le voyant LED vert s’éteint alors.
- 0:13 Débrancher tous les raccordements de fonctions Le technicien débranche tous les raccordements de fonctions du boîtier de commande, en recommandant de repérer chaque connexion avant de la retirer.
- 0:38 Débrancher les pompes à air et à eau Le technicien débranche tous les raccordements électriques des pompes à air et à eau dont la baignoire peut être équipée.
- 0:59 Repérer et appuyer sur le bouton de configuration Le technicien repère le bouton de configuration sur le boîtier de commande et appuie dessus jusqu’à ce que le voyant LED vert parcoure son cycle de configuration.
- 1:31 Rebrancher les composants de la baignoire Le technicien rebranche tous les composants de la baignoire, y compris les conduites d’air et les câbles électriques, en veillant à ce que chacun soit bien fixé.
- 1:49 Tester toutes les fonctions de la baignoire Le technicien teste toutes les fonctions de la baignoire — air, eau, microbulles et éclairage LED — afin de vérifier leur bon fonctionnement.
Questions Fréquentes
Y a-t-il de l'électricité au niveau du bouton-poussoir sur la plage de la baignoire ?
Que signifie l'absence de clic lorsque j'appuie sur le bouton ?
Pourquoi mon bouton-poussoir reste-t-il enfoncé après que j'ai appuyé dessus ?
Pourquoi l'air et l'éclairage fonctionnent-ils alors que les jets pour les pieds restent inactifs ?
Puis-je effectuer le test d'inversion des tuyaux avec la baignoire vide ?
Pourquoi les boutons de ma baignoire tout juste installée ne réagissent-ils pas ?
About this guide. Answers in the Ella’s Bubbles Support Center are compiled from real conversations with tub owners, our technicians’ notes and the product documentation, then reviewed by our team. Tub models and options have evolved over the years, so a detail here may differ slightly from your exact tub. If something looks different on yours, send us your serial number and a specialist will confirm it for your model.
Did this solve your question?
Sinon, ouvrez un ticket et notre équipe prendra le relais.
Ouvrir un ticket d'assistance Vidéos