


Can I upgrade my Ella walk-in tub from push buttons to a digital touchpad?
Updated September 2026
Yes, on a tub with a combination of jetting systems. Ella's team can send a digital control matched to the blue control box on your tub, and it mounts in the deck where two push buttons currently sit, as Where Can the Digital Control Be Mounted and How Is It Installed? explains. The limit is your therapy package: the keypad is offered only on tubs with a combination of jetting systems such as air plus hydro, so a hydro-only tub keeps its push controls and intensity dial unless the tub moves to a dual-jetting package first.
Which Tubs Can Take the Touchpad
The digital keypad runs the air massage and the hydro massage on a dual-jetting tub, and that is the requirement for adding one. A hydro-only tub uses push controls with an intensity dial and cannot be fitted with the keypad. Even on a fully loaded tub the keypad does not control everything. Microbubble therapy and the independent hydro foot massage are built as separate systems and keep their own push buttons, and on new builds the warehouse confirms which functions stay on buttons before work begins. Two-seat tubs with heated seats also carry a separate heat keypad for each seat, independent of the digital controller.
Some models already ship with the touchpad, which is useful context if you are comparing your tub with a neighbor's. It is standard on the Shak, the Big4One and the whole two-seat family, the Tub4Two, Companion, Escape and Big4Two. The Lounger's Air plus Hydro package is digital controller only, and on the Monaco the controller is an add-on that is not always shown on the published listing. What Is the Digital Controller (Touchpad) on a Walk-In Tub? describes how the panel plugs into the display connector on the control box and performs the same functions the push buttons would.
What Changes and What Stays the Same
The therapy systems under the deck are identical either way. Only the way you start, adjust and stop them changes, and the video on this page demonstrates both sets of controls side by side.
| Function | Push controls | Digital touchpad | What it means for you |
|---|---|---|---|
| Air massage | Air button: once for high, a second time for medium, a third time for low, a fourth time to shut off | Touch the air bubble icon once to start, plus and minus to change intensity, hold the icon for two seconds to stop | The touchpad lets you step the speed in either direction instead of cycling through |
| Hydro massage | Water button: one touch starts, one touch stops | Hydro button: press once to start, once again to stop | Same single press on both |
| Jet intensity | Intensity control dial on the deck | Still the intensity control dial on the deck | The dial stays after the upgrade; the touchpad does not replace it |
| Chromatherapy light | Press once for the full range, repeat a single press to select a color, hold two seconds to turn off | Works the same as the push button | No change |
| Microbubble therapy | Own push button | Keeps its own push button | The Micro button remains on the deck |
| Key size and feel | Large buttons, a single gentle push, can be pressed with the palm of the hand | Smaller keys for finer control of the massage settings | Push buttons are recommended for limited hand strength, coordination or vision |
The practical difference is who is bathing. Turning the dial up introduces more air into the jet stream for a stronger flow and turning it down gives a gentler flow, and that dial is unchanged by the upgrade. The keypad suits a bather who wants to nudge the air speed up and down and likes a flat panel, while the standard push buttons remain the better choice for someone who cannot see or press a small key accurately. Digital Keypad or Push Buttons: Which Therapies It Controls and Which Is Easier to Use goes deeper on that choice.
How the Retrofit Is Done
- Send a photo of the labeled side of the blue electrical box under your tub to ellasbubbles.com/support or call (800) 480-6850. Digital controls are matched to the control box, so the team confirms compatibility before anything ships.
- Each control is tested on a matching setup before it is packed, and you receive a tracking number once it ships.
- Choose the mounting spot with your installer. The usual placement is in the deck near the existing push buttons, where the bather reaches it from the seat. The team can send photos of the other placement options on your model, sometimes taken with the door on the opposite side, so mirror the location as needed. If reach is the concern, the keypad can be installed on the front apron so a seated bather can operate it without leaning; this is an added option, so raise it when you order.
- Remove the two push buttons where the control will go. The team has a video showing how to remove buttons from the top of the tub.
- Mark the opening to match the body of the control you received. The team confirms the opening size and sends the written instructions, which are the same for every Ella model.
- Cut the opening with a router and clean up the edges so the control slides in and sits flush. The opening cannot be undone, so dry fit before sealing.
- Route the cable to the blue control box under the tub and plug it into the display connector.
- Run a bead of white kitchen and bath silicone sealant around the control, press it into the opening, wipe away the excess and let the sealant cure before the tub is used.
Ella does not send technicians. Your installer or a local licensed contractor does the cutting and sealing, and the team supports them by phone and email. The second video on this page shows how a touchpad is later swapped as a single part: the old seal is cut, the pad is pried up, the plug is disconnected and reconnected on the new pad, power is restored briefly to test it, the two-sided tape is exposed, and the edges are sealed with white silicone. None of the pumps need to come out for that job.
Before You Decide
- If your buttons are unlabeled, that is normal on Transfer and some legacy tubs and is not a reason to upgrade on its own. What Does This Button on My Walk-In Tub Do? gives the quick key: Water is hydro, Air is the three speed air massage, Micro is microbubble, Light is chromatherapy and the flame is the heated seat.
- Press push buttons gently with your palm. Pressing too hard can damage the mechanism, and gentle operation is often all that a frustrated bather needs.
- The touchpad backlight stays on all the time, which is normal, and a soft damp cloth is all the panel needs for cleaning.
- If a touchpad ever stops responding, start with a control box reset and confirm the cable is seated at the display connector before assuming the panel has failed.
- Never press a pump button on a dry tub while testing new controls. Fill until the water sits at least 1 inch above the highest jets first, because a dry run causes permanent damage that is not covered.
For a ticket, have your model name, your order details from where you purchased, a photo of the labeled side of the blue control box and a photo of your current deck controls. The team confirms whether your therapy package qualifies and which functions will stay on push buttons.
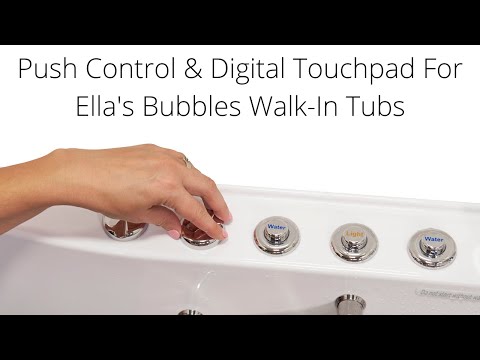
Chapters in this video
- 0:00 Push Controls Versus Digital Touchpad Ella's Bubbles walk-in tubs offer a choice between on/off push controls and a digital touchpad for easy bathing.
- 0:45 Controlling Air Massage With Touchpad The air bubble icon on the digital touchpad activates the air massage, with plus and minus buttons adjusting intensity.
- 1:21 Chromo Therapy Light Functions Chromo therapy light functions the same with both control types, cycling through colors or selecting a specific one.
Watch: Walk-In Tub with Push Controls & Digital Touchpad for Easy, Effortless Bathing | Ella’s Bubbles with chapters and a full transcript.

Chapters in this video
- 0:00 Replacing Your Digital Touchpad This video explains how to replace an Ella's Bubbles walk-in tub digital touchpad.
- 0:12 Removing the Old Touchpad The technician carefully cuts the seal around the old pad and pries it away from the tub.
- 0:44 Connecting the New Touchpad The technician connects the new touchpad and temporarily reconnects power to test its function.
- 1:03 Installing and Sealing the Touchpad The technician removes the backing from the tape, sets the new unit in place, and seals the edges with silicone.
Watch: Ella's Bubbles: Digital Touchpad Replacement with chapters and a full transcript.
Related Guides
- Why Isn't My Digital Control Pad Lighting Up?
- Heated Seat and Back Not Warming Up: Checking the Control Box LED and the Button Prongs
- Why Won't My Chromatherapy Light Turn On?
Related Videos

Chapters in this video
- 0:00 Introduction to Master Control Boxes The video introduces two master control boxes that manage the massage systems and heated seat in Ella's Bubbles walk-in tubs.
- 0:16 First Control Box Connections This section details the connections for the heater pads, air pump, water pump, and the main power input for the first control box.
- 0:41 Control Connectors and Switches The video explains where to connect the push buttons for the water pump, air blower, LED light, and the digital control keypad.
- 1:36 Second Master Control Box The second master control box is presented, showing its connections for the heated seat, air pump, water pump, and main power inlet.
- 1:55 20 Amp Power Connector The video highlights the 20 amp power connector for the second control box and explains how to identify its unique plug.
Common Questions
Can I add a digital touchpad to a hydro-only Ella tub?
Will the touchpad run my microbubble therapy after the upgrade?
Does the digital touchpad replace the jet intensity dial?
Can the touchpad be mounted where I can reach it from the seat?
Is the touchpad better for a bather with arthritis or poor eyesight?
What do I send to find out if my tub qualifies?
About this guide. Answers in the Ella’s Bubbles Support Center are compiled from real conversations with tub owners, our technicians’ notes and the product documentation, then reviewed by our team. Tub models and options have evolved over the years, so a detail here may differ slightly from your exact tub. If something looks different on yours, send us your serial number and a specialist will confirm it for your model.
Did this solve your question?
If not, open a ticket and our team will pick it up from here.
Open a Support Ticket Videos