


How do I install the drain assembly on a walk-in tub?
Updated October 2026
On an Ella walk-in tub you do not install the drain assembly yourself. The gravity drain body is fitted at the factory, the tub arrives with its drain in place and open ports, and your plumber's job is to connect those ports to the house drain line. The pieces you or your plumber handle on site are the floor drain stopper, the drain handles with their emergency chain, and the vent assembly, and Replacing Drain Elbows, Nuts, Gaskets, Drain Covers and Plunger Parts on a Walk-In Tub lists what ships when one of those pieces later needs replacing.
What Arrives Already Installed
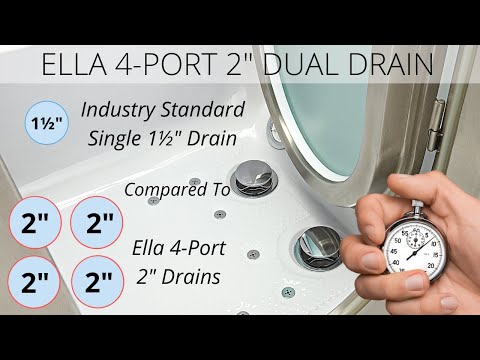
Ella walk-in tubs use a gravity dual drain with a multi-port drain body under the tub. The video on this page shows the layout: dual four-port T-type drains, operated by stainless steel cables in protective black plastic sleeves that open and close the drains from the handles on the deck. The Ella Standard is the exception in the lineup, shipping with one 2-inch gravity floor drain with overflow and an emergency pull-up chain.
The holes in the shell are drilled to Ella's assembly before the tub ships, which is why the factory drain stays. Removing it to fit an aftermarket drain creates leak risks and voids the warranty on the affected parts, so Ella recommends keeping the factory assembly and ordering any replacement piece through your Ella dealer or the team at (800) 480-6850 with your model number, which is also how you get the drawings for your model.
One planning point decides which side the plumbing lands on: the door and the drains are on opposite sides of every Ella walk-in tub. A right-side door tub has its drains on the left and a left-side door tub has its drains on the right, with sides taken as you face the tub. Choosing the door side that puts the tub drain over the existing house drain saves your plumber work.
What the Plumber Connects
The tub's drain body presents four open ports, and connecting them to the house drain line is best built before the tub is set in position, while the plumber can still reach everything. The drain pipes are standard 1 1/2 inch PVC, so they can be cut and rejoined with ordinary couplings, while the drain body and its fittings come from Ella. Every fitting goes on snug and never forced, because overtightening is what usually cracks a plastic elbow later. The elbow joins the drain body to the house piping, and if an elbow or its securing nut cracks it is replaced as a unit, with a dual drain possibly needing one for each side.
Ella does not perform installation and does not send technicians. A local licensed plumber makes the connection, and the threaded nuts and rubber gaskets on the drain tailpieces are tub-specific parts that come from Ella rather than from a generic fitting. If a nut or gasket starts to weep years later, it is ordered the same way, with photos of the tub label and the failed part so the team can match the part to your tub generation.
Fitting the Floor Drain Stopper
The stopper is the one piece of the drain that is assembled by hand on site:
- Screw the back nut onto the adjustable leg.
- Insert the leg into the drain stopper.
- Tighten the back nut with pliers or a wrench until snug.
- Insert the stopper into the drain assembly.
The drop-in drain cover at the bottom of the tub simply drops back into place. It is the piece most often lost during a plumbing visit, so set it somewhere safe while the drain is being connected.
Fitting the Handles, the Chain and the Vent Assembly
Each chrome handle slips onto a brass mounting on the drain assembly and is held by a single set screw that takes a 2.5mm Allen key. Replacing a Drain Handle or Overflow Plate: The 2.5mm Set Screw, the Chain Ring and the Updated Handle gives the order:
- Slip the key ring at the end of the emergency pull-up chain over the brass mounting so it rests in place under the handle. Skip this and the chain has nothing to anchor to.
- Slide the handle onto the mounting.
- Tighten the set screw until the handle is snug and turns the drain cleanly. Firm is enough. Do not over torque.
- Set the handle so it sits straight up and down to indicate open and closed.
The handle sits on a vent assembly that passes through the tub deck and is secured underneath by a retaining ring and lock nut, with the drain cable attached beneath. The video shows the reassembly: place a thin bead of silicone onto the back of the vent assembly, insert it into the drain vent hole, replace the retaining ring and lock nut, and tighten firmly without over torquing. The cable barrel end then goes onto the drain armature in the connection box with the flat side of the cable connection facing up, and there must be a positive connection between the drain stem and the armature before the small panel goes back on the connection box. A handle that later wobbles or spins is covered in Why Are My Drain Handles Loose and How Do I Tighten Them?.
Two Habits That Protect the Drain
- Never step on an open drain. It puts tremendous stress on the cable and can break it, which is why Ella places warning stickers on every tub before it ships.
- Do not overtighten anything on the drain. Nuts, elbows, retaining rings and the stopper's back nut all go on snug, and forcing them is what cracks plastic parts.
If a handle ever sticks in the open position, the brass lever inside the overflow has travelled past its stop, and Drain Lever Stuck in the Open Position: Adding a Screw Stop So It Does Not Happen Again explains the permanent fix. The lifetime parts warranty covers the waste and overflow hardware for the original purchaser at the original installation address and is not transferable, so a later owner purchases the part and pays the shipping. Either way, Ella ships the part and a local licensed plumber does the labor.

Chapters in this video
- 0:00 Introduction to Drain Cables The video introduces the dual four-port t-type drains with stainless steel cables that open and close the drains.
- 0:18 Removing the Old Cable The technician removes the service panel, armature, barrel end, drain handle, and vent assembly to access the cable.
- 1:13 Installing the New Cable The technician screws in the new cable, tightens the locking nut, and replaces the drain vent assembly with silicone.
- 1:46 Reassembling the Drain The technician places the cable barrel head onto the armature, inserts it into the connection box, and replaces the panel and drain handle.
- 2:30 Adjusting Drain Height The technician demonstrates how to adjust the drain height by turning the drain stem and tightening it with a lock nut.
Watch: Drain Cable Replacement with chapters and a full transcript.
Related Guides
- My drain will not open or close: replacing the drain cable and adjusting drain height
- Leak at the Drain Elbow or Drain Pipe: Overtightening, Standard PVC Fittings and Replacement Assemblies
- How Do I Open or Close the Drain in My Walk-In Tub?
Related Videos

Chapters in this video
- 0:00 Dual Drain Technology Overview The video introduces Ella's Bubbles dual 2-inch, four-port drain system and its connection to a house drain.
- 0:20 Live Drain Demonstration A live demonstration shows water flowing through the dual 2-inch, four-port drains.
- 0:39 Drain Setup Images Actual images display a drain setup before and after the installation of the dual drain system.
- 1:01 House Drain Connection Options The video explains recommended house drain connections and how installers determine the best setup.
- 1:27 Easy Turn Drain Handles The easy turn drain handles are shown, which also function as dual air vents to maximize water outflow.
- 1:40 Single Drain and Gravity Driven System Some tubs feature an oversized single drain with emergency pull chain, and the gravity-driven system is highlighted.

Chapters in this video
- 0:00 Ella Standard Walk-In Tub Overview The video introduces the Ella Standard walk-in tub, highlighting its size and design for average bathers.
- 0:27 Fitting Tub Into Alcove Tips are provided for fitting the tub into a 60-inch alcove, including trimming the apron or using the standard end piece.
- 0:49 Hydro Massage System Features The tub's 18-jet hydro massage system is described, including its intensity control dial and inline water heater.
- 1:14 Drainage And Adjustable Frame The oversized two-inch drain and adjustable frame with access points for door adjustments are showcased.
Chapters in this video
- 0:00 Ella's Dual Drain Technology Ella's Bubbles walk-in tubs feature dual four-port two-inch drains for fast and efficient draining.
- 0:17 Oversized Two-Inch Drains Ella's walk-in tubs use two oversized two-inch drains, doubling air vent capacity to speed water out.
- 0:37 Connecting Your House Drain Customers can connect their house drain to all four ports for maximum draining capacity or seal unused ports.
- 1:01 Gravity Driven Drain System Ella's drain system is gravity-driven, so customers never worry about pump or power failure slowing the drain process.
Common Questions
Can my plumber swap in a hardware store drain assembly?
What pipe size connects to the walk-in tub drain?
Which side of the tub will the drains be on?
Does Ella connect the drain to my plumbing for me?
What if the drain cover was lost during the installation?
Why does the emergency chain ring go on before the handle?
About this guide. Answers in the Ella’s Bubbles Support Center are compiled from real conversations with tub owners, our technicians’ notes and the product documentation, then reviewed by our team. Tub models and options have evolved over the years, so a detail here may differ slightly from your exact tub. If something looks different on yours, send us your serial number and a specialist will confirm it for your model.
Did this solve your question?
If not, open a ticket and our team will pick it up from here.
Open a Support Ticket Videos