


How is the drain assembly installed on an Ella walk-in tub?
On an Ella walk-in tub you do not install the drain assembly yourself. The gravity dual drain is fitted at the factory, so the tub arrives with its drain body in place under the shell and open ports waiting for the house connection, and your plumber's job is to join those ports to the drain line, ideally built before the tub is set in position. If a piece of that assembly is later damaged or lost, Replacing Drain Elbows, Nuts, Gaskets, Drain Covers and Plunger Parts on a Walk-In Tub explains how the team matches the exact part to your tub.
What Is Already Installed When the Tub Arrives
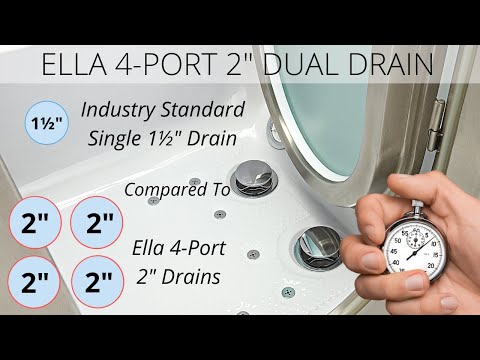
Ella walk-in tubs use dual four-port T-type drains: a multi-port drain body under the tub, a copper overflow, and two chrome handles on the deck that open and close the plugs through stainless steel cables running in protective black plastic sleeves. Each handle sits on a vent assembly that passes through the tub deck and is secured underneath by a retaining ring and lock nut, with the cable attached beneath that and running to a connection box on the drain. Inside the connection box an armature, worked by the cable, lifts and lowers the drain stem. All of this is assembled and tested before the tub ships, and warning stickers on every tub remind installers never to step on an open drain, because that puts tremendous stress on the cable.
One fact your plumber needs before roughing in: the door and the drains are on opposite sides of the tub. A right-side door tub has its drains on the left, and a left-side door tub has its drains on the right, with sides read as you face the tub. Confirm which door side you ordered before any drain line is cut into the floor.
Connecting the Factory Drain to the House Line
- Build the house drain line first, where the tub's ports will land, so the tub can be set over it rather than lifted again afterward.
- Join the ports to the line with standard PVC fittings. The drain pipes can be cut and rejoined with ordinary couplings, but the drain body itself and its threaded nuts and rubber gaskets are tub-specific parts that come from Ella, not generic plumbing-aisle fittings.
- Run every fitting on snug and no further. Overtightening is what usually cracks a plastic drain elbow or its securing nut later, and a dual drain may then need a new elbow on each side.
- Fill and drain the tub once before the apron goes on, and watch the elbows and nuts for any weeping while the water is moving.
Keep the factory assembly rather than swapping in an aftermarket one. The holes in the shell are drilled to Ella's assembly, removing it creates leak risks, and parts affected by that kind of modification fall outside the warranty terms the team verifies against your serial number.
Fitting the Floor Drain Stopper
The one piece a plumber or owner does assemble by hand is the floor drain stopper, for example when a replacement arrives or the stopper came out during a plumbing visit.
- Screw the back nut onto the adjustable leg.
- Insert the leg into the drain stopper.
- Tighten the back nut with pliers or a wrench until it is snug.
- Insert the stopper into the drain assembly.
- Turn the handle open and closed once and confirm the plug seals fully and lifts fully. The drop-in drain cover simply drops back into place over it.
How the Handle, Vent and Cable Go Together
The video shows the drain cable being replaced, and in doing so it shows exactly how the deck hardware is assembled, which is the sequence to follow any time a handle or vent assembly has been off.
- Remove the small service panel on the connection box, then slowly draw the armature out and unhook the cable's barrel end.
- With an Allen wrench, remove the drain handle, loosen the retaining ring nut on the vent, and lift the vent assembly out of the deck.
- Unscrew the old cable from the assembly and screw the new one in completely. Tighten the locking nut firmly without over-torquing.
- Replace the cover on the vent assembly, place a thin bead of silicone on the back of the assembly, insert it into the vent hole, and refit the retaining ring and lock nut, firm but not over-torqued.
- Hook the barrel end of the cable onto the armature and slide the assembly back into the connection box with the flat side of the cable connection facing up. Check for a positive connection between the drain stem and the armature, then replace the small panel.
- Before the handle goes back on, slip the key ring of the emergency pull-up chain over the brass mounting so it sits under the handle, then slide the handle on and tighten its set screw with a 2.5mm Allen key. Set the handle straight up and down so it reads open and closed clearly.
Skipping the chain ring leaves the emergency chain with nothing to anchor to, so seat it every time a handle comes off. Replacing a Drain Handle or Overflow Plate: The 2.5mm Set Screw, the Chain Ring and the Updated Handle covers the current handle, which fits the same drain assembly as the older style.
If Something Is Wrong After Installation
- A handle that wobbles but still lifts the stopper needs its Allen screw snugged, or the retaining ring and lock nut under the vent tightened if the whole assembly rocks in the deck. See Why Are My Drain Handles Loose and How Do I Tighten Them?.
- A handle that spins and never moves the stopper means the cable barrel end has slipped off the armature or the cable has broken, usually after someone stepped on an open drain. Reseat it flat side up, or replace the cable as shown in the video.
- A handle that turns one way and will not come back means the brass lever inside the overflow has overshot its channel. Pushing it back toward the copper overflow pipe and adding a small self-tapping screw as a stop fixes it permanently, as described in Drain Lever Stuck in the Open Position: Adding a Screw Stop So It Does Not Happen Again.
- Brittle nuts and gaskets that weep, a cracked elbow, a lost drop-in cover or a worn plunger seat are all individual replacement parts, and when the inside of the drain is damaged the team may recommend the complete assembly so everything seals properly.
To request any drain part, open a ticket at ellasbubbles.com/support or call (800) 480-6850 with your model and serial number, photographed from the label behind the magnetic access panel next to the door or the paper label on the side of the shell. Add photos of the drain from above the tub floor and, if the apron is off, of the drain body and elbow underneath, and note where you purchased the tub and whether you are the original owner. The lifetime parts warranty covers the waste and overflow hardware for the original purchaser at the original installation address, and the team confirms what applies to your tub. Ella ships the part and does not send technicians; a local licensed plumber does the work, and the drawings for your model are available on request with your model number.

Watch: Drain Cable Replacement with chapters and a full transcript.
Related Guides
- Broken Drain Lever, Drain Cable or Full Drain Assembly: Which Part You Need and How It Is Replaced
- Leak at the Drain Elbow or Drain Pipe: Overtightening, Standard PVC Fittings and Replacement Assemblies
- How Do I Open or Close the Drain in My Walk-In Tub?
Related Videos


Common Questions
Does an Ella walk-in tub arrive with the drain already installed?
Which side of the walk-in tub are the drains on?
Can my plumber fit an aftermarket drain assembly instead?
How do I put the floor drain stopper back together?
Why does the drain handle spin without opening the drain?
Does the warranty cover the plumber's time to connect the drain?
About this guide. Answers in the Ella’s Bubbles Support Center are compiled from real conversations with tub owners, our technicians’ notes and the product documentation, then reviewed by our team. Tub models and options have evolved over the years, so a detail here may differ slightly from your exact tub. If something looks different on yours, send us your serial number and a specialist will confirm it for your model.
Did this solve your question?
If not, open a ticket and our team will pick it up from here.
Open a Support Ticket Videos