


Adding Infusion Microbubble Therapy to a Conventional Bathtub: The Universal Installation Kit and the NuWhirl Install Guides
Updated October 2026
Yes, microbubble therapy can be added to a regular bathtub. Ella's Bubbles offers the Infusion Microbubble Therapy Universal Installation Kit, a microbubble retrofit kit designed for standard conventional tubs with a small installation footprint. The pump, pressure tank and plumbing mount behind or beneath the tub, so the installer needs access to that space, and Ella's site says the kit is installed by a licensed contractor. The installation manual that ships with it is written for tub manufacturers and qualified service personnel only. This page summarizes what the kit contains and the installation rules from the NuWhirl guides.
What the Kit Does
The kit uses a US patented thin-film device that raises the oxygen saturation of the bath water up to 70 percent above regular tap water and releases billions of tiny 10 to 50 micron bubbles into the tub through a single wall fitting. Once installed, you press the on/off button, the water turns milky, and the bath is quiet and non-turbulent, quite unlike a jetted or air bath. Ella notes that microbubble bathing softens and moisturizes skin, exfoliates, and makes and keeps the body warm. For how the therapy feels on an Ella walk-in tub, see our microbubble infusion therapy article; this page is about putting the same system into a conventional bathtub. If you would rather have a bathtub built with the system from the start, Ella's Fiji and Solo microbubble alcove tubs are the factory option.

Chapters in this video
- 0:00 Infusion MicroBubble Therapy Introduction The video introduces Infusion MicroBubble Therapy as a popular accessory for Ella's Bubbles walk-in tubs.
- 0:12 Oxygenation And Skin Benefits Micro bubbles produce more oxygen than tap water and create a skin-softening, exfoliating, invigorating, and detoxifying bathing experience.
- 0:26 Visualizing MicroBubble Generation The water in the tub changes from clear to cloudy as micro bubbles are generated and fill the tub.
The video shows what the kit delivers. One touch of the micro button generates billions of microbubbles from a single port, producing up to 70 percent more oxygen than regular tap water. The water turns from clear to completely cloudy as the bubbles fill the tub, and the result is a warm, skin-softening bath that exfoliates, invigorates and detoxifies. The system shown is the same technology packaged in the universal kit. Watch: Infusion Micro-Bubble Therapy For Walk-In Tubs with chapters and a full transcript.
What Is in the Kit
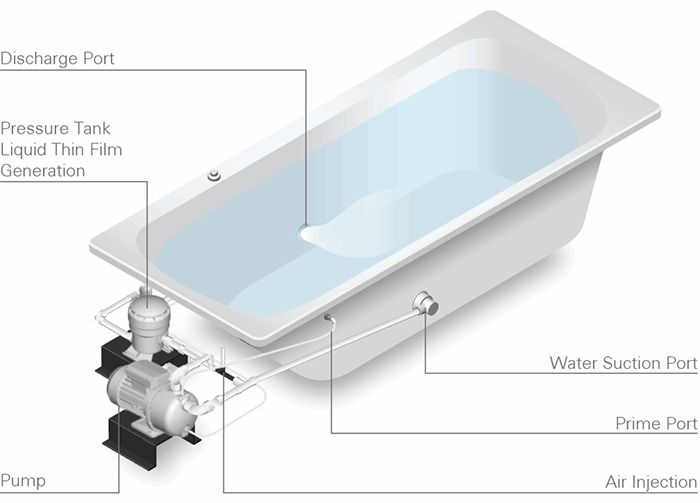
The Generation II for Conventional Baths manual lists these components:
- Microbubble pump, part MB2G07500XCB, supplied without an air switch
- Pressure tank assembly MBPTA2, an ABS tank that operates at 50 PSI and is supplied fully assembled
- Nozzle assembly MBNZA
- Wall fitting assembly MBWBA1 with wall body and wall flange
- Air injector assembly
- Discharge union assembly MBPUA-100, which is 1/2 inch, and suction union assembly MBPUA-101, which is 3/4 inch
- Prime port fitting MBPPF and trim fitting MBTF1, listed in a color number to match the tub
- Suction elbow, suction cover and 1 inch suction body
- Part 30900 ABS to PVC transition solvent cement, plus the PVC tees, elbows, reducer bushings, unions, couplings, hose clamps and plugs listed as additional required items
Tools called for are a wrench, hack and hole saws, a PVC pipe cutter, safety goggles, silicone sealant with a gun, a tape measure and a level.
Installation Rules from the NuWhirl Guides
- Dry-fit first. Dry-fit all parts until the design is complete, then glue. The included ABS to PVC transition cement must be used on all fittings; standard PVC cement will not bond the ABS tank.
- Mount the pump high. Install the pump so it sits at least 1 inch higher than both the suction and discharge fittings, with the suction and drain lines run at a slight downward slope so the system self-drains. The tee must be horizontal with a slight draft angle.
- Position the pressure tank the same way. Orient its smaller 1/2 inch port toward the discharge fitting. Never open the tank if a problem occurs; return it intact.
- Air injector. Install it with the FLOW arrow pointing toward the suction line and away from the discharge line.
- Prime port. The conventional-bath manual locates it 2 inches below the maximum water level or higher, and warns not to go more than 2 inches below or the pump may have trouble priming; the barb points downward and the 1/8 inch tubing to the pump is kept short with minimal droop. This fitting bleeds air out of the pump so it can prime.
- Nozzle. Place the nozzle assembly in the discharge line a minimum of 12 inches from the wall fitting, with its elbow connected in the down position for drainage. The drain port assembly goes upstream of the nozzle.
- Electrical. Connect only to a ground-type receptacle or junction box protected by a GFCI, installed to local and national electrical codes in a location not subject to splashing or flooding. Never use an extension cord. Test the GFCI routinely. Our electrical requirements article explains the GFCI setup Ella uses on its own tubs.
Rules That Apply Every Day
- Never run the pump dry. Be certain the pump casing is filled with water before starting. If the pump fails to prime within 30 seconds, turn it off and check for an airlock, clogged plumbing or a closed valve.
- There are no user-serviceable parts inside the control components. Opening, modifying or tampering with them voids the certifications and warranties.
- Keep the controls dry; exposure to water or moisture voids certifications and warranties.
- Flush the system monthly with the same vinegar and water mix used on Ella walk-in tubs, described in cleaning and monthly maintenance, and keep oils and bath bombs out of the water while it runs.
If the Kit Stops Making Bubbles
The chain runs from the on/off button to the relay, the pump, the pressure tank and the wall fitting. A pump that buzzes without producing the milky cloud usually points to water level, an air lock or a pressure tank problem, and large bubbles instead of a fine cloud usually mean the tank is not holding pressure. Our article on a microbubble system not producing bubbles lists the checks in order, and the pressure tank is a replaceable part.
Related Guides
Common Questions
Can microbubbles be added to a regular bathtub?
What does the universal kit include?
Where does the pump mount and how far is the nozzle from the wall fitting?
Can the pump run dry?
Who installs the microbubble retrofit kit on a conventional bathtub?
Does the kit fit my tub?
What electrical supply does it need?
Is a microbubble bath like a jetted tub?
How much water do I need before switching it on?
How do I clean it?
For anything model-specific, open a ticket at ellasbubbles.com/support or call (800) 480-6850 and the team will be glad to help.
About this guide. Answers in the Ella’s Bubbles Support Center are compiled from real conversations with tub owners, our technicians’ notes and the product documentation, then reviewed by our team. Tub models and options have evolved over the years, so a detail here may differ slightly from your exact tub. If something looks different on yours, send us your serial number and a specialist will confirm it for your model.
Did this solve your question?
If not, open a ticket and our team will pick it up from here.
Open a Support Ticket Videos