


How do I water test my walk-in tub door after adjusting it?
Updated September 2026
To water test your walk-in tub door after adjusting it, wipe the seal clean, close and latch the door while standing, fill the tub above the door handle, and let the water stand while you inspect the outside of the door, the frame and the floor for any moisture. It is the same fill check every Ella walk-in tub receives before the walls are closed, described in What Is the Pre-Installation Water Test on a Walk-In Tub?, narrowed to the door alone. Run it after every handle, latch, leveling or screw-sealing change, because a dry fill is the only proof that the adjustment worked.
Why the Door Gets Its Own Test After an Adjustment
Every adjustment you can make at the door changes how firmly it presses the seal. Loosening the handle lock nut reduces handle tension, tightening it increases tension, lowering the leveling legs takes the twist out of a tub whose door rubs the jamb, and a shim at the latch adds compression on the latch side. The goal described in Adjusting the Door Handle Lock Nut, and Why the Hinges Are Not the Fix for a Door That Is Hard to Close is a handle that moves smoothly and still holds the door firmly against the seal. The only way to know you have reached that point is to put water against the door and watch.
The test also keeps you from ordering a part you do not need. Ella's technical support asks owners to seal the handle screws first and test the tub before a new door seal is considered, because water weeping at the handle is a sealing problem at the screw holes rather than a gasket problem. A drip at a plumbing union during a fill is likewise a normal install-stage adjustment, not a defect. The union was over-tightened or its O-ring shifted, and the fix is to disassemble it, re-seat the O-ring and reassemble it snugly.
Before You Fill the Tub
- Check level first. An unlevel tub can leak at the door during the test. A door that is hard to close, rubs the jamb, or whose gasket does not touch on the lower handle side is a leveling problem, so lower the leveling legs until every foot is firmly on the floor before you test, and leave the hinges alone.
- Let silicone cure. If you resealed the handle screws, wait the full cure time stated by the sealant manufacturer before the tub sees water.
- Wipe the seal and frame. Wipe the silicone seal with a common household cleaner or rubbing alcohol, then wipe the door frame, and on inward doors the gasket and inner frame. If a section looks deformed, squeeze it gently with your fingertips and pull it away from the frame.
- Close the drains. The pre-installation test tapes the drains shut on an uninstalled tub. On an installed tub, simply close them.
- Latch the door while standing. Close it, turn the handle and confirm it holds the door firmly against the seal without being hardly able to be moved. Keep the access panel open so you can look under the tub, as the installer does during the pre-installation test.
The Fill Test, Step by Step
- Fill the tub above the height of the door handle. That is the level Ella's technical support uses after the handle screws are resealed, and it puts water against the full door seal, the latch side and the screw holes. For a complete pre-installation style check, the fill line is 3 inches above the highest jet, or the bottom of the grab bar on a tub with no jets.
- Let the water stand. The pre-installation test stands for 30 minutes before any pump runs, and the warranty activation check has your installer confirm a watertight door seal after a 20 minute fill. Give the door at least that long rather than a quick look.
- Inspect while the water stands. Look at the bottom edge of the door, the handle and the area just below it, the hinge side, the frame, the floor in front of the tub, and under the tub through the access panel.
- Do not start a pump unless water covers every jet. Running a pump dry causes permanent damage that is not covered. If you filled to the pre-installation line, you can run each electrical component on its rated 3-prong cord for another 30 minutes and inspect every union again while the pumps move water, exactly as the installer did.
- Drain the tub completely, then open the door. Wipe the seal and leave the door open once you are done.
Reading What You Find
- Dry everywhere. The adjustment is complete. Replace the apron and put the access panel back.
- Water at or just below the handle while the rest of the door edge stays dry. The handle screws are the source. Drain and dry the door, remove the screws, clean out the old sealant, apply silicone into each hole and under each head, reinstall, let it cure and test again, as laid out in Water Leaking From the Door Handle Screws: Reseal the Screws Before Replacing the Door Seal. This drip can run down inside the apron and show up as a wet floor, so treat it promptly.
- Water at the bottom edge. The seal is not compressed enough on the latch side. After leveling, the team may suggest adding a shim to the door latch and testing the door again. If it still leaks, contact the team with photos.
- Door hard to close or sitting low after someone leaned on it. Level the tub, check the seal and contact the team with photos. Do not touch the hinges. The door and seal warranty is valid only when the alignment is correct and has not been changed by a bather's weight, so explain to family and caregivers that the open door is not a grab bar.
- Drip under the tub rather than at the door. That is a union. Re-seat the O-ring and reassemble it snugly, then fill again.
- Water in the lines or the crate of a brand new tub. That is factory test water, not a door leak. Every tub is filled and run before it ships, as explained in Water in the Lines or the Crate of a New Walk-In Tub Is Normal: Every Tub Is Water-Tested Before It Ships.
After the Test
Once the door passes, replace the apron and carry on with warranty activation, where your installer confirms a watertight door seal after a 20 minute fill and watertight connections with the pumps running. Keep the door on its monthly rhythm afterward: wipe the seal and frame, and leave the door open when the tub is not in use, as listed on the Printable Monthly Maintenance Checklist for a Walk-In Tub. If a leak ever appears later, note where the water shows up, take photos, and have your model and serial number ready when you open a ticket at ellasbubbles.com/support or call (800) 480-6850. A replacement seal, when one is needed, ships under the parts warranty after the team verifies the problem with photos and your serial number. Ella does not send technicians, so a local licensed plumber does the work, and Ella's technical support can answer that person's questions by phone or email.
Related Guides
- Door Handle Loose, Wobbly or Hard to Turn: Tightening the Bolt Under the Cap and Adjusting the Lock Nut
- Caring for Your Door Seal: Cleaning, Reseating, and Replacing the Gasket
- Water at the Door: What to Check First and Why You Should Never Lean on the Door
Related Videos

Chapters in this video
- 0:00 Door Rubbing the Jamb The video explains that a door rubbing the jamb indicates the tub is bowed down.
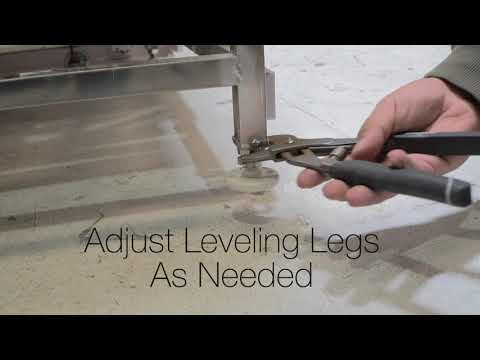
- 0:33 Ensuring Tub is Level Ella's Bubbles tubs have at least six leveling legs that must be solidly on the ground to prevent leaks.
- 0:47 Making Final Adjustments Each leg is adjusted to rest firmly on the floor, and careful measurements are taken to achieve a level tub.

Chapters in this video
- 0:00 Leveling Legs Are Critical Many Ella's Bubbles walk-in tubs have up to eight leveling legs to evenly disperse weight and ensure proper function.
- 0:14 Secure Each Foot The technician checks if each foot is securely on the ground, as an unsealed door could leak.
- 0:28 Check Tub Levels The technician checks levels on all sides of the tub to ensure all feet sit securely on the floor.
- 0:41 Proper Door Alignment Proper leveling assures correct door alignment and closure for your walk-in tub.
Common Questions
How high should I fill the tub to test the door seal?
How long should the water stand during a door test?
Can I run the jets during the door water test after adjusting it?
What if the door still leaks after I adjusted the handle lock nut?
Do I need a new door seal if the door leaks after adjustment?
Is water in a brand new tub a sign that the door leaks?
About this guide. Answers in the Ella’s Bubbles Support Center are compiled from real conversations with tub owners, our technicians’ notes and the product documentation, then reviewed by our team. Tub models and options have evolved over the years, so a detail here may differ slightly from your exact tub. If something looks different on yours, send us your serial number and a specialist will confirm it for your model.
Did this solve your question?
If not, open a ticket and our team will pick it up from here.
Open a Support Ticket Videos