


How do I finish the exposed sides of an alcove walk-in tub?
Updated November 2026
In a three-wall alcove, the only side of an Ella walk-in tub that shows is the front, and the front apron comes finished from the factory. The rest of the finishing is about two gaps: the one between a tub shorter than the alcove and the end wall, which the extension panel fills, and the seam where the tub meets the walls, which a tile flange and silicone close. Can the Tub Be Freestanding? Exposed Ends, Second End Panels, and Knee Walls covers layouts with open ends; this page covers the alcove and what finishes each face of the tub inside it.
Which Face Gets Which Cover
An Ella tub has four faces, and the factory supplies a finished cover for three of them.
- Front. The removable front apron with its access panels is always finished and always stays reachable. In an alcove it is the face you see.
- Ends. One reversible end panel ships with every tub to cover whichever short end is exposed. In a true three-wall alcove you may not need it at all; it attaches with two white screws and adds no length to the tub. If a short end will be open to the room, the end panel covers it, and a second panel can be purchased if both ends show.
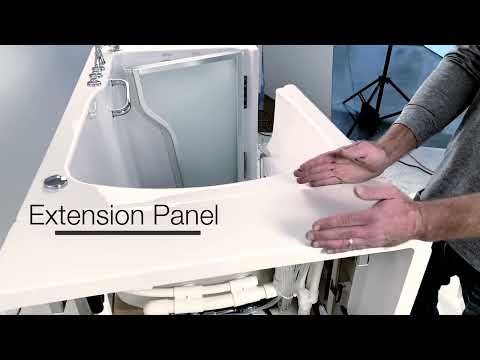
- The gap to the end wall. The extension panel fills the space between a tub shorter than 60 inches and the alcove wall. It rests on adjustable stainless steel shelf brackets that are part of the tub frame, can go on the left or the right, and can be trimmed if the alcove is out of square.
- Back. No Ella model has a cover for the long back side, so in an alcove the back sits against the wall, and in any other layout it sits against a knee wall your contractor frames and finishes the same way an alcove wall is finished.
The end panel and the extension panel are often confused. The end panel hides the shell edge, plumbing and frame at an exposed end and adds no length; the extension panel is the one that lets a 52 to 55 inch tub fill a 60 inch pocket.
Filling the Alcove to the Wall
Ella tubs shorter than 60 inches include one custom-size extension panel, with a few exceptions. Extension panels and filler kits by model lists each tub: the Standard, Elite, Petite, Royal and Ultra take a 7 inch panel, the Deluxe a 4 inch panel, the Capri and the Transfer26, Transfer30 and Transfer32 an 8 inch panel, the TransferXXL a 5 inch panel, and the Flow a 12 1/2 inch panel. The Standard60, Zen60, Ultimate and Transfer60 are already 60 inches and need none, and the Big4One, Shak, Front Entry and Mobile ship without one. The two-seat tubs are full length.
The Standard installation tips video shows the arrangement on the most common size, a 30 by 52 inch tub in a 60 inch alcove: the end panel goes on the faucet side and the 7 inch extension panel on the other side for a snug fit. If the tub still fights the opening with the extension panel in place, the video gives two options. Trim the corner piece off the main tub apron for a cleaner, tighter fit, or slide the tub into the alcove using the standard end piece and apron without the end panel at all.
The extension panel video shows the panel itself: trimmed for an out-of-square alcove, placed on either side, and carried by the adjustable stainless brackets built into the frame. Once installed it doubles as a shelf for towels, shampoo and soap, so place it on the side where a shelf is useful to the bather.
Sealing the Seam Where the Tub Meets the Wall
The finished look, and a dry wall behind it, come from how the rim is tied into the alcove walls. Before the tub is pushed into place, glue a tile flange to the tub edge where it will meet the wall. Any 1/8 inch or 3/16 inch rustproof, waterproof strip about 5 inches tall works, overlapping the tub edge by 2 inches and bonded with 100 percent silicone. Push the tub to the wall and level it, then let the tile or wall panel come down over the flange and overlap the deck. Run silicone caulk at every joint where the finish meets the tub.
What Must Stay Reachable
Everything that makes the tub work is serviced through the removable panels. The pumps, the heater, the control boxes and the plumbing sit behind the front apron and the side panels, so nothing is tiled, trimmed or built in front of them, and no insulation goes around the equipment. The end panel and the extension panel are removable for the same reason. If a contractor proposes a tiled skirt across the apron, the answer is no; the apron is the finish.
Order the work so the water test comes before the finish. Level the tub with every leveling leg bearing on the floor, fill it and run the pumps with the panels open, and only then close the tile and trim around it. This is the same sequence the freestanding exposed-side guide gives for an open layout, and it matters more in an alcove because the walls make later access harder.
Handling the Panels on Install Day
All removable panels, including the front apron, the end panel and the extension panel, come off before the tub is moved into the house, and the tub is lifted only by its frame. The two white end-panel screws are often taped to the back of the panel or tucked in the parts box inside the tub, so look there before reporting them missing. A panel that arrives cracked is freight damage: photograph it, save all the packaging, and report it within 48 hours of delivery through ellasbubbles.com/support or at (800) 480-6850, and let where you purchased know as well. Panels are cut for a specific model and door side, so a replacement or a second end panel needs your model, serial number and door side, as installing a second end panel explains.
If you want the layout confirmed before the tile goes up, open a ticket at ellasbubbles.com/support with your model, serial number, door side and a sketch or photo showing which sides will be open. Your Ella dealer or the team at (800) 480-6850 will confirm what is included and what to add.

Chapters in this video
- 0:00 Ella Standard Walk-In Tub Overview The video introduces the Ella Standard walk-in tub, highlighting its size and design for average bathers.
- 0:27 Fitting Tub Into Alcove Tips are provided for fitting the tub into a 60-inch alcove, including trimming the apron or using the standard end piece.
- 0:49 Hydro Massage System Features The tub's 18-jet hydro massage system is described, including its intensity control dial and inline water heater.
- 1:14 Drainage And Adjustable Frame The oversized two-inch drain and adjustable frame with access points for door adjustments are showcased.
Watch: Ella's Bubbles: Installation Tips For The Ella Standard Walk-In Tub with chapters and a full transcript.
Chapters in this video
- 0:00 What Are Extension Panels? Ella's Bubbles walk-in tubs use extension panels to create the best fit for your new tub in your home.
- 0:14 Trimming Panels For Fit Extension panels can be trimmed to ensure your tub fits seamlessly and beautifully, even if your alcove is out of square.
- 0:29 Panel Storage Space The extension panels provide a convenient place for towels, shampoos, soaps, and other bathing items.
Watch: Ellas Bubbles: Extension Panels or "Filler Kits" For Alcove Installation with chapters and a full transcript.
Related Guides
- What Is an Extension Panel (Filler Kit) on a Walk-In Tub?
- Will it fit my alcove? Extension panels, end panels, and 60 inch spaces
- Can an Ella End Panel or Extension Panel Be Trimmed to Fit?
Common Questions
Do I need the end panel in a three-wall alcove at all?
What fills the gap between a 52 inch tub and a 60 inch alcove?
Can I tile over the front apron of the tub?
How do I seal the tub rim to the alcove wall?
What if the extension panel still does not give a tight fit?
When should the finish work around the tub be closed in?
About this guide. Answers in the Ella’s Bubbles Support Center are compiled from real conversations with tub owners, our technicians’ notes and the product documentation, then reviewed by our team. Tub models and options have evolved over the years, so a detail here may differ slightly from your exact tub. If something looks different on yours, send us your serial number and a specialist will confirm it for your model.
Did this solve your question?
If not, open a ticket and our team will pick it up from here.
Open a Support Ticket Videos