


Why does my walk-in tub door leak: seal, latch, hinge or panel?
Updated October 2026
A walk-in tub door leak is diagnosed by where the water shows up, and the order of checks is fixed: level the tub first, then fill it and watch the door while the water stands, then match the wet spot to its cause. Water along the gasket line points to the seal, water at the handle points to the handle screws, water that keeps coming at a hinge after the hinges are reset points behind the hinge plate, and water on the floor in front of a dry door points under the tub rather than at the door at all. Water at the Door: What to Check First and Why You Should Never Lean on the Door has the full first-pass checklist, and this page is the triage that tells seal, latch, hinge and access-panel causes apart.
Step One Is Always Leveling
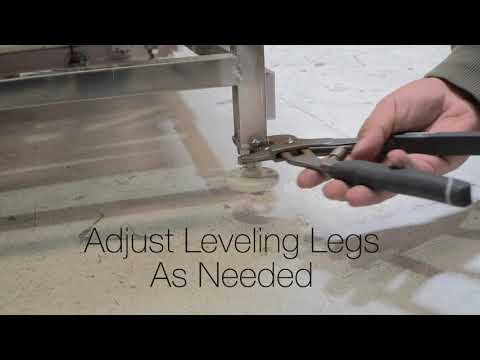
The number one cause of door leaks by far is leveling. Many Ella walk-in tubs have as many as eight leveling legs to disperse weight evenly, and if even one leg is not carrying its share, the frame flexes, the shell and door frame twist slightly, and the door goes out of alignment so water finds the gap. Before any part is replaced, drain the tub, remove the front apron and check that each foot is securely on the ground, then check levels on all sides and adjust each leg until every foot sits solidly and the tub reads level in both directions. Extending or shortening legs is also how you close any visible gap between the door and its frame. On the L-shape Transfer door the same rule applies first, because a bowed shell moves the striker relative to the door pins, as Why Don't the Pins on My L-Shape Transfer Door Line Up? explains.
Step Two Is a Water Test You Watch
Once the legs are right, fill the tub the way the installer checklist does and let the water stand for at least the twenty minute fill. During that time watch five places: the bottom edge of the door, the handle and the area just below it, the hinge side, the frame, and the floor in front of the tub. While the water stands, also take the front access panel off and look under the tub, because a union around the pump or the heater can leak there, and that needs its O-ring reseated rather than any door part. Then read the pattern.
| Where the water shows | What it points to | What to do |
|---|---|---|
| Along the bottom edge or the gasket line | The door seal: debris, residue, a section out of its channel, or a gasket compressed from being kept latched | Clean seal and frame, reseat or re-secure the gasket with a thin bead of silicone, set 20 minutes, cure 24 hours, and leave the door open about a day before retesting |
| At or just below the handle while the rest of the edge stays dry | The handle screws, not the seal | Reseal the handle screws before touching the seal; check the handle is oriented correctly and its locking bolt is snug |
| Door will not pull tight and the white plastic latch piece is cracked | The latch receiver, a two part assembly of hard plastic receiver and silicone cover | Replace the latch assembly; never glue it; the door, hinges and seal stay in place |
| Hinge side, still wet after the hinges have been reset | Water behind the hinge plate and along the bolts | Slide the door off, remove the laminate plate at the bottom hinge, reseal behind it and around every bolt hole, seal the bolt heads |
| Following the bottom corner of the frame rather than the gasket line | Leveling | Back to the legs; a twisted frame will defeat any new part |
| Transfer door: one pin shorter than the other | A pin that has skipped a gear, or a loose striker plate | Both pins should extend about 1 1/2 inches; tighten the striker, press the seal into its channel, retest |
| Floor in front of the apron wet while the door edge is dry | Under the tub: a union at the pump or heater | Reseat the O-ring at the union; this is not a door repair |
What the table tells you is that the four words in the title are not interchangeable. A seal problem shows along the gasket, a latch problem shows as a door that no longer pulls tight, a hinge problem survives a hinge reset and shows only on the hinge side, and a panel problem is not a door problem at all. Picking the wrong one means ordering a part that will not stop the water.
Seal: Clean, Reseat, Re-Secure
The door seal is a silicone gasket seated in a channel around the door, covered by the Lifetime Limited Warranty along with the door, with no scheduled replacement interval. Residue on the gasket or the frame is a common leak cause, so wipe both with a common household cleaner or rubbing alcohol, and on inward-swing doors wipe the inner frame too. A seal that stuck or deformed in shipping is restored by squeezing it with your fingertips and gently pulling it away from the frame with the door open. A loose section is re-secured with a thin bead of silicone in the gasket channel. Then leave the door open, at least overnight and ideally about a day, so the gasket reforms, and keep the door at least slightly open whenever the tub is not in use. Caring for Your Door Seal: Cleaning, Reseating, and Replacing the Gasket has the video and the steps.
Latch: A Cracked Receiver Is Its Own Part
If the plastic latch cracked and the door will not seal, the receiver has stopped holding the handle in its locked position, so the door can no longer be pulled tight against the seal. This is a known wear point and the fix is a replacement latch assembly, not a new door. Photograph the latch area with the door open and with the handle locked, and note whether the crack is in the hard plastic receiver block or the silicone cover over it, because the photo tells the team which pieces to ship. Do not glue it. Also check that a drifted level or a reversed handle is not what overloaded the latch, since a twisted frame will keep a new latch from sealing the door properly. Why Did the Plastic Door Latch Crack and Why Won't the Door Seal Now? lists what to send.
Hinge: When Resetting Did Not Help, Reseal Behind the Plate
Hinge alignment controls how the door meets the seal. A hinge-area leak that persists after the hinges have been reset is coming from the mounting itself, where water sits against the plate behind the bottom hinge and works through the bolt holes and along the bolts. The repair is to drain and dry the tub, slide the door off, remove the whole laminate plate behind the bottom hinge with its bolts, clean off all old sealant, apply silicone behind the plate and around every bolt hole, reinstall the plate and hinge, seal the head of each bolt where it attaches to the hinge, let the silicone cure for the sealant maker's full time, rehang the door and fill above hinge height to check for moisture. Door Still Leaks at the Hinge After Resetting the Hinges: Remove the Door and Reseal Behind the Bottom Hinge gives the full sequence. The outward-swing door video on this page shows the removal itself: a 3/16 Allen wrench loosens the six bolts on the door side of the hinge, an assistant helps lift the door away from the tub, and the door goes back on by lining up the bolt holes with the hinge and tightening the bolts firmly.
Panel: Water at the Apron That Is Not a Door Leak
The front of the tub carries a removable apron for service access. Those panels are not part of the water seal, so a loose panel does not cause a door leak, but a wet floor at the apron is often mistaken for one. While the tub stands full during your water test, take the panel off and look at the unions around the pump and the heater. A drip there calls for the O-ring at the union to be reseated, and no door part will fix it. The serial number video on this page shows that the serial label sits on the inside of one of the removable panels, so note it while the panel is off; the team uses it to see when the tub was made and which replacement parts are compatible. And never lean on the door or put weight on it, because that strains the latch and hinge and can change door alignment.
When to Open a Ticket
If the tub is level, the seal is clean and reseated, and the water still shows, open a ticket at ellasbubbles.com/support or call (800) 480-6850 with your model and serial number, photos of the wet spot during the fill, and a photo of the handle and the latch or hinge involved. Ella does not send technicians: the part ships under the warranty and a local licensed plumber does the labor, with Ella's technical support answering that person's questions by phone, email or video. A whole new door is almost never the answer, and most door leaks are resolved at home.

Chapters in this video
- 0:00 Loosening The Door Bolts A technician uses an Allen wrench to loosen and remove six bolts on the door side of the hinge.
- 0:36 Removing The Door With an assistant, the technician lifts the door away from the tub, showing the hinge.
- 0:48 Replacing The Door The technician lines up the bolt holes on the door with the hinge holes and tightens the bolts firmly.
Watch: Ella's Bubbles: Replacing An Outward Swing Door with chapters and a full transcript.

Watch: Ella's Bubbles: Serial Number Location with chapters and a full transcript.
Related Guides
- Water Leaking From the Door Handle Screws: Reseal the Screws Before Replacing the Door Seal
- Door seal or gasket looks worn, loose, or leaks: care, repair, and replacement
- Bent or Loose Door Hinge: Diagnosis, Tightening, and Replacement
Related Videos
Chapters in this video
- 0:00 Leveling Legs Are Critical Many Ella's Bubbles walk-in tubs have up to eight leveling legs to evenly disperse weight and ensure proper function.
- 0:14 Secure Each Foot The technician checks if each foot is securely on the ground, as an unsealed door could leak.
- 0:28 Check Tub Levels The technician checks levels on all sides of the tub to ensure all feet sit securely on the floor.
- 0:41 Proper Door Alignment Proper leveling assures correct door alignment and closure for your walk-in tub.

Chapters in this video
- 0:00 Clean Your Door Seal Regularly The video explains how to clean the door seal and frame to prevent leaks and debris buildup.
- 0:38 Replacing a Loose Door Seal The video demonstrates how to replace a loose or damaged door seal by applying a thin bead of silicone to the gasket channel.
- 1:02 Adding Silicone to Inward Doors The video shows how to add a bead of silicone to the corner of the gasket where it meets the frame on inward swing doors.
- 1:23 Extend Gasket Life The video recommends leaving the walk-in tub door slightly open when not in use to extend the gasket's flexibility and life.

Chapters in this video
- 0:00 Door Rubbing the Jamb The video explains that a door rubbing the jamb indicates the tub is bowed down.
- 0:33 Ensuring Tub is Level Ella's Bubbles tubs have at least six leveling legs that must be solidly on the ground to prevent leaks.
- 0:47 Making Final Adjustments Each leg is adjusted to rest firmly on the floor, and careful measurements are taken to achieve a level tub.
Common Questions
Why should I check leveling before replacing any door part?
How do I tell a seal leak from a handle screw leak?
Can I glue a cracked plastic door latch back together?
Why does my door still leak at the hinge after I reset the hinges?
Can a loose front access panel make my walk-in tub leak?
Where is the serial number on my walk-in tub?
About this guide. Answers in the Ella’s Bubbles Support Center are compiled from real conversations with tub owners, our technicians’ notes and the product documentation, then reviewed by our team. Tub models and options have evolved over the years, so a detail here may differ slightly from your exact tub. If something looks different on yours, send us your serial number and a specialist will confirm it for your model.
Did this solve your question?
If not, open a ticket and our team will pick it up from here.
Open a Support Ticket Videos