


Should I install new bathroom flooring before or after the walk-in tub?
Updated October 2026
Set the walk-in tub before the new finished flooring goes down, but only after the subfloor has been made sound and level. The order Ella's own tile flange installation video builds around is subfloor prepared, tub set and leveled on its legs and sealed to the walls, tiling, a bead of silicone between the tub floor and the tiles, and then the finished flooring. Subfloor, waterproofing and the finished floor are your licensed contractor's call under local code, so confirm the plan with them, and remember that every tub also gets the one hour pre-installation water test before the walls are closed up.
The Sequence Ella Builds Around
- The old tub comes out, and your licensed contractor assesses and prepares the wall and floor conditions.
- The subfloor is made level and able to carry the tub, the bather and the water. That surface has to be sound before the tub goes in.
- The tub is set in place on its adjustable leveling legs, with every leg touching the subfloor and the weight distributed equally.
- The tub or base is sealed to the walls.
- Tiling follows.
- A bead of silicone goes between the tub floor and the tiles.
- The finished flooring begins.
So the usual answer is subfloor first, then the tub, then the finished flooring. Ella does not send technicians; a local licensed plumber or electrician does the labor, and the contractor on site decides how the subfloor is prepared, where waterproofing goes and what local code requires. Treat the sequence above as the plan to confirm with them rather than a substitute for their judgment, and if they prefer a different order for your particular flooring, that is their call. What should not change is that the surface under the legs is level and sound before the tub is set.
Why the Subfloor Comes First
Two parts of that order are not negotiable. The tub stands on adjustable leveling legs, and all of them must touch the subfloor with equal weight distribution. A leg that does not bear its share lets the tub sit out of level, and the first place that shows is at the door, because an unlevel tub can leak at the door during the water test. The subfloor also has to carry the tub, the bather and the water together, so any repair or leveling of the subfloor belongs before the tub is set, not after. Once the tub is down and the walls are tiled, the legs are no longer easy to reach, which is why the published order has the installer level the tub against the subfloor and seal the tub-to-tile joint before the finished floor is laid up to the apron.
The Water Test Happens Before the Walls Close, and Usually Before the Tub Goes in
Every Ella walk-in tub receives a required one hour pre-installation water test before the walls are closed up. The installer places the tub on a flat, level surface, wipes the door seal clean, tapes the drains shut and fills the tub to 3 inches above the highest jet, or to the bottom of the grab bar on a tub with no jets. The water stands for 30 minutes while the installer looks around and under the tub for any moisture. Then each electrical component runs on its rated 3-prong cord, plugged into separate outlets, for another 30 minutes, and every union is inspected again while the pumps move water. Pumps never start before water covers all the jets, because running a pump dry causes permanent damage that is not covered. Ella strongly suggests doing the test outside, before the tub is carried in.
For the flooring question that matters in two ways. The test needs a level surface, which is one more reason the subfloor is prepared first. And because the test is done before the tub is set and the walls are finished, a drip at a union is found while everything is still easy to reach, not after the floor and tile are in. A drip at that stage is a normal install-stage adjustment rather than a defect: the union was over-tightened or its O-ring shifted, and the fix is to disassemble it, re-seat the O-ring and reassemble it snugly. Ask your installer to confirm the test was done before the walls close.
Taking Delivery Before the Floor Is Ready
There is no deadline to install an Ella walk-in tub after it arrives, so the tub does not have to wait for the floor and the floor does not have to wait for the tub. Many customers take delivery before the bathroom is even framed so the tub is on site when the plumber and electrician are scheduled, which is common with new builds and phased remodels. Keep it in its original packaging, indoors and out of the weather, until the installer is ready. A conditioned room inside the house is the safest place, a garage is acceptable when it keeps the weather off and the tub out of the cold, and an unheated garage in freezing weather does not meet that recommendation. How Long and Where Can I Store a Walk-In Tub Before Installation? covers the options at home and the alternative of scheduling delivery close to installation day.
Two clocks start at delivery rather than at installation. Freight damage must be reported within 48 hours of receipt, and a tub that sits for months cannot be inspected retroactively, so open the crate, look over the shell, door and fixtures, and note anything unusual on the delivery paperwork before the driver leaves. The 30-day return window applies only to brand new, uninstalled tubs in original packaging, and it does not pause while the tub waits for the floor; a 25% restocking fee applies to returns. Is There a Deadline to Install My Walk-In Tub After Delivery? lays out both. Ella walk-in tubs are assembled and tested to order, so if your flooring schedule is months out, confirm timing for your specific order with your Ella dealer or the team at (800) 480-6850 rather than assuming a configuration will be on hand later.
What to Settle with Your Contractor Before the Tub Is Set
- Who prepares the subfloor, confirms it is level and able to carry the load, and whether any repair is needed once the old tub is out.
- Where waterproofing goes and what local code requires for the floor and the wall finish.
- That the tub will be leveled with every leg in contact, sealed to the walls, and the tub-to-tile joint siliconed before the finished floor is laid.
- That the one hour water test will be done, ideally outside before the tub is carried in, and that you would like it confirmed before the walls close.
Warranty activation comes after installation, not at delivery. It goes into force once the activation form signed by you and your installer is returned with the required documents, and the installer confirms a watertight door seal and watertight connections with the pumps running as part of that step. If a leak ever appears later, note where the water shows up, take photos, and have your model and serial number ready when you open a ticket at ellasbubbles.com/support or call (800) 480-6850.
Related Guides
- How Are Walk-In Tubs Installed in an Existing Bathroom, Step by Step?
- Leveling your walk-in tub: why every leg must touch the floor before anything else
- Tile Flange, Caulking, and Finishing the Walls Around Your Walk-In Tub
Related Videos
Chapters in this video
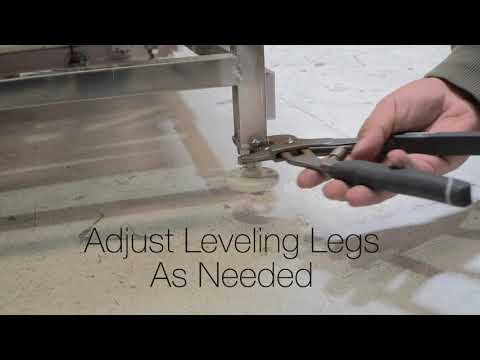
- 0:00 Leveling Legs Are Critical Many Ella's Bubbles walk-in tubs have up to eight leveling legs to evenly disperse weight and ensure proper function.
- 0:14 Secure Each Foot The technician checks if each foot is securely on the ground, as an unsealed door could leak.
- 0:28 Check Tub Levels The technician checks levels on all sides of the tub to ensure all feet sit securely on the floor.
- 0:41 Proper Door Alignment Proper leveling assures correct door alignment and closure for your walk-in tub.

Chapters in this video
- 0:00 Preparing for Your Walk-In Tub The video shows the removal of an old tub and the preparation of the space for a new Ella's Bubbles walk-in tub.
- 0:31 Unboxing and Leveling the Tub The installer removes the tub's panels to prevent damage and then levels the tub using its adjustable leveling legs.
- 1:00 Ella's Dual Drain Technology The video explains Ella's dual drain system and shows different drain configurations for efficient water removal.
- 2:03 Water Supply and Electrical Connections The video highlights the importance of shutoff valves, proper supply lines, and dedicated GFCI circuits for the tub.
- 2:31 Designing for Easy Access The video recommends incorporating access panels into the bathroom remodel for convenient future servicing of the tub.
Common Questions
Does the walk-in tub go in before the finished floor?
Why does the subfloor have to be level before the tub is set?
Can the tub be delivered before my new floor is ready?
When is the pre-installation water test done in the sequence?
Does Ella send someone to set the tub and finish the floor?
About this guide. Answers in the Ella’s Bubbles Support Center are compiled from real conversations with tub owners, our technicians’ notes and the product documentation, then reviewed by our team. Tub models and options have evolved over the years, so a detail here may differ slightly from your exact tub. If something looks different on yours, send us your serial number and a specialist will confirm it for your model.
Did this solve your question?
If not, open a ticket and our team will pick it up from here.
Open a Support Ticket Videos