


How do I secure a loose panel beside my tub door?
Actualizado noviembre 2026
The panels around an Ella walk-in tub are cosmetic covers held by hardware rather than glue, so a panel beside the door that is not held forward is almost always re-seated and tightened rather than replaced. The front access panels fasten with screws under white caps on the Standard and Zen platform, or with clips, velcro tape or magnets on other models; the reversible end panel fastens with two screws at the bottom into its mounting brackets; and the extension panel rests on adjustable shelf brackets and is secured with the kit screws, washers and bolts. Once the panel sits square, the seam where it meets the wall and the deck is closed with 100 percent silicone so no cut edge is left open. Where Do I Get the White Screw Caps and Trim for the Front Panel? covers the caps and screws themselves; this page covers getting the panel to sit right and finishing the edge.
Start with the Tub, Not the Panel
Nothing should be measured, cut or fastened while the tub is sitting loose. Confirm the tub is in its final position and leveled on its adjustable legs, with the front apron installed, before you touch the panel. A tub that is not level can bow the shell and shift the frame, and the panels follow the frame, so a panel that will not sit flush is sometimes telling you about the tub rather than about itself. Every removable panel comes off before the tub is carried into the house, so a panel that has never sat right since installation may simply have gone back on before the tub was leveled and before the apron was in place.
Which Panel Is Beside Your Door?
Three different panels can sit next to a tub door, and each is held a different way. Identify yours before you reach for a screwdriver.
| Panel | Where it is | How it is held | What to check |
|---|---|---|---|
| Front access panel (apron) | Across the front, on the same side as the door | Screws under white caps on the Standard and Zen platform; clips, velcro tape or magnets on other models | Every screw present under its cap, or the magnets catching the tabs inside the panel |
| Reversible end panel | Over the exposed short end of the tub in a corner installation | Two screws at the bottom into the mounting brackets | Both screws tight; wall-side edge trimmed only a fraction of an inch at a time |
| Extension panel (filler kit) | In the gap between the tub and the alcove wall; doubles as a shelf | Three extension support brackets with adjustable shelf brackets, kit screws, washers and bolts, silicone at the seams | Shelf brackets set level with the deck before the panel is secured; panel width 7, 4, 8 or 5 inches depending on the model |
| Magnetic side panel (some models) | Beside the door on models with a magnetic apron | Magnets on the frame bearing against tabs on the inside of the panel | Panel cut back about 3/8 inch so it sits flush to the wall; a panel standing proud or sitting back points here |
The table shows why one fix does not suit every panel. A screwed apron needs its screws back before the caps go on, a magnetic panel needs the magnets to catch the tabs, an end panel needs its two bottom screws, and an extension panel needs its brackets set before anything is tightened. None of these panels has a structural role, so the goal is a flush, square fit, not force.
Re-Seating Each Panel
For a screwed front panel, count the screw positions along the apron and note which caps are missing and whether the screw under each is still there. Refit any screws that were left out after a service visit or a move, check that the panel sits flat against the frame, and then press the caps on. The caps and screws are small stock parts the team sends with your order details or model, which is how the screw-cap article above is framed.
For a magnetic panel, set it against the frame so the magnets catch the tabs inside the panel. How Do the Two Front Access Panels on the Ella Ultimate Open for Service? describes a magnetic panel pulling gently away from one corner with no tools, and both access panels sitting on the door side on that 60 inch tub. If a magnetic panel stands proud of the wall or sits back from it, check the cut-back of about 3/8 inch that lets it sit flush.
For the reversible end panel, drive the two screws at the bottom into the mounting brackets and confirm the panel is held forward square to the tub. If it is a fraction of an inch too long for the opening, Can an Ella End Panel or Extension Panel Be Trimmed to Fit? explains that the cut is made on the wall-side edge, including some or all of the return lip of about an inch, removing only a fraction of an inch at a time.
For the extension panel, measure the gap at the top and the bottom, set the three extension support brackets, and adjust the shelf brackets until the panel is level with the tub deck. Only then secure it with the kit screws, washers and bolts and run silicone along the seams. Trimming is the published fix when the alcove is out of square, rather than moving the tub to make room.
Finishing the Exposed Edge
Once the panel is held forward correctly, close the seam where it meets the wall and the deck with 100 percent silicone so no cut edge is left open. The end panel and extension panel are cosmetic covers, so a trimmed edge sealed with silicone is the intended finish, not a defect. Take off only what the opening needs, because a panel cut too short cannot be put back. If your tub is one of the models that ships with no extension panel at all, the Mobile among them, the space beside the tub is framed and finished by your installer instead of closed with a factory panel; How do you fill the alcove gap when installing the 45 inch Ella Mobile? describes that sequence and the wall access panel to add behind the plumbing end.
When to Send Photos
Because the right hardware depends on your model and on which panel it is, send your model name, the serial number from the label inside the panel by the door, and a photo of the panel and the exposed edge to ellasbubbles.com/support, or call your Ella dealer or the team at (800) 480-6850. For a panel that needs replacing, add the door side and which end of the tub is exposed, since panels are cut for a specific model and end. For caps or screws, a photo of one intact cap and screw next to a ruler, plus a wider shot of the apron, lets the matching part ship the first time. The team confirms what applies to your tub from those photos.
Related Videos
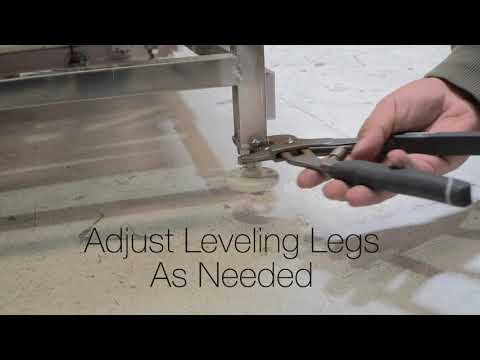
Chapters in this video
- 0:00 Leveling Legs Are Critical Many Ella's Bubbles walk-in tubs have up to eight leveling legs to evenly disperse weight and ensure proper function.
- 0:14 Secure Each Foot The technician checks if each foot is securely on the ground, as an unsealed door could leak.
- 0:28 Check Tub Levels The technician checks levels on all sides of the tub to ensure all feet sit securely on the floor.
- 0:41 Proper Door Alignment Proper leveling assures correct door alignment and closure for your walk-in tub.
Preguntas comunes
Are the panels beside the tub door glued to the frame?
Why does my magnetic side panel stand proud of the wall?
Should I shim the panel to hold it forward?
Can I trim the end panel if it is too long?
What should I send the team if the panel still will not sit right?
Does the Ella Mobile have an extension panel to fill the alcove?
About this guide. Answers in the Ella’s Bubbles Support Center are compiled from real conversations with tub owners, our technicians’ notes and the product documentation, then reviewed by our team. Tub models and options have evolved over the years, so a detail here may differ slightly from your exact tub. If something looks different on yours, send us your serial number and a specialist will confirm it for your model.
Did this solve your question?
Si no, abre un ticket y nuestro equipo se encargará a partir de aquí.
Abrir un ticket de soporte Vídeos