


Can an Ella End Panel or Extension Panel Be Trimmed to Fit?
Updated October 2026
Yes. Both panels can be trimmed on site, and trimming is the fix Ella's support team recommends rather than moving the tub to make room. The end panel is cut on its wall-side edge when it is a fraction of an inch too long for the opening, and the extension panel is designed from the start to be trimmed to the wall of an alcove that is out of square or an odd size. End Panel Too Long for the Opening: Trimming It to Fit walks through the end panel cut in detail; this page covers both panels, how to tell which one you are holding, and when cutting is the wrong answer.
Two Panels, Two Different Jobs
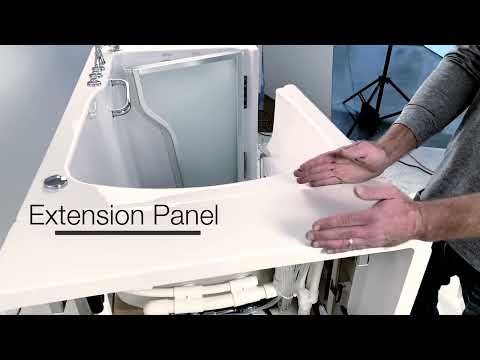
Every Ella walk-in tub ships with one reversible end panel. It covers the exposed short end of the tub in a corner installation, hiding the shell edge, plumbing and frame: a tub in the right corner takes the panel on the left end, and the reverse for a left corner. A second end panel can be ordered when the tub sits against the back wall with both ends open. The extension panel is a different part. Every Ella tub shorter than 60 inches ships with one so the tub fills a standard 60 inch alcove, and it is the only panel that adds length to the installation. It goes on either end, rests on adjustable stainless steel shelf brackets that are part of the tub frame, and doubles as a shelf for towels and soap. The video below shows both panels, where each one goes, and the rule that every removable panel comes off before the tub is carried into the house.
| Panel | What it does | How it is held | Where it is trimmed | What it means for the cut |
|---|---|---|---|---|
| End panel (ships with every tub) | Covers the exposed short end of the tub; adds no length | Two screws at the bottom into the mounting brackets | Wall-side edge, including some or all of the return lip of about an inch | Remove only a fraction of an inch at a time; cosmetic cover with no structural role |
| Extension panel (ships with tubs shorter than 60 inches) | Fills the gap to a standard 60 inch alcove; doubles as a shelf | Adjustable stainless steel shelf brackets in the tub frame, kit hardware, silicone at the seams | Edge toward the wall, after measuring the gap at the top and the bottom | Built to be trimmed; panel width is 7, 4, 8 or 5 inches depending on the model |
| Second extension panel (ordered separately) | Closes the gap at both ends so a shorter tub sits centered | Same shelf brackets | Each end receives a trimmed panel | Lets the tub sit centered in a 60 inch alcove instead of against one wall |
| Second end panel (ordered separately) | Covers the other end when the tub sits against the back wall with both ends open | Same two bottom screws | Same wall-side edge | Needed only when both ends of the tub are exposed |
The difference matters for the cut. An end panel is molded to overlap the end of the tub slightly, so when it binds you remove only a small amount from the wall-side edge, and the fix is a matter of a fraction of an inch. An extension panel is a filler by design: the gap it covers depends on the model and the alcove, so trimming it to the wall is part of its normal installation rather than a correction.
Trimming the End Panel
The end panel is a cosmetic cover with no structural role, held by two screws at the bottom that fasten it to the mounting brackets, so trimming a fraction of an inch does not weaken the tub or leave the panel loose. Take the material off the edge that will sit against the wall or tile, and remove only enough for the panel to slide into place.
- Set the tub in its final, leveled position with the front apron installed before you measure anything.
- Measure the opening from the finished wall surface to the edge of the apron where the end panel seats, at the top and at the bottom, since walls are rarely plumb.
- Measure the end panel along the same edge and note the difference. Mark the cut line on the wall-side edge using the larger of the two differences, and add nothing extra; you can always take a little more off.
- Run painter's tape along both faces of the panel over the cut line, cut with a fine-toothed blade with the panel supported on a flat surface so it does not flex or vibrate, and smooth the cut edge with a sanding block.
- Test fit the panel, drive the two bottom screws into the brackets, and trim a little more if it still binds. Cover the screws with the trim caps and caulk the wall joint.
The panel bends over with a short return lip of about an inch on the side that goes against the wall, and trimming to fit usually means taking some or all of that lip off. Installers sometimes worry that this removes the panel's support on the wall side. Support confirms it does not matter: the two screws hold the panel, and it will not flap or rattle when the pumps run.
Trimming the Extension Panel
Your installer sets and levels the tub first and fits the extension panel last. Alcoves are rarely square, so the gap is measured at the top and the bottom, the panel is trimmed to the wall, and the brackets are adjusted so it sits level with the deck. The kit hardware secures it and the seams are sealed with silicone. The panel does not add length to the tub itself; the interior dimensions are unchanged. Panel widths follow the tub length, so the amount you are working with depends on the model: the Standard, Ultra, Elite, Petite and Royal use a 7 inch panel, the Deluxe uses a 4 inch panel, the Capri, Transfer26, Transfer30 and Transfer32 use an 8 inch panel, and the TransferXXL uses a 5 inch panel. Kit contents vary by door family; the Standard, Zen and Flow kit, for example, uses 2 stainless L brackets, 1 plastic bracket, 2 pressure clips and 4 nuts. What Is an Extension Panel (Filler Kit) on a Walk-In Tub? lists the panel for each model.
Some installers prefer to center a shorter tub in a 60 inch alcove rather than push it to one wall. A second extension panel can be ordered for that, and because the panels can be cut down to size, each end receives a trimmed panel and the tub sits centered. The single panel supplied with the tub is included whether you use one, two or none. Nothing inside the tub depends on the extension panel: the pumps, heater and plumbing are reached through the tub's own access panels, so the extension end is never an access point and the tub never has to be pulled out to service anything behind it. The Extension Panel: What Ships With Your Tub, Where It Installs, and When to Set It Aside covers choosing the head end or the foot end.
When Trimming Is the Wrong Fix
- Pulling the tub away from the wall to make room for a long end panel. That leaves a gap between the wall and the end of the tub. Keep the tub in its leveled position and trim the panel instead.
- Trimming an end panel that leaves a gap at the wall. The end panel runs across the end of the tub, not out to the wall, and it adds no length. A gap means the tub is off the wall or the alcove is longer than the tub; the fixes are to move the tub back or add an extension panel, and a thin seam at the joint is closed with caulk. What If the End Panel Is Too Short and Leaves a Wall Gap? sorts out the three cases.
- Cutting a panel before the tub is level and the apron is on. Walls are out of plumb, and a cut made with the tub sitting loose will not match the final opening.
- Trimming a panel meant for a different tub. Panels are cut for a specific model and door side. If your extension panel is missing, the order may have opted out of it to reduce plastic waste, or the tub may be a full-length model that does not use one; the Ultimate, Standard60, Zen60, Transfer60, Big4One, ShaK, the two-seat models, the Front Entry and the Mobile all go without. Where Do I Buy an Extension Panel for My Walk-In Tub? explains how to order one with your model, serial number, door side and a photo of the alcove end.
One rule applies before any of this. All removable panels, including the front apron with its access panels, the end panel and the extension panel, must come off before the tub is moved into the house and the bathroom, and the tub is lifted only by the frame. Once installed, clean a trimmed panel with the same mild, non-abrasive cleaner you use on the shell.
Related Guides
Related Videos

Chapters in this video
- 0:00 Extension Panel for Seamless Installation The video introduces the extension panel, also called a fill kit, which allows for custom cutting to fit various wall spaces.
- 0:35 Integrated Shelf Support Bracket The video shows the integrated shelf support brackets, which are adjustable and made of stainless steel.
- 0:52 Panel Support and Durability The video explains how the integrated support prevents issues like silicone cracking or panel failure, making it a durable component.
Chapters in this video
- 0:00 What Are Extension Panels? Ella's Bubbles walk-in tubs use extension panels to create the best fit for your new tub in your home.
- 0:14 Trimming Panels For Fit Extension panels can be trimmed to ensure your tub fits seamlessly and beautifully, even if your alcove is out of square.
- 0:29 Panel Storage Space The extension panels provide a convenient place for towels, shampoos, soaps, and other bathing items.
Common Questions
Will trimming the end panel make it loose or weaken the tub?
Can I trim the extension panel at both ends to center the tub?
How much can I safely take off an end panel?
Should I pull the tub off the wall instead of cutting the panel?
Does trimming the extension panel change the inside size of the tub?
Do I need the extension panel if my tub already fits the alcove?
About this guide. Answers in the Ella’s Bubbles Support Center are compiled from real conversations with tub owners, our technicians’ notes and the product documentation, then reviewed by our team. Tub models and options have evolved over the years, so a detail here may differ slightly from your exact tub. If something looks different on yours, send us your serial number and a specialist will confirm it for your model.
Did this solve your question?
If not, open a ticket and our team will pick it up from here.
Open a Support Ticket Videos