


How Do I Caulk and Seal a Walk-In Tub Against the Walls?
Updated October 2026
Sealing a walk-in tub means running 100 percent silicone at every joint where the tub meets the walls and wherever a fixture passes through the deck, while keeping silicone off the door gasket entirely. Ella tubs have a flat deck edge with no molded tile lip, so a tile flange overlaps the tub edge, the wall finish overlaps the flange, and each of those lines is caulked as the final layer. If the tub is already installed and water shows up at the wall line, Why Does My Tub Leak at the Corners or Wall When Filled? covers how that gap is found and closed.
Where Silicone Belongs, and Where It Does Not
Two different jobs get called sealing the tub, and they follow opposite rules. The first is the finishing seal around the outside of the tub. Because the deck edge is flat, nothing on the shell itself stops splash water from running down behind the walls. That protection comes from a tile flange bonded to the tub edge, a wall finish that overlaps the flange, and a bead of 100 percent silicone at every joint. If any of those layers is missing, water shows up at the floor corners the first time someone uses the hand shower.
The second job is the door, and here caulk is the wrong tool. A walk-in tub door stays watertight when its gasket sits fully in its channel and the door closes square onto a level tub. Silicone spread across the sealing face of the gasket adds no sealing power. It holds the gasket away from the frame, traps grit, and stops the door from compressing the seal evenly, which is why a caulked door often leaks more than it did before.
The joints that do get a bead of 100 percent silicone are:
- The tub to wall line along all three sides of an alcove.
- Each corner where two walls meet the tub.
- The extension panel to tub line on models shorter than the opening.
- The end panel to wall line.
- The tile flange itself, which is bonded to the tub edge with silicone before the wall finish goes on.
- Fixtures that pass through the deck, such as a shower column base.
Build the Wall Line in Layers Before You Caulk
Caulk is the last layer of the wall seal, not a substitute for the layers beneath it. On a new installation, the flange strip is bonded to the tub edge with 100 percent silicone so that it overlaps the edge, and the tile or wall panel then comes down over the flange. Only after both are in place does the finishing bead go along the tub to wall line, into each corner, and along the extension panel and end panel lines.
On an existing tub that leaks at the wall, look behind the wall finish at one corner before you reach for a caulk gun. A flange strip should be visible, bonded to the tub edge and overlapped by the tile or panel. If the tile stops above the flange, or there is no flange at all, a fresh bead alone will not hold for long, because water is getting behind the finish above the caulk line.
Level matters as much as the caulk. An unlevel frame opens gaps at the wall and at the door at the same time, so confirm every leveling leg is bearing weight before sealing. Ella also asks installers to fill and hold the tub with the access panels open for the pre-installation water test before the walls are closed, so that a union, fitting or drain elbow that weeps under the tub is found while it is still easy to reach.
Sealing Fixtures on the Deck and Seams in Shower Panels
Anything that passes through the deck is sealed with silicone under and over its gasket rather than on the threads alone. The Ella video on setting a shower column base shows the method: remove the locking piece and all gaskets, run a thin bead of silicone caulk where the attachment ring meets the thread, set the rubber gasket over it and press gently, then run another thin bead around the outside of the gasket and smooth it for complete coverage. The base goes into the pre-drilled hole, the metal washer and locking piece go on from underneath, and everything is tightened securely without over tightening. Over torquing damages the rubber washer and can cause the very leak the silicone was meant to prevent.
Shower wall panels follow the same idea at their seams. Every joint where a panel meets the base or another panel is caulked, tooled smooth and allowed to cure as directed on the caulk before the shower is used. A small hole at the edge of a wall panel near the base has no fitting or fastener that belongs in it, so it is simply filled with the same seam caulk or covered with finish corner trim, as explained in What Is the Hole at the Edge of My Shower Wall Panel and How Do I Close It?. Gaps at these seams are the usual reason water appears behind or below a shower after installation.
Keep Caulk Off the Door Seal
The only place silicone belongs on a door is inside the gasket channel, and only to hold a seal that has come loose. Ella's door seal maintenance video shows the routine: run a thin bead of silicone into the channel, let it set for 20 minutes, press the gasket back in, and wait 24 hours before the tub is filled. On an inward-swing door, the video also shows rolling the gasket away from the frame and running a bead down the corner where the gasket meets the frame, again with 24 hours to dry. Nothing goes on the face of the gasket that touches the door, and the video's everyday advice is simpler still: keep the seal and frame clean with a common household cleaner and leave the door slightly open when the tub is not in use.
If a door has already been caulked and still leaks, the fix starts with removing that caulk. Wipe every trace of silicone off the sealing face and the frame with rubbing alcohol or a common household cleaner, then check every leveling leg by trying to slide a slip of paper under each foot. A leg that lets the paper through is not carrying weight. Leave the door open for about a day so the gasket can reform before retesting. Why Does My Tub Door Still Leak After I Caulked the Seal? gives the full order of checks, and Why Does My Walk-In Tub Door Leak at the Bottom? covers the leveling and handle adjustments that fix most bottom-edge leaks without any parts. A seal that still leaks after reseating is replaced with a model specific part, never caulked over.
Test the Seal Before You Trust It
Dry everything, fill the tub with the door closed and let it stand. Watch the gasket line for 20 minutes. If the door and the corners stay dry until you splash or use the hand shower, any water that appears afterward is coming over the deck edge at the wall, which points back to the flange and the finishing bead. If water shows on the floor or on the tiles below the panel while you bathe, open the access panels and trace it under the tub instead, starting with the unions at the pump and heater, the air tube fittings, the push button gaskets and the drain elbow.
One thing that is not a seal failure is a little water sitting just below the drain plug after the tub empties. That is the trap seal every bathtub drain holds to keep sewer gases out of the room, and it is covered in Is It Normal to See Water Sitting Just Below the Drain Plug After Draining?. Water resting in the door frame channel after draining is normal for the same reason.
If the wall line is sealed, the door is clean and level, and water still appears, open a ticket at ellasbubbles.com/support or call your Ella dealer or the team at (800) 480-6850. Include your model and serial number, a photo of where the water appears, a photo behind the access panel, and a note on whether it happens while filling, bathing or draining.
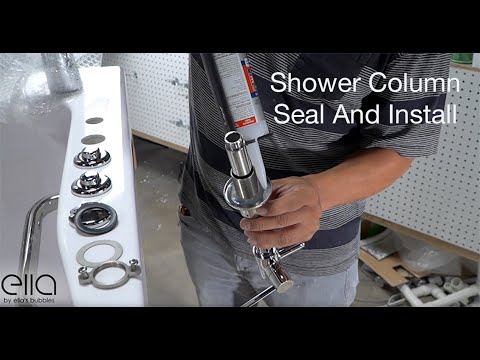
Chapters in this video
- 0:00 Prepare Shower Column Base The technician removes the locking piece and all gaskets from the shower column base.
- 0:17 Apply Silicone Caulk The technician applies a thin bead of silicone caulk where the attachment ring meets the thread.
- 0:52 Install Column Base The technician places the column base into the pre-drilled hole and secures it with the metal washer and locking piece.
- 1:14 Tighten Screws Securely The technician tightens each screw snugly, ensuring a secure and watertight seal for the shower column base.
Watch: Shower Column with Water-Tight Seal for Walk-In Tubs | Ella’s Bubbles with chapters and a full transcript.
Related Guides
- Tile Flange, Caulking, and Finishing the Walls Around Your Walk-In Tub
- The Glue-Up Tile Flange Kit: What Is in the Box, Which Length to Choose, Which Colored Side Faces Out, and Whether It Goes On Before or After Drywall
- How do I tile over the tile flange on a walk-in tub?
- How Do You Install a Tile Flange on a Tub or Shower Base?
- How Do You Install a Glue-Up Tile Flange on a Tub or Shower Base?
- Does Drywall or Backer Board Go Over the Walk-In Tub Flange?
Related Videos

Chapters in this video
- 0:00 Introducing the Tile Flange Kit This video introduces the Ella's Bubbles glue-up tile flange kit and explains the unique properties of Sealux.
- 0:56 Marking Strip Position on Walls The video demonstrates two methods for marking the correct strip position on the shower walls for proper alignment.
- 2:29 Applying the Sealux Strip The technician trims the Sealux strip, aligns it to the wall, and carefully bonds it into place using a spatula tool.
- 3:23 Applying Adhesive and Sealing The technician applies adhesive to the wall, spreads it, and then presses the Sealux strip firmly onto the wall.
- 4:18 Preparing for Tub Installation The technician cleans the surface with alcohol wipes and applies silicone for three-wall and two-wall installations to ensure a leak-proof seal.
- 5:12 Final Sealing and Tiling The technician applies a bead of waterproof sealant, smooths it, and prepares the area for tiling and flooring.

Chapters in this video
- 0:00 Installing the Shower Column Base The technician inserts the shower column base into the pre-drilled hole and secures it with washers and a locking collar.
- 0:37 Attaching the Riser Tube The technician screws the riser tube onto the shower base unit, ensuring the gasket is correctly placed.
- 0:50 Connecting the Shower Supply Line The technician connects the shower supply line to the bottom of the base unit and then to the diverter.
- 1:13 Adjusting the Riser Arm Bracket The technician adjusts the riser arm bracket to accommodate various wall configurations and places the rubber gasket.
- 2:04 Mounting the Shower Column The technician attaches the mounting brackets to the shower wall, ensuring the unit is perfectly level.
- 2:22 Attaching Rain and Hand Showers The technician attaches the rain shower to the riser tube and the hand shower to the unit with a flexible hose.
Common Questions
Should I put silicone on my walk-in tub door seal to stop a leak?
What kind of caulk seals the tub to the wall?
Why does my tub still leak at the corners after I caulked it?
Do I need to seal the shower column base with silicone?
Is water under the drain plug after draining a sign my seal failed?
How do I test the seal after caulking the tub?
About this guide. Answers in the Ella’s Bubbles Support Center are compiled from real conversations with tub owners, our technicians’ notes and the product documentation, then reviewed by our team. Tub models and options have evolved over the years, so a detail here may differ slightly from your exact tub. If something looks different on yours, send us your serial number and a specialist will confirm it for your model.
Did this solve your question?
If not, open a ticket and our team will pick it up from here.
Open a Support Ticket Videos