


What should I use to seal shower walls and caulk the tub edge?
Mis à jour Novembre 2026
Use 100 percent silicone. On every Ella wall system the same silicone is the adhesive that holds the panels, the sealant on the glue-up flange at the tub edge, and the caulk in every seam the shower can reach, so one kind of cartridge handles the walls and the tub edge together. Where each bead goes on each wall family is mapped in How do I seal shower wall panels to keep water out?; this page covers what to put on the shopping list, how the tub edge itself is sealed, and whether panels can go up over existing tile.
Why the Answer Is the Same Sealant Everywhere
Ella's wall panel kits are glued, not fastened, and the glue is silicone. The acrylic 3-panel kit is glued only, never screwed or nailed. It is dry-fitted first, then braced or taped for 24 hours while the silicone cures, and every joint in the wet area is sealed with silicone afterward. The same 100 percent silicone bonds the glue-up tile flange at the tub edge and sets the SMC panels. The full breakdown by kit is in Which Adhesive or Caulk Do Ella Acrylic Wall Panel Kits Require?.
What changes from one kit to the next is the bead pattern and the way the panels are held still while the silicone cures, not the material:
- Acrylic 3-panel kit: silicone only. Dry-fit the panels, glue them, then brace or tape them for 24 hours.
- SMC 12-piece subway kit: a continuous perimeter bead of 100 percent silicone plus vertical beads every 8 to 12 inches, overlapping flanges with the bottom row of the back wall going up first, clamps, braces or painter's tape while curing, and white caulk at the inside corners.
- Tongue and groove PVC tiles: adhesive on the back of each tile plus a thin bead of silicone at every joint before the tile snaps into the one before it.
- Cultured marble surrounds: glued over drywall, plaster, painted walls, Durock or existing tile.
So the list is short: 100 percent silicone, and clamps, braces or painter's tape to hold the panels while it cures. Screws, nails and a separate panel adhesive do not belong on an Ella wall. Both the SMC panels and the PVC tiles use a tongue and groove interlock, so name the exact product when you call the team at (800) 480-6850, or the answer may describe the wrong one.
The Joints That Actually Take Water
Every Ella panel arrives as a large finished piece with the surface already sealed, so keeping water out is about seams and edges rather than grout. Tile is built up one piece at a time on a substrate you have to prepare, with a grout joint between every tile, which is why a glue-up wall has far fewer places for water to get in and each one is sealed with silicone instead of grout.
- Panel-to-panel seams. On the interlocking systems the joint is a tongue in a groove; on flat panels it is where two edges meet. Both get silicone.
- The edge at the tub or base. The bottom of the wall meets the tub deck or the shower base, and that line takes water every time the shower runs.
- Cut edges. A factory edge is finished. An edge you cut around a valve, a window or a niche is not, until you seal it or cover it with trim.
- Corners and the gap at the tub. Ella carries trim pieces for these on the cultured marble line, and they cover the joint after it is sealed rather than replacing the sealant.
Gaps at the joints where a panel meets the base or another panel are the usual reason water shows up behind or below a shower or tub after installation, so check every one of them before the job is called done.
Caulking the Tub Edge
The wall meets the tub along the deck, and Ella seals that line with a glue-up tile flange rather than a lone bead of caulk. The flange is a strip about 5 inches tall that overlaps the tub edge by about 2 inches, bonded with 100 percent silicone. Before it goes on, the tub edge is cleaned with the alcohol tissues supplied in the kit so the silicone bonds to a clean surface. The wall panels then come down over the flange, and the seam gets its own silicone like every other joint in the wet area.
The other place silicone goes on the tub itself is around anything that passes through the deck. The shower column video on this page shows a column base being set watertight: the locking piece and all gaskets come off, a thin bead of silicone caulk goes where the attachment ring meets the thread, the rubber gasket is pressed gently over it, a second thin bead goes around the gasket and is smoothed for complete coverage, and only then does the base drop into the pre-drilled hole and receive its metal washer and locking piece. The locking piece and each screw are tightened snugly but never over-torqued. That gasket-plus-silicone sandwich is the pattern for any fitting that sits in a hole in the deck.
The Small Hole at the Panel Edge
Installers sometimes find a small hole at the edge of the back panel, near the flange where it meets the base, and go looking through the manual for a fitting to put in it. Nothing attaches there. It is not a drain, fastener or fixture opening, so there is no bracket, screw or hose that belongs in it. Fill it with the same caulk you are using on the seams, tool it smooth to match the seam line and let it cure as directed on the caulk, or cover the whole panel edge with finish corner trim set in the same caulk where the panel meets the drywall. Both options are described in What Is the Hole at the Edge of My Shower Wall Panel and How Do I Close It?.
Can Shower Wall Panels Go over Existing Tile?
Yes for two of Ella's wall families, as long as the wall behind them is sound, clean and dry. The cultured marble travertine panels glue over drywall, plaster, painted walls, Durock or even existing tiles. The cultured marble video on this page shows the multi-piece eight, six or four panel surrounds, made from a natural quartz and granite composite with a gel coat surface, being carried and installed by one person, with factory finished edges that can be trimmed and cut for a custom fit. The tongue and groove PVC tiles go over new or existing surfaces on an approved substrate, with the method in How do you install and seal tongue and groove PVC shower wall tiles?.
In both cases bring the cartons into the bathroom and let them acclimate for 24 hours first, measure each wall at the top, middle and bottom and use the largest figure, and note any windows, valves or niches the panel must be cut around. If you are unsure whether your existing wall qualifies as a substrate, describe it to the team at (800) 480-6850 before you start rather than after. A PVC board from another maker follows that maker's instructions; Can PVC Board or PVC Panels Be Used for Shower Walls? explains what Ella's own groutless tiles are and what keeps them watertight.
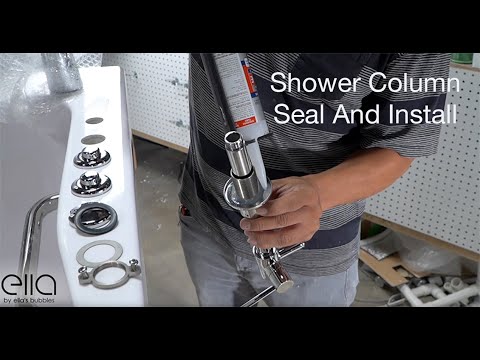
Chapters in this video
- 0:00 Prepare Shower Column Base The technician removes the locking piece and all gaskets from the shower column base.
- 0:17 Apply Silicone Caulk The technician applies a thin bead of silicone caulk where the attachment ring meets the thread.
- 0:52 Install Column Base The technician places the column base into the pre-drilled hole and secures it with the metal washer and locking piece.
- 1:14 Tighten Screws Securely The technician tightens each screw snugly, ensuring a secure and watertight seal for the shower column base.
Watch: Shower Column with Water-Tight Seal for Walk-In Tubs | Ella’s Bubbles with chapters and a full transcript.
Related Guides
- How Do I Caulk and Seal a Walk-In Tub Against the Walls?
- How Do You Install a Tile Flange on a Tub or Shower Base?
- The Glue-Up Tile Flange Kit: What Is in the Box, Which Length to Choose, Which Colored Side Faces Out, and Whether It Goes On Before or After Drywall
Related Videos

Chapters in this video
- 0:00 Introducing Grout-less Shower Tiles We introduce Ella's Bubbles PVC grout-less shower tiles, a simple and stylish way to upgrade your shower or bath enclosure.
- 0:14 Measuring and Cutting Tiles We demonstrate how to carefully measure, score, and snap the tiles to get the precise piece you need for installation.
- 0:35 Upgrading Your Enclosure In no time at all, you have upgraded your shower or bath enclosure with a beautiful, modern look.
Questions fréquentes
Is silicone the only sealant an Ella wall kit needs?
Do I seal the seams before or after the panels are glued?
Should I add screws or nails for extra hold?
Can I put cultured marble panels over my old tile?
How is the seam at the tub deck sealed?
What do I do about the small hole at the panel edge?
About this guide. Answers in the Ella’s Bubbles Support Center are compiled from real conversations with tub owners, our technicians’ notes and the product documentation, then reviewed by our team. Tub models and options have evolved over the years, so a detail here may differ slightly from your exact tub. If something looks different on yours, send us your serial number and a specialist will confirm it for your model.
Did this solve your question?
Sinon, ouvrez un ticket et notre équipe prendra le relais.
Ouvrir un ticket d'assistance Vidéos