


Shower Column with Water-Tight Seal for Walk-In Tubs | Ella’s Bubbles
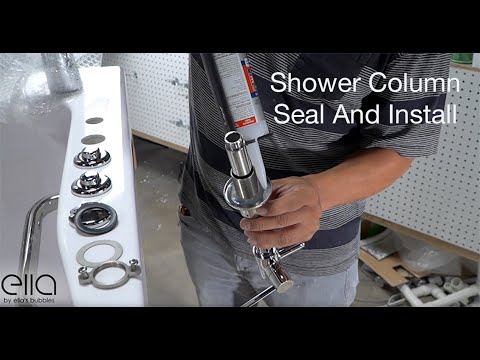
Chapters in this video
- 0:00 Prepare Shower Column Base The technician removes the locking piece and all gaskets from the shower column base.
- 0:17 Apply Silicone Caulk The technician applies a thin bead of silicone caulk where the attachment ring meets the thread.
- 0:52 Install Column Base The technician places the column base into the pre-drilled hole and secures it with the metal washer and locking piece.
- 1:14 Tighten Screws Securely The technician tightens each screw snugly, ensuring a secure and watertight seal for the shower column base.
A technician demonstrates how to install a shower column with a water-tight seal on an Ella's Bubbles walk-in tub. This video shows the steps for applying silicone caulk and securing the column base.
The installation process begins with preparing the shower column base. A technician removes the locking piece and all gaskets from the shower column base. Next, a thin bead of silicone caulk is applied where the attachment ring meets the thread, followed by placing a rubber gasket over the caulk and pressing gently.
Another thin bead of caulk is then applied around the rubber gasket, and the silicone is smoothed for complete coverage. The column base is placed into the pre-drilled hole on the walk-in tub. A metal washer is placed onto the bottom of the shower column base, and the locking piece is screwed on.
Each screw is tightened snugly to ensure a secure and watertight seal for the shower column base, but care is taken not to overtighten or over torque. This process ensures the shower column base is set and watertight for lasting performance and durability with your Ella's Bubbles walk-in tub and shower system.
- Remove locking piece and gaskets
- Apply silicone caulk
- Place rubber gasket
- Install column base
- Secure with metal washer and locking piece
- Tighten screws snugly
Step by step help for this topic: Installing the Shower Column Kit on Your Walk-in Tub, Shower Column Drips After Shutoff, Deck Hole Size, Connector Rods and Replacement Column Sections and Can I Shower in a Walk-In Tub? Hand Showers, Shower Columns, and Screens.
Video transcript2 paragraphs · 1:33
Remove the locking piece and all gaskets. Place a thin bead of silicone caulk where the attachment ring meets the thread. Place the rubber gasket over that, press gently, and then place another thin bead of caulk around the rubber gasket. Smooth the silicone to ensure complete coverage. Place the column base into the pre-drilled hole. Place the metal washer onto the bottom of the shower column base and screw on the locking piece.
Tighten securely. Do not over tighten. Tighten each screw snugly but don't over torque. Your shower column base is now set and watertight.
Guides that use this video
- 📖Can a Walk-In Tub Be Part of an Aging-in-Place Shower Remodel?Tamaños, ajuste y medición
- 📖Installing the Shower Column Kit on Your Walk-in TubDuchas, paneles y accesorios
- 📖How Do I Caulk and Seal a Walk-In Tub Against the Walls?Instalación y nivelación
- 📖Shower Column Drips After Shutoff, Deck Hole Size, Connector Rods and Replacement Column SectionsSolución de problemas y reparaciones
More Showers, Panels & Accessories videos
 ▶2:19How to Cut Acrylic Shower Wall Panels Safely | Ella’s Bubbles Cutting GuideCustomers learn how to cut acrylic shower wall panels safely for Ella's Bubbles walk-in tubs. This video provides a cutting guide for acrylic…used in 15 guides
 ▶1:09CNC Engraved Patterns in Acrylic Wall KitsCNC engraved patterns are shown on acrylic wall kits, offering a decorative option for Ella's Bubbles shower installations. These wall kits…used in 9 guides
 ▶0:20Upgrade Your Bathroom With Custom Engraved Shower WallsElla's new CNC-Engraved Acrylic Wall Kit transforms your bathroom with one-of-a-kind patterns. This kit features a 3-panel configuration…used in 2 guides
 ▶0:23Slip-Resistant, Strong Shower Bases - Built to LastElla's Bubbles SMC shower bases offer slip-resistant, reinforced strength for bathroom remodels. These durable bases are engineered for…used in 2 guides
 ▶1:02Installing a Waterfall Tub Faucet For Your Walk-In Tub (Is It Worth It?)Installing a Waterfall Tub Faucet for an Ella's Bubbles walk-in tub involves wall-mounting a brass faucet with a 24-inch slider bar and…used in 4 guides
 ▶1:01The Luxurious Walk-In Tub Upgrade You Need - Waterfall FaucetThe Ella waterfall fast-fill faucet delivers water in a soothing cascade, filling your walk-in tub quickly. This faucet includes an extendable…3 chapters · used in 13 guides
More Showers, Panels & Accessories videos → All videos → Watch on YouTube →
 Vídeos