


How Do I Seal a Shower Unit So It Does Not Leak?
To seal a shower unit, run a continuous bead of caulk along every seam where a wall panel meets the base or another panel, close any exposed panel edge, and seal each fixture that passes through a surface. The Ella guide What Is the Hole at the Edge of My Shower Wall Panel and How Do I Close It? points out that gaps at those joints are the usual reason water shows up behind or below a shower or tub after installation. Good sealing therefore means working through every joint in order, not piling extra caulk in one spot.
Start with the Seams: Panel to Base and Panel to Panel
A shower unit has two kinds of seams that carry the whole job. The first is the line where each wall panel lands on the base. The second is the vertical line where one panel meets the next. Both must be fully sealed along their entire length, because a short gap at either one lets water travel behind the panel and down into the wall or under the base.
The method is the same for each seam, and your installer can follow it in this order:
- Make sure the panel edge and the joint are clean and dry before any caulk goes on.
- Apply the caulk along the panel-to-base seams and the panel-to-panel seams, filling each joint completely so there is no break in the bead.
- Tool the caulk smooth so the bead forms one even seam line.
- Let the caulk cure as directed on the caulk before anyone uses the shower.
Use one caulk for the whole unit. The same material that seals the seams is also what closes the small openings described below, so the finished shower has one consistent seal line.
Close the Panel Edges and the Small Hole Near the Flange
Installers sometimes find a small hole at the edge of the shower wall panel, near the flange where the back panel meets the base, and go looking for it in the instruction manual. They will not find it there, because the hole plays no part in the assembly. It is not a drain, fastener or fixture opening, and no bracket, screw or hose belongs in it. It simply needs to be closed so water stays out of the wall, and there are two ways to do that:
- Fill it with seam caulk. With the edge clean and dry, fill the hole completely with the same caulk used on the seams, tool it smooth so it matches the seam line, and let it cure.
- Cover the edge with finish corner trim. Corner trim installed on the panel edge where it meets the drywall covers the hole and the raw edge in one piece. Your contractor can pick up standard corner trim locally and set it in the same caulk used for the seams.
Treat every other exposed panel edge the same way. An edge that is caulked or trimmed gives a clean, uniform line from panel to wall and leaves no opening for spray to find.
Seal Every Fixture That Passes Through a Surface
Seams are only half of the picture. Anything that passes through a deck or a panel needs its own seal, and the shower column is the clearest example. The video Shower Column with Water-Tight Seal for Walk-In Tubs shows the sequence step by step:
- Remove the locking piece and all gaskets from the column base.
- Place a thin bead of silicone caulk where the attachment ring meets the thread.
- Place the rubber gasket over that bead and press gently, then run another thin bead of caulk around the rubber gasket.
- Smooth the silicone to ensure complete coverage.
- Place the column base into the pre-drilled hole, add the metal washer from below and screw on the locking piece.
- Tighten securely and snug each screw, but do not over-tighten.
The second video, Shower Column Installation With A 5 Piece Faucet Set, shows the rest of the assembly. A little silicone goes on before the base is inserted into the pre-drilled hole, the recommended height for the shower column base is 7 inches, and the rubber gasket is placed into the mounting plate before each wall bracket is attached. The video also reminds installers to keep the column perfectly level when it is mounted to the shower wall.
When the Shower Is a Walk-In Tub Used Shower-Style
Many Ella owners shower in a walk-in tub, and the wall seal there follows its own rule. Ella tubs have a flat deck edge with no molded tile lip, so nothing on the shell itself stops splash water from running down behind the walls. As How Do I Caulk and Seal a Walk-In Tub Against the Walls? explains, the protection is built in layers. A tile flange is bonded to the tub edge with 100 percent silicone so that it overlaps the edge, the tile or wall panel comes down over the flange, and the finishing bead goes on last. Caulk is the last layer of the wall seal, not a substitute for the layers beneath it.
The joints that receive a bead of 100 percent silicone on a tub are:
- The tub to wall line along all three sides of an alcove.
- Each corner where two walls meet the tub.
- The extension panel to tub line on models shorter than the opening.
- The end panel to wall line.
- Fixtures that pass through the deck, such as a shower column base.
One place never gets caulk, and that is the door gasket. A walk-in tub door stays watertight when its gasket sits fully in its channel and the door closes square onto a level tub. Silicone spread across the sealing face holds the gasket away from the frame, traps grit and stops the door from compressing evenly, which is why a caulked door often leaks more than before. The article Do Walk-In Tubs Leak and How Is the Door Sealed? covers the leveling checks that fix a door leak properly.
If your tub is a Handyman Special, it was sold specifically for shower-style use, and the bathroom is planned as a walk-in shower with a shower screen so the door never needs to hold water. The planning details are in How do I set up a Handyman Special tub for shower-style use?
What to Check When Water Still Appears
If water shows up after the shower has been sealed, work back through the joints before adding more caulk.
- Check that every seam where a panel meets the base or another panel is fully sealed, with no break in the bead.
- Confirm the panel edges, and the small edge hole, are filled or covered with trim.
- On a walk-in tub, look behind the wall finish at one corner before you reach for a caulk gun. If the flange layer is missing, a new bead on the surface will not solve the problem.
- If the pull-out hand shower has been moved to a wall mount without the leak kit, water can drip through the deck insert hole to the space behind the tub. That is a fixture issue, not a seam issue.
Sealing is part of installation, so it belongs to your local licensed plumber or installer. Ella does not send technicians. For help identifying a joint or a part, reach your Ella dealer or the team at (800) 480-6850, or open a ticket at ellasbubbles.com/support with a photo of where the water appears.
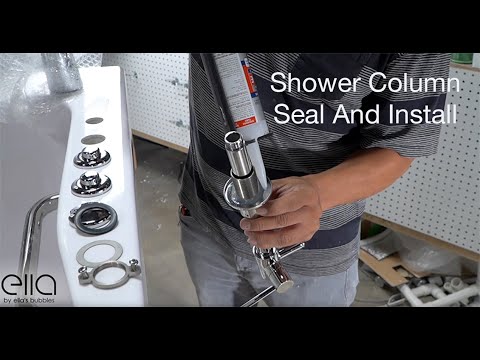

Watch: Ella's Bubbles Shower Column Installation With A 5 Piece Faucet Set with chapters and a full transcript.
Related Guides
- How Do You Install a Tile Flange on a Tub or Shower Base?
- What is a shower flange and what does it do?
- How do I seal a tub or shower and which silicone color works best?
Common Questions
Which seams on a shower unit need to be caulked?
What is the small hole at the edge of my shower wall panel?
How do I make a shower column base watertight?
Should I put silicone on a walk-in tub door gasket?
How long should caulk cure before I use the shower?
About this guide. Answers in the Ella's Bubbles Ella's Bubbles Walk-In Tub Support Center are compiled from real conversations with owners, our technicians’ notes and the product documentation, then reviewed by our team. Models and options have evolved over the years, so a detail here may differ slightly from yours. If something looks different on yours, send us your serial number and a specialist will confirm it for your model.
Did this solve your question?
If not, open a ticket and our team will pick it up from here.
Open a Support Ticket Videos