


Why does my walk-in tub door still leak after a new seal?
Mis à jour Novembre 2026
A walk-in tub door that still leaks after a new seal is almost never a bad seal. The gasket can only hold water back when the door frame presses into it evenly all the way around, and the number one cause of an uneven door is a leveling leg that has lost contact with the floor, not the silicone strip. Work through the leveling and seating checks in Why Does My Walk-In Tub Door Leak at the Bottom?, then use the fill test and the location guide below to decide whether the door has passed or whether a part is the answer.
Start with a Dry-And-Fill Test, Not Another Seal
The first job is to prove there is a leak at all, because many reports of a new seal leaking turn out to be drainage. Dry the door, the frame, the sill and the floor completely. Close and lock the door, fill the tub to a normal bathing level, and watch the gasket line, the outside of the frame and the floor for a full 20 minutes while the water stands. Do not open the door, run the jets or use the hand shower during the test.
- Dry while full. The seal is doing its job. Anything you see after draining is water coming off the inside face of the door, the gasket and the sill, which runs down the frame and threshold when an outward-swing door opens. That is normal on every tub and on a brand new seal.
- A few drops under the striker after draining. The opening where each locking pin seats is not sealed underneath, so a little water that collects in the door track can pass through that hole to the floor beneath the tub. No part is missing.
- A steady run from the frame while the tub is full. This is the only pattern that counts as a door leak, and it is the one the rest of this page is about.
Water on the Floor After a Bath: Door Leak or Drain Leak? adds the other half of the timing rule: water that appears only while the jets or hand shower run, or water under the frame rather than at the door, points away from the seal entirely.
The Paper Slip Test on Every Leveling Leg
If the tub failed the fill test, go to the legs before you touch the gasket again. Many Ella walk-in tubs have as many as eight leveling legs to disperse weight evenly, and every one of them has to carry its share. Drain the tub, remove the front apron, and try to slide a slip of paper under each leg. A leg that lets the paper through is floating. A floating leg lets the frame and the shell warp, and even a slight bow pulls the door frame out of shape so the door no longer meets the seal evenly. A new gasket cannot fix that, which is why the leak comes back.
The second video on this page shows the most common version of the problem. When the door rubs the jamb, the tub is usually bowed down in the middle because the center leg is not carrying weight. Raise that leg by extending it until the door frame opens up and the door clears the swing, then recheck every other leg and the levels on all sides until the gaps between the door and the frame close evenly all the way around. Floors settle and legs work loose, so this check applies to a tub installed years ago just as much as to a new one. Two things follow from it: the hinges are never the fix for a door that rubs or will not seal, and extending or shortening legs is also how a visible gap between the door and its frame gets closed.
Read the Wet Spot While the Tub Is Full
Once every leg bears weight and the deck reads level in both directions, refill and watch again. Where the water shows up tells you what is pressing unevenly, and only one of the patterns is the seal itself.
- Along the bottom edge or the gasket line. The seal: debris or residue on it, a section out of its channel, a seal sitting off center, or a gasket compressed from being kept latched between baths. This is the only location where the seal is the suspect.
- At or just below the handle while the rest of the edge stays dry. The handle screws or the latch tension. If the handle no longer pulls the door firmly against the seal, the tension is set at the lock nut behind the apron, and that is a latch adjustment rather than a seal problem.
- At the bottom striker on a newly installed tub. The locking pins not seating evenly, or a frame that reads level across the deck but is not bearing on every leg. On the Transfer family's L-shape door the handle drives two tapered pins into the striker, and the last part of the handle travel is what presses the door evenly into the gasket. Why does water seep at the door striker on a new level tub? walks through the pins.
- At a hinge that keeps weeping after the hinges are reset. Behind the hinge plate rather than the gasket.
- On the floor in front of a dry door. Under the tub. Take the front access panel off while the water stands and look at the unions around the pump and the heater, which need an O-ring reseated rather than any door part.
The full triage, including what to do for each pattern, is in Why does my walk-in tub door leak: seal, latch, hinge or panel?.
Reseat the New Seal the Right Way
A replacement gasket that was fitted while the tub was out of level, or that arrived flattened from shipping, often just needs to be seated properly. New seals sometimes arrive stuck or slightly flattened. Squeeze the seal with your fingertips and pull it away from the door frame to restore its shape. Then clean the gasket and the frame with rubbing alcohol on a soft cloth, never with abrasives. Press any popped section back into its channel evenly, and if it will not stay, secure it with a thin bead of silicone inside the channel. Let it set for 20 minutes and cure for 24 hours, and leave the door open for about a day so the gasket reforms before you retest. Never run silicone or caulk over the face of the seal, because that defeats the compression the gasket relies on.
Two owner habits decide whether the fix lasts. Keep the door open or unlocked whenever the tub is not in use so the silicone can rest, and never lean on the door or use it as a handhold, because a bather's weight changes the door alignment that was set at installation. What Is the Door Seal on a Walk-In Tub? covers how the gasket, the latch and the leveling work together.
Pass or Fail: When a Part Is the Answer
The door has passed when, with every leg bearing weight, the seal centered in its channel and the handle tension set, the frame and floor stay dry for the full 20 minute fill. That is the same watertight check your installer confirms on the warranty activation checklist, and it is the point at which a replacement part would change nothing.
The door has failed when a steady run along the gasket line continues while the tub is full after all of the above. A seal that still leaks after reseating is then replaced with a model specific part, because each door uses its own seal size matched to your model and serial number. The door and seal are covered for defects under the Lifetime Limited Warranty. Parts ship under the warranty, and your installer or a local licensed plumber does the labor. Open a ticket at ellasbubbles.com/support or call (800) 480-6850 with your serial number, clear photos of the seal and the leak point, and a note on whether every leveling leg touches the floor. The technical support team reviews what the installer finds and can talk your contractor through the adjustment, and that review is what decides which part, if any, is sent.
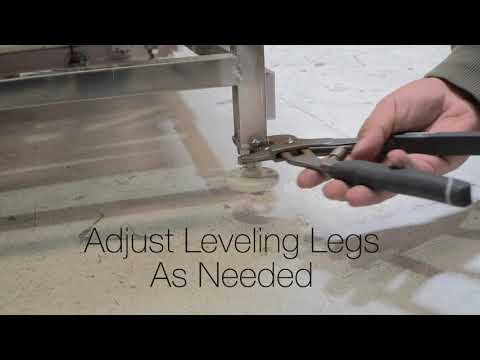
Chapters in this video
- 0:00 Leveling Legs Are Critical Many Ella's Bubbles walk-in tubs have up to eight leveling legs to evenly disperse weight and ensure proper function.
- 0:14 Secure Each Foot The technician checks if each foot is securely on the ground, as an unsealed door could leak.
- 0:28 Check Tub Levels The technician checks levels on all sides of the tub to ensure all feet sit securely on the floor.
- 0:41 Proper Door Alignment Proper leveling assures correct door alignment and closure for your walk-in tub.
Watch: Ella's Bubbles-Leveling legs are critical to a proper functioning tub. with chapters and a full transcript.

Chapters in this video
- 0:00 Door Rubbing the Jamb The video explains that a door rubbing the jamb indicates the tub is bowed down.
- 0:33 Ensuring Tub is Level Ella's Bubbles tubs have at least six leveling legs that must be solidly on the ground to prevent leaks.
- 0:47 Making Final Adjustments Each leg is adjusted to rest firmly on the floor, and careful measurements are taken to achieve a level tub.
Watch: Ellas Bubbles: Proper Door Alignment with chapters and a full transcript.
Questions fréquentes
Is it normal for water to appear at the door only after I drain the tub?
Why did my brand new door seal arrive flat or stuck together?
Can I run a bead of caulk over the seal to stop the leak?
Should I adjust the hinges if the door rubs the frame?
How long should I wait after reseating the seal before testing again?
What should I send to support if the door still leaks after every check?
About this guide. Answers in the Ella’s Bubbles Support Center are compiled from real conversations with tub owners, our technicians’ notes and the product documentation, then reviewed by our team. Tub models and options have evolved over the years, so a detail here may differ slightly from your exact tub. If something looks different on yours, send us your serial number and a specialist will confirm it for your model.
Did this solve your question?
Sinon, ouvrez un ticket et notre équipe prendra le relais.
Ouvrir un ticket d'assistance Vidéos