


How do I seal a tub or shower and which silicone color works best?
To seal an Ella walk-in tub or shower base to the walls, the installer bonds a tile flange along the edge that meets the wall, seals the gap between the fixture and the flange with a neutral-curing, sanitary-grade, 100 percent silicone sealant, and then brings the tile or wall panels down over the flange with a second bead where the wall finish meets the tub floor. For color, match the caulk you use on the wall seams: Ella's ASI 502 100 percent RTV silicone for acrylic shower wall panels comes in Clear, White, Aluminum/Gray, Bronze, Almond and Black. Why that joint needs a flange in the first place is explained in What is a shower flange and why does a shower pan need one?, and this page covers the sealing work itself and the other places on a tub where silicone does a job.
The Joint Is What Keeps a Bathroom Dry
An Ella acrylic shower base is a finished surface with its slope, threshold and drain molded in, so water that lands on it runs to the drain on its own. The place water escapes is the seam where the pan or tub meets the wall. If the wall finish simply stopped at the top edge, every shower would push a little water into that seam and on into the framing and subfloor, where it stays hidden until something swells or stains.
A tile flange turns the edge up behind the wall finish so water running down the wall lands on the pan. Ella walk-in tubs have a flat deck edge with no molded lip, and for tubs and bases without a built-in flange Ella offers the Glue-Up Flexible Tile Flange, a thin, waterproof fabric membrane that bonds to the edge and forms a seal that stays flexible as the floor contracts and expands and the joints move. That flexibility is the reason the sealant has to be a true silicone rather than a rigid filler, because the joint keeps moving after the tub is in.
Sealing the Tub or Base to the Wall, Step by Step
Bonding the flange and sealing the joint is work for your local licensed contractor, and these are the steps Ella's guidance describes:
- Clean the edge. The flange kit includes two alcohol surface-cleaning tissues for this, because silicone bonds only to a clean, dry surface.
- Bond the flange. The strip is a 4 inch wide waterproof membrane with an integrated 1 1/4 inch siliconized adhesive strip, bedded along the edge with neutral-cure silicone using the spreading spatula and cardboard alignment guide in the kit. The pink portion is the membrane and the rest is a cloth-like material that gets tiled over.
- Seal the gap between the tub or base and the flange with neutral-curing, sanitary-grade, 100 percent silicone.
- Bring the wall finish down over the flange, whether tile or Ella wall panels, so water runs onto the pan rather than behind it.
- Protect the tub or shower floor with painter's tape along the joint.
- Run a bead of silicone into the joint between the floor and the wall, smooth it with the corner of the spatula for a clean bead, then remove the tape.
- Add a bead of silicone or other waterproof sealant between the tub floor and the tiles, and let everything cure for the time the sealant maker specifies before the first fill.
Choose the strip length from the wall perimeter at deck height. The standard 124 inch kit suits most Ella walk-in tubs in a three-wall 60 inch alcove, with 132 inch for the Big4One, TransferXXL or a 60 by 36 shower base, 136 inch for the LayDown72, 144 inch for the Escape or ShaK, and 152 inch for the Big4Two. Because the strip is flexible, it can go on during or after the tub is installed. The Glue-Up Tile Flange Kit covers what is in the box and which colored side faces out.
Which Silicone Color Works Best
The color that works best is the one that matches the caulk already on your wall seams, so the joints read as one line and the sealant performs the same way everywhere. Ella's ASI 502 100 percent RTV silicone for acrylic shower wall panels is offered in six colors:
- Clear
- White
- Aluminum/Gray
- Bronze
- Almond
- Black
Ella's suggestion is to use the same caulk on the tub or base joint that you use on the panel seams, so color and performance match. If you are unsure which color suits your tub and walls, share your model name and a photo with the team at ellasbubbles.com/support and they will help you choose. Whatever the color, the type matters more than the shade: a neutral-curing, sanitary-grade, 100 percent silicone is what the joint calls for.
Every Place Silicone Goes on an Ella Tub or Shower
Silicone does more than one job on a walk-in tub, and the method differs from joint to joint. The table uses only figures printed in Ella's documents and videos; where none is printed, the cell says not listed.
| Joint | Sealant and method | Printed figures | What it means for you |
|---|---|---|---|
| Tub or base edge to the wall | Glue-up tile flange bonded with neutral-cure 100 percent silicone, then the wall finish over it | 4 inch membrane, 1 1/4 inch adhesive strip, 124 inch standard kit | The main water barrier, planned into the tile or panel work before the first course goes up |
| Wall finish to tub floor | Bead of silicone or other waterproof sealant, taped and smoothed with the spatula corner | non répertoriée | The visible line, so this is where the color choice shows |
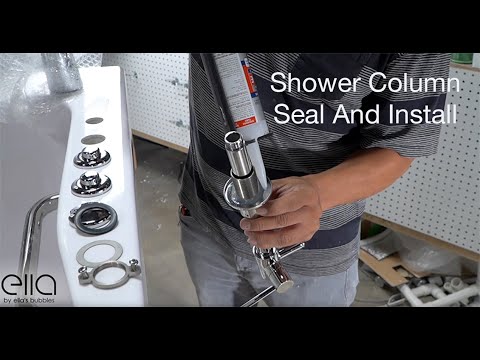
| Shower column base on the deck | Thin bead where the attachment ring meets the thread, rubber gasket, second bead, smoothed | non répertoriée | Makes the column base watertight; tighten snugly, never over torque |
| Door gasket channel, loose or replaced seal | Thin bead of silicone in the gasket channel before the gasket is reinserted | 20 minutes to set up, 24 hours to dry | The seal is secured in its channel, not glued to the frame face |
| Inward-swing door gasket to frame | Roll the seal away and run a bead down the corner where the gasket meets the frame | 24 hours to dry | Closes a gap at the gasket edge without removing the seal |
| Behind the bottom door hinge | Silicone behind the laminate plate, around every bolt hole and over each bolt head | not listed; cure for the sealant maker's full time | The fix for a hinge leak that outlasts resetting the hinges |
The difference between these joints is where the water is coming from. The wall joints and the column base keep shower water from getting behind a surface, so a continuous bead and a full cure before use are the whole job. The door joints are different, because the door seal is a soft silicone gasket that works by compression, and a bead there only secures or backs up the gasket. The first video shows the shower column base being sealed with two thin beads and its rubber gasket, and the second shows the door seal being cleaned and resealed on both inward-swing and outward-swing doors.
Sealing a Door Is Not the Same as Caulking It
The door seal on a walk-in tub is a silicone gasket that compresses against the frame when the door is closed and locked, and it needs a clean surface and a rest between baths. Clean the gasket and the door frame regularly with a common household cleaner and a soft cloth, never abrasives, and leave the door open or unlocked when the tub is not in use, because residue in the seal or frame can itself cause a leak. If a seal comes loose or is replaced, a thin bead of silicone goes into the gasket channel, is allowed to set up for 20 minutes before the gasket is reinserted, and then dries for 24 hours. What Is the Door Seal on a Walk-In Tub? explains why leveling, not the gasket, is the first thing to check when water appears at the door.
A leak at the hinge that continues after the hinges are reset is a sealing job of its own: the door comes off, the laminate plate behind the bottom hinge is removed, old sealant is cleaned away, and fresh silicone goes behind the plate, around the bolt holes and over the bolt heads. Door Still Leaks at the Hinge After Resetting the Hinges gives the full sequence. Ella does not send technicians, so a local licensed plumber does this work, and the team can answer that person's questions by phone, email or video through ellasbubbles.com/support or (800) 480-6850.

Watch: Ella's Bubbles: Proper Door Seal Maintenance-Inward and Outward Swing Doors with chapters and a full transcript.
Related Guides
Related Videos


Questions fréquentes
What kind of silicone should I use on an Ella tub or shower?
Which silicone color should I choose for my shower walls?
Do I seal the tub joint before or after the wall tile goes on?
How long does silicone need to dry on a door seal?
Will a bead of silicone on the door seal fix a door leak?
Who should bond the tile flange and seal my walk-in tub?
About this guide. Answers in the Ella’s Bubbles Support Center are compiled from real conversations with tub owners, our technicians’ notes and the product documentation, then reviewed by our team. Tub models and options have evolved over the years, so a detail here may differ slightly from your exact tub. If something looks different on yours, send us your serial number and a specialist will confirm it for your model.
Did this solve your question?
Sinon, ouvrez un ticket et notre équipe prendra le relais.
Ouvrir un ticket d'assistance Vidéos