


How Do You Level an Ella Walk-In Tub With the Frame Legs?
Actualizado noviembre 2026
You level an Ella walk-in tub by taking off the front apron to reach the adjustable threaded legs on the frame, then turning each leg in or out until every foot rests solidly on the floor and the deck reads level along both its length and its width. Every Ella tub has at least six of these legs and many have eight, including center legs, and all of them must carry equal weight, with no leg ever extended past its limit screw. Leveling your walk-in tub: why every leg must touch the floor before anything else explains why this is the first thing to verify on any install; this page is the hands-on procedure at the legs themselves.
What You Are Working with
The tub does not rest on its acrylic shell. It is carried by a frame, and the leveling legs are threaded into that frame so the tub can be set true on the actual floor rather than on a perfect one. What Are Leveling Legs on a Walk-In Tub? describes them in detail: at least six per tub, up to eight on many models, with the center legs spreading the weight to reduce subfloor movement and frame twist and to protect the silicone seams. Each leg has a limit screw, the shorter screw on the leg, which marks the furthest it may be extended. The factory height leaves about 3 inches under the tub so the drain piping can run above the floor.
The legs sit behind the front apron, which is removable for service, so the apron comes off before you can see or adjust anything. Ella does not level its walk-in tubs on a mortar bed or on wedge shims. Should an Ella Walk-In Tub Sit on a Mortar Bed or Shims? explains that those methods belong to certain Ella showers, while the tub stands on its own legs on a level subfloor that can support the tub, the water and the bather. The legs do the job a mortar bed or a stack of shims does under other fixtures, and they stay adjustable afterward.
Before the Tub Comes in
- Fix the subfloor first. It must be level and rated to support the tub, the water and the bather. The tub can sit on the subfloor before tile or on the finished floor, but subfloor problems are corrected before the tub is set, never by stretching a leg.
- Remove all four access panels before the tub enters the house. The panels are cosmetic covers that crack if the tub is carried by them, and with the panels off the air jets on the underside of the shell are exposed, so lift and carry only by the frame and never drag the tub or set it down on a hard edge.
- Have a level long enough to span the deck and a slip of paper for testing each foot.
Leveling the Tub, Leg by Leg
- Set the tub in its final position with the apron and panels off so every leg is in view.
- Place the level on the deck and check both the length and the width, not just one edge. Check all sides of the tub.
- Look at each foot. Any foot that is off the floor is threaded out until it touches, and a corner that reads high has its leg threaded in. Work around the tub and recheck the deck after each change, because adjusting one leg changes the load on the others.
- Stop at the limit screw. No leg may be extended beyond it. If a foot cannot reach the floor without passing the limit screw, the subfloor needs correction, not a longer leg.
- Do not forget the center legs. They must touch and carry weight just like the corners, or the frame bows in the middle and the door pays for it.
- Run the paper test at every leg. Try to slide a slip of paper under each foot. If it slides under, that leg is not carrying weight; adjust it until the paper will not pass.
- Tighten all legs firmly once every foot is planted and the deck reads level in both directions.
- On the Standard, Standard60, Zen, Zen60, Flow and HomeCare, screw the front legs into the subfloor. There must be no gap between those legs and the floor.
- Check the door. Swing it, latch it, and look at the gap between the door and the frame all the way around. Even gaps and a smooth latch tell you the frame is true.
- Level again after the plumbing and electrical connections are made. The tub is leveled at the factory, but the installer must re-verify on site and once more after the connections, because hooking up drains and supply lines can shift the tub.
The leveling legs video on this page shows the check an installer makes: look at each foot to see that it is securely on the ground, adjust each leg as necessary, and check levels on all sides of the tub. All feet should sit securely on the floor, which is what assures proper door alignment and proper closure.
Reading the Door as Your Second Level
The door is the most sensitive indicator of a frame that is not true, which is why Ella calls the legs critical to the proper functioning of the tub. If a foot is not planted, the door will not seal correctly and could leak. A level frame lets the door meet its seal evenly all the way around.
- Door rubs the jamb: the center leg is usually not carrying weight and the tub is bowed in the middle. Extend the center leg until the door frame clears, then re-check every leg.
- Uneven gaps between the door and the frame: a leveling sign. Adjust the legs until the gaps close evenly.
- A door leak on a tub that used to be dry: run the paper test first. Leveling is the number one cause of door leaks, and a leg that has lifted lets the frame flex enough to open a gap at the gasket.
Why the Legs Matter for the Warranty
Misleveling voids the warranty. When a leg is not carrying weight, the frame and shell slowly warp, the door falls out of alignment and the seal leaks, and the activation form your installer signs confirms that all legs are touching the floor. Leveling is also the step where self-installers most often go wrong, as How hard is it to install a walk-in tub yourself? points out: a leg that is almost right shows up later as a door that will not close properly. If you need to open a ticket about a door gap or a leak, have your model and serial number, photos of the door gap and a note on whether the paper test passed at every leg ready at ellasbubbles.com/support or (800) 480-6850.
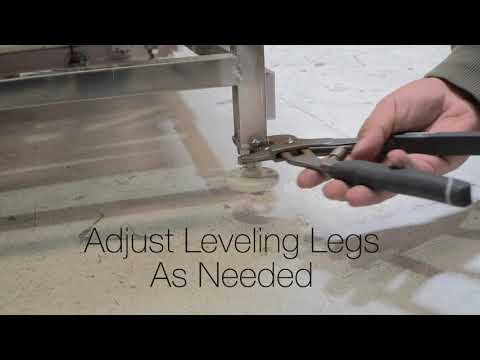
Chapters in this video
- 0:00 Leveling Legs Are Critical Many Ella's Bubbles walk-in tubs have up to eight leveling legs to evenly disperse weight and ensure proper function.
- 0:14 Secure Each Foot The technician checks if each foot is securely on the ground, as an unsealed door could leak.
- 0:28 Check Tub Levels The technician checks levels on all sides of the tub to ensure all feet sit securely on the floor.
- 0:41 Proper Door Alignment Proper leveling assures correct door alignment and closure for your walk-in tub.
Watch: Ella's Bubbles-Leveling legs are critical to a proper functioning tub. with chapters and a full transcript.
Related Videos

Chapters in this video
- 0:00 Leveling Feet for Bathtub Stability The video explains how leveling feet are crucial for installing a walk-in tub and ensuring its longevity.
- 0:29 More Leveling Feet, More Stability The speaker emphasizes that more leveling feet disperse weight, prevent movement, and lead to a more stable and lasting installation.
- 1:16 Ella's Bubbles' Unique Design Ella's Bubbles offers more leveling feet, including center legs, compared to competitors, providing a stronger foundation for the tub.
Preguntas comunes
How many leveling legs does an Ella walk-in tub have?
How far can I extend a leveling leg on the tub?
Do I have to remove the apron to level the tub?
Which Ella models need the front legs screwed into the subfloor?
Can I use shims or a mortar bed instead of adjusting the legs?
How do I know whether a leg is really carrying weight?
About this guide. Answers in the Ella’s Bubbles Support Center are compiled from real conversations with tub owners, our technicians’ notes and the product documentation, then reviewed by our team. Tub models and options have evolved over the years, so a detail here may differ slightly from your exact tub. If something looks different on yours, send us your serial number and a specialist will confirm it for your model.
Did this solve your question?
Si no, abre un ticket y nuestro equipo se encargará a partir de aquí.
Abrir un ticket de soporte Vídeos